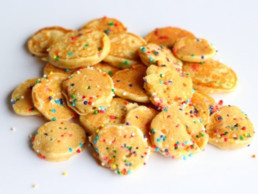
How to Make Tiny Pancakes
As a child, I used to love anything that was miniature! Tiny flowers, tiny cutlery, miniature objects – anything. If your child loves cooking and if they love miniature things, this is the perfect activity for you. You can make it for yourselves or if you are planning a teddy bear picnic.
Best Ages for This Activity
Two to five years
How to Make It
Ingredients
- Pancake batter (use the recipe for how to make fluffy pancakes, or use pre-made pancake mix if you prefer)
- Round rainbow sprinkles
- A butter stick to coat the pan before making each batch of pancakes
You Will Also Need
- A small pancake turner or flipper
- A stove your child can access and a coated, non-stick (enameled) skillet. I recommend enameled because they are better for your health than Teflon or non-stick, but you can use whatever you normally cook with.
- If your child cannot safely access your stove, you can use what we use at our schools: an electric griddle. We make lots of different recipes on them and they can sit on a child-sized table, where your child can cook a little more safely.
Let’s Get Started!
- Invite your child to make tiny pancakes
- Start by cleaning the work surface, then preparing the batter as per the instructions on your pancake mix or on my recipe for how to make fluffy pancakes.
- Turn on the griddle or fire and pan to low medium heat.
- Slightly grease the pan or griddle with a little butter (I use butter sticks that children can hold and “paint” the pan with (not too much butter – they need to move fast). If your child is too young for this part, you can grease the surface yourself.
- Once the pan is buttered, sprinkle it generously with the rainbow sprinkles. Sprinkles burn if they are left in the frying pan too long so you will need to pour the batter on the frying pan (over the sprinkles) quite quickly.
If your child is just learning and cannot go that fast, you can simply add the sprinkles to the batter instead. They will be less noticeable but will allow your child the time to practice making the pancakes, which is a more important skill to learn. - Using a teaspoon (to pour just a tiny bit of batter and make the pancakes very small) show your child how to pour pancake batter on the pan and watch it spread into a tiny circle. You can use a measuring cup with batter in in (you will pour about ¼ cup per pancake). You can also use a squirt bottle, which may be easier for them to handle. They just have to squeeze it gently so only a little bit of batter comes out. Be sure to supervise at all times as the pan is hot and can burn your little one.
- If the batter is thick and does not spread, add a little more milk or water to it. The pancakes are so tiny that you will not be able to spread the batter easily, but if it is runny enough, it will spread into a circle on its own.
- Teach your child that the pancakes are ready to be flipped when the underside is golden and little bubbles start to form on the surface of the pancake. Teach them how to flip a pancake and remember that as messy as things can get, this is helping your child become independent and learn all sorts of skills needed to succeed at school.
- If you sprinkled the pan, try to flip the pancake onto a spot where there are still sprinkles loose, so they attach to your pancake.
- Once they are ready, your child can proudly serve the pancakes to the whole family. Or to a family of teddy bears. What a wonderful way to contribute.
- Serve with whipped cream on the side if desired. For even more fun with miniature things, pour some maple syrup in a tiny squirt bottle for your child to add to their tiny pancakes. So much fun!
Learning Opportunities
I love helping children learn to cook because it is a great life skill and an incredible way to contribute, to give of yourself to others, to do something for someone other than yourself, which children both love doing and need to do. By cooking with you, children feel great pride and benefit from a healthy self-esteem. They also learn to be independent and responsible. Children will learn S.T.E.M. while measuring, combining, mixing and counting. This recipe also has a great amount of hand-eye coordination skills and of fine motor skills, a precursor to writing. Following directions also teaches reading and S.T.E.M.
Doing this activity together also is a great opportunity for you and your child to connect. You can share life stories, ask them about them, their plans and get closer. You can ask, for example:
- Who are you preparing tiny pancakes for?
- How many tiny pancakes will we need then?
- What is your favourite topping for the pancakes? What is theirs?
- Who else likes pancakes? (Grandma? Uncle? Friends from school?)
Distributing the pancakes equally amongst all family members is also 1 to 1 correspondence – a math concept. It also works on the math concepts of estimating quantities, measuring, division and many others.
Making the pancakes, cleaning the workspace and the dishes are essential life skills. Cooking in itself is also an important life skill and sharing what they cooked with the rest of the family teaches your child the habit of contribution and thinking of others.
Extended Learning Opportunities
- Invite your child to serve the pancakes to their teddy bears or other small dolls or stuffed animals for dramatic play. See my teddy bear picnic activity for ideas.
- Instead of sprinkles, use one chocolate chip per tiny pancake. This will teach your child math and fine motor skills, as your child will have to use tongs or tweezers to pick up one chocolate chip and add it to the pancake before flipping it.
CEFA tip: Remember to let your child do as much of the process as they are capable of.
Books Your Child Might Like
For 0-5
For 1-5
For 3-5
For 3+
Toys Your Child Might Like
For 0-2
For 2-5
For 3-5
For 3+
For 4+
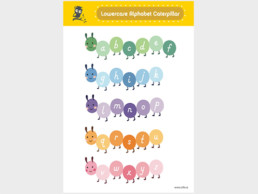
Bottle Cap Lowercase Alphabet Caterpillar
Your child will love playing with this game! This printable caterpillar game has a second page with all the letters for you to cut out and glue on top of bottle caps. Once your child has all 26 bottle caps, they can practice matching the letter on the bottle cap with the letter on the caterpillar.
This activity is used at our CEFA Early Learning schools for our 2 and 3 year old children (Junior Kindergarten One and Two), so they have plenty of practice with alphabet letters.
Make sure you supervise closely as the bottle caps can be a choking hazard. If you prefer, simply print the game on cardstock and use the letters without the bottle caps. I much prefer the bottle cap version (and so will your child) but you must supervise.
You can download the game here. I use water bottle caps, but you can use anything you like. If you don’t want to go through the trouble of gluing all the letters on the bottle caps, you can always use a sharpie to draw them on a clear bottle cap. Just make sure your letters look exactly like the ones on the caterpillar.
If you are playing with your child, you can sing the alphabet song as you place the letters, or you can use the phonetic sound of the letters to refer to them: ah, b, k, d) rather than their names. This will teach your child to read sooner. Once your child can read, you can use the letters’ names (ay, bee, see, dee). Have fun!
Best Ages for This Activity
Two to four
How to Make It
What You Will Need
- Paper
- A printer
- 26 bottle caps (start saving them from your water bottles)
Or:
- Cardstock if you don’t want to use bottle caps
- A laminator to laminate the game and the letters (to make them more sturdy – you don’t have to. We do at our schools so the game can be used over and over again)
Let’s Get Started!
- Print the worksheets
- Put the bottle caps in a small bowl or basket, next to the worksheet
- Invite your child to play the alphabet caterpillar game
- Demonstrate: pick up any bottle cap and read the letter and read it – “this is mmmmm, where is mmmmm on the caterpillar? Oh! Here it is!” then place the cap on the m on the caterpillar. Pick up one more bottle cap and repeat. Invite your child to join in. Once they are engaged in the activity, leave them to work on your own but supervise to make sure they don’t put a bottle cap in their mouth. You can read a magazine in the meantime, or work alongside your child but on your own activities.
Learning Opportunities
This activity will give your child literacy skills: they will learn fine motor skills as they manipulate the bottle caps and place them carefully on top of each letter on the caterpillar. This is harder than it looks for a young child. It also teaches them reading skills as they identify the letter and/or the sound it makes and see the entire alphabet in one activity.
Extended Learning Opportunities
- Invite the child to make a caterpillar on the floor, placing all the bottle caps in a row from the letter a to the letter z. If they don’t remember the order, they can look at the caterpillar for guidance.
- Find out which letters are in your child’s name
- See which letters are in your name, in their siblings’ names, etc.
- Use the bottle caps to write your child’s name, and simple words like dad or bib (you will need to make more bottle caps, so you have more than one of each letter)
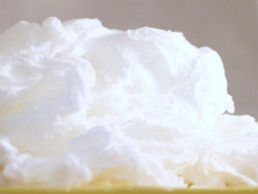
Soap Cloud Experiment
This incredibly simple science experiment only needs a bar of soap and your microwave. Give it a try and see a bar of soap expand to six times its size right before your eyes. Our students at CEFA Early Learning schools love it! At the end of this activity, I will show how to use the cloud of soap you have created in other fun ways.
Best Ages for This Activity
Two to five
How to Make It
Ingredients
- 1 bar of pure original ivory soap (it cannot be any other kind or brand)
You Will Also Need
- A microwave
- Any microwave-safe dinner plate
- A way for your child to reach to the level of your microwave to observe
Let’s Get Started
- Invite your child to try a science experiment.
- Invite them to unwrap the bar of ivory soap, and encourage your child to use descriptive words to describe how it feels, how it smells, etc. Ivory soap has a higher air content, which makes it possible for this experiment to work. It has so much air in fact that it floats in water! (don’t try it with this bar, however – maybe another time).
- Make sure your child can get a good view of the microwave, and help them place the unwrapped bar on a plate and bring it to the microwave.
- Help them press the microwave timer for 2 minutes, and watch as the soap magically expands before their very eyes!
- Once it is ready, remove the plate yourself as it may be hot, and wait until it cools off before your hand it to your child to examine.
- Again, use descriptive words to describe how the soap changed.
- The area surrounding your microwave will smell of soap but will not leave a soapy taste next time you use the microwave. The scent itself is a great sensory experience for your child. Describe how that changed too.
- The soap will now feel fluffy, crumbly and powdery, and is so much fun to play with! Just make sure they don’t taste it!
- Place your soap fluff in a sensory bin so your child can play. Offer cookie cutters, butter knives, and toys if you wish.
- Be careful that your child does not touch their eyes or mouth with soapy hands.
The Science Behind This Experiment
The ivory soap bar floats and is very light because air is whipped into it during the manufacturing process. If you break the bar of soap in half (use your hands) and look closely (give your child a magnifying glass) you will see tiny pockets of air in it.
Why does the soap expand in the microwave? The air bubbles in the soap contain water molecules. When that water is heated in the microwave, the water vaporizes and that vapor trapped in the soap is what makes it expand. Likewise, the heat causes the soap itself to soften and become more pliable.
When the soap is heated, the molecules of air in the soap move quickly, causing them to move far away from each other. This causes the soap to puff up and expand to an enormous size.
Learning Opportunities
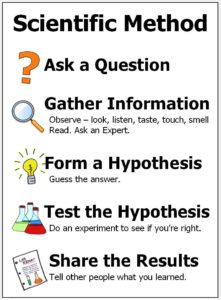
This is a thrilling S.T.E.M. activity where your child can see a chemical reaction as it happens. For better science learning, follow the steps of your scientific method with your child.
Extended learning opportunities
- Try the same experiment using popcorn kernels instead. The exact same chemical reaction occurs.
- Try it with a marshmallow for the same results.
- Use your new fluffy soap cloud to play.
- Use your new fluffy soap cloud in the bath – you can slide around the soap, then finally add water for an extra soapy, extra cleansing bath.
CEFA tip: Remember to let your child do as much of the process as they are capable of.
CEFA WARNING: This experiment requires adult supervision at all times.
Books Your Child Might Like
Toys Your Child Might Like
For 3+
For 5+

Toys I Recommend for 5 Year Olds
By age five, your child will have made even more progress in their physical development, and especially in their fine motor skills. All the practice in the early years really starts to pay off! Your five year old now starts kindergarten, where (sadly) they will be required to sit for long periods of time, and focus on the teacher, as well as follow instructions. After school, though, is where you can fit all the fun, running around and play they need. Choose toys that are social, that they can play with family and friends, and also toys that encourage daydreaming and dramatic play. You will know by now what our child is interested in, and can follow their interests when it comes to toys.
Here are some toys I would recommend for that age, grouped by learning outcomes: