This is a beautiful gift for Mother’s Day, but it takes a little work (maybe two hours). I did it with my children one summer day, we painted outside, and they made their own self-portraits. My oldest was five and my youngest was two. They turned out beautifully! I framed them and had them as art at my house for years. We also do self-portraits at CEFA Early Learning schools every year when studying Picasso, which are masterpieces every time. This is a gift Mom will be sure not to forget, and an amazing opportunity for you to spend a few hours with your child, taking about Mom, about painting, about life. If you can, take photos of the process (of your child painting their masterpiece).
Best Ages for This Activity
3 to 5 years
How To Make It
You will need
- A canvas or drawing paper (I prefer a canvas because you can hang it once it is finished. You can buy these as single canvasses at an art store or even at Walmart – it does not have to be of great quality. I would recommend at least a 9×12 size.)
- A B pencil (You can use a regular pencil, but the lines will be a lot lighter)
- Acrylic paint. Here’s a set with beautiful colours. You can also buy a very inexpensive set at Walmart, or individual colours at an art store. You could also use liquid tempera paint if you have it at home already, but I think it looks much brighter with acrylic paint.
- Chalk pastels
Let’s get started!
I will teach you an easy, simple way to paint portraits for young children.
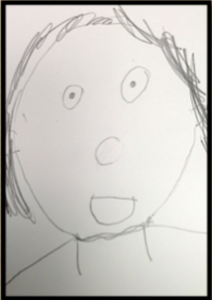
- Invite your child to draw the outline of the face on your canvas using the pencil. Draw lightly at first. If your child needs to erase, you can – It doesn’t matter if it doesn’t erase perfectly as you will paint over it.
- Start with an oval for the face, two lunes for the neck, two semi-circles for the ears (talk to your child about the body parts)
- Add the eyes
- Add the mouth
- Add the nose
- Add the eyebrows
- Add the outline for the hair
Here is an idea of how it will look once your child has drawn the outline (depending on your child’s age – you don’t need as much detail):
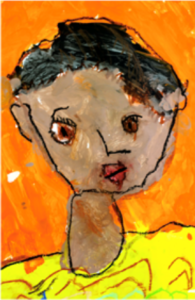
- Then begin painting your masterpiece, following the outline
- Paint the skin (face, ears, neck) using acrylic skin colour paint, then let it dry before you paint the features in the face.
- Paint the features of the face with acrylic colours as well (eyes, nose, mouth, hair)
- Paint the clothes (if your child drew them)
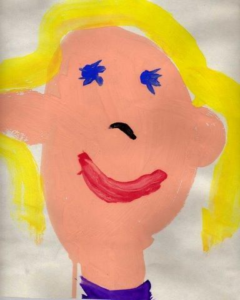
- Paint the rest of the canvas with a beautiful, bright colour. I like to suggest to children to paint the sides of the canvas – leave no white space. Here is a beautiful example:
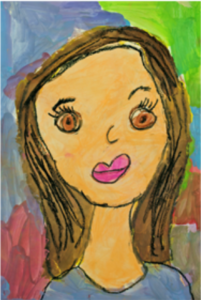
- Once it is complete, here is a little secret that will really define your child’s painting: add the details with the chalk pastel colours! It makes it really pop, giving it texture and depth. You can add eyelashes, eyebrows, outline your painting (the painting above is outlined, for example), add different colours to the hair if you wish (and by you I always mean your child, of course). Here is the difference between using only paint (left) and using pastels to draw the outlines (right):
Learning Opportunities
This is a proper visual arts lesson for your child. The purpose of visual arts is to invite your child to express themselves, to bring the inside, out. Your child will discover themselves and the beauty they are capable of expressing through art, and that is an amazing thing to witness. Enjoy every moment of it. Don’t try to guide your child or “teach” them how the portrait should look like. You can ask them if they want to draw the eyes (for example), the mouth, or lips, but don’t “tell” them to do it – let them express themselves.
It is also a great activity to help your child think of others, namely: their mother. This helps your child develop empathy. Also, painting is an excellent fine motor activity, a precursor to writing!
Books Your Child Might Like