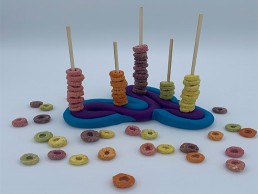
Froot Loops Sorting and Fine Motor Practice – Learning Math and Writing

At CEFA Early Learning schools, we teach children attributes as part of our S.T.E.M. program, and one of the ways we do it is using sorting games like this one, which sorts according to colour.

Sorting is a foundational math skill and is very important to learn, as it helps children describe things and then compare, using attributes (like colour, size, shape, etc.). We use sorting games all year long, and in every grade. They get more and more complex as children gain sorting skills, and are more descriptive in their attributes.

This is a fun activity that your child can play on their own, and is appeals to many of your child’s senses, including smell and taste! I use skewers and play dough to stick the skewers onto, but you can use Styrofoam instead of play dough (or anything that you can pierce a skewer into, like a banana) and also, for an added level of fine motor skills, try using uncooked spaghetti instead of skewers. Because the spaghetti is more fragile, children will have to be extra delicate lacing their Froot loops through, which makes it a more complex fine motor activity.

Best Ages for This Activity

One to four

How to Make It

You will need

Let’s get started

  • Place the froot loops to be sorted in a container or bowl
  • Dig the skewers (one for each colour of froot loops) into the play dough
  • Place one froot loops cereal of each colour in each skewer
  • Invite your child to play a sorting game and begin playing together until your child understands what to do on their own. You can say “blue goes with blue… yellow goes with yellow…” as you sort for your child to understand that they are sorting by colour
  • Once you finish, you can count how many of each colour you found if you like

Learning Opportunities

Children will learn S.T.E.M., especially in the area of mathematics. While you play with your child, encourage your child to describe why they are sorting the objects in that specific manner (in this case, by colour).  (example, by colour, by type, etc. you can also invite your child to sort using different attributes during play, or simply by setting up the objects differently (some examples below).

In this game, the greatest learning opportunities are in reasoning (which objects go where and why) and use of mathematical vocabulary.

This activity also encourages your child to focus and stay on one task (increases attention span) which contributes to your child’s social and emotional development.

Sorting Books Your Child Might Like

In order to truly understand these concepts, it is always best for your children to have as many hands-on activities and manipulatives as possible. For sorting, an activity that they can touch, feel and play with is so much better than a worksheet or book. If your child really has a passion for sorting, however, or if you need an activity that is educational but does not require as much supervision, then books and workbooks can be fun! Plus, it really depends on your child. Some children love working on workbooks (I was one of them) and can find them entertaining for hours on end, while others prefer real objects. Whatever your child’s preference may be, make sure you always provide manipulatives (rather than only workbooks or activities on paper). Trust me on this one.


As an Amazon Associate I earn from qualifying purchases


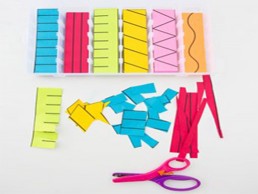
Colourful Scissor Skills Station (with Free Printable)

Children need to learn how to use scissors before starting kindergarten. At our CEFA Early Learning schools, we introduce our young students to scissors by first offering material other than paper to cut, as cutting paper is more difficult. Once your child is comfortable using scissors, introduce this scissors practice sheet, which will challenge their fine motor skills. This sheet is designed to teach your child to work adeptly with scissors and move beyond just snipping or cutting in a straight line.

Best Ages for This Activity

Three to five

How to Make It

You Will Need

Let’s get Started

  • Print one copy of the free printable stencil provided in each colour of paper
  • Cut the paper where indicated so you end up with strips of paper for children to cut following the lines provided
  • Place the strips on the storage box, use all the different colours to make it more attractive. If you don’t want to invest in a storage box, you can always use small containers for the different types of stencils.
  • Add a pair of safety scissors next to the strands of paper so it looks inviting for your child
  • Invite your child to cut the paper and demonstrate if necessary. Notice together that there are lines across each heart to indicate where to cut exactly.

Learning Opportunities

Children learn a lot by practicing cutting with scissors. They develop fine motor skills, which are essential for your child to learn to write. They also develop hand-eye coordination and bilateral coordination (using both sides of the body at the same time while each hand (or side) is performing a different task).  All of these skills are a fundamental part of our CEFA Early Learning schools writing curriculum, as well as our physical education curriculum.

Extended Learning Opportunities

Once your child has cut all the paper, you can use the colourful pieces to make a collage! Making the collage and using glue on small pieces of paper is not only a great creative and artistic activity, it is also a wonderful way to develop fine motor skills.


As an Amazon Associate I earn from qualifying purchases


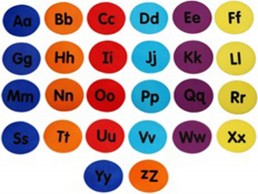
Alphabet Phonetic Sorting Step by Step

At our CEFA Early Learning schools, children learn to recognize the letters of the alphabet as well as the sound each letter makes. This is achieved through various fun activities presented as part of our literacy curriculum.

This is one of the activities your child will love to play as it involves the whole body as well as multiple senses! You can play this game with things you have around the house and even write each letter on pieces of coloured paper if you don’t want to invest in the little alphabet rugs, so give it a try!

Best Ages for This ActivityCardstock

Best for one to three year old children (CEFAbaby to Junior Kindergarten One grades). If your child is not at a CEFA Early Learning school, you may want to present it to your four year old as well.

How to Make It

You will need

  • Aa – Zz flor mats or
  • Cardstock paper (to write or print the letters on)
  • Phonetic alphabet pouches; and/or
  • Small objects or pictures of objects that you can find around the house representing each letter of the alphabet (ex: a toy car for the letter Cc, a spoon for the letter Ss)

Let’s get Started

Place the pouches in their cloth basket. Together take one, “read” the letter, turn it around to see the sound it makes, then find its match in the carpet markers. Trace the letters on the markers once you find each one, to reinforce sensory learning of the letters. You can add just a few if it’s too hard, and add more as the children progress.

  • Line up the carpet markers in alphabetical order on the floor. Place them in a path that children can follow. You can use a hallway, turn corners into another room and place them any way you like but make sure that they are all in order as well as straight (crooked or upside-down mats will make it much more difficult for your child to recognize and does not help your child learn how to write or recognize the letters).
  • Place the phonetic pouches in their cloth basket, or in a basket or container
  • Invite your child to play with the alphabet.
  • together take one pouch, and “read” the letter. Turn it around to see the sound it makes, then find its match on the carpet markers. Once you found the letter on the marker, invite your child to trace it on the marker (the texture provides the same learning as the Montessori sandpaper letters), saying its sound as you trace (mmmmmm) not the name of the letter (em). Tracing will reinforce sensory learning of the letters, which is a step towards learning to write.
  • Keep the instructions simple. If you are playing with the pouches, say: let’s match each pouch to their letter! Here’s a ccccccrocodile! What letter says ccccc? Cc! let’s find Cc!
  • If your child does not recognize the letter, that’s fine! This is a fun way to associate the letter with its phonetic sound, and good practice. You will see that before long, your child will know the sounds of the letters, which is the beginning of reading!
  • If you wish, you can start with three or four letters and pouches, and then discover more letters and pouches as you play again in the following days and weeks.
  • If you want to expand, you can also look around the house for objects that start with the letters and add them to the mats. For example, on the Bb mat, you can put a button, a balloon, a ball, etc. The game is finished when you find at least one object or image for each letter.

Learning Opportunities

Children will gain literacy skills, fine motor skills, reading skills, sensory development, hand-eye coordination, letter recognition, phonics, S.T.E.M., especially in the area of mathematics (sorting, grouping, matching, sizes, etc.). It is an excellent activity to enrich your child’s vocabulary, which is a great predictor of school success. It is also offers an opportunity for you and your child to spend quality time together, playing and having fun, which is essential for your child’s social and emotional development.

Books Your Child Might Like

Toys Your Child Might Like


As an Amazon Associate I earn from qualifying purchases


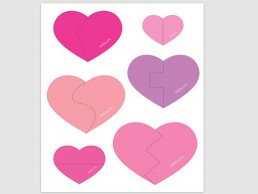
Scissor Skills for Valentine’s Day Heart Breaker's (and How to Fix Them!)

Children need to learn how to use scissors before starting kindergarten. At our CEFA Early Learning schools, we introduce our young students to scissors by first offering material other than paper to cut, as cutting paper is more difficult. Once your child is comfortable using scissors, introduce this scissors practice sheet, which will challenge their fine motor skills. This sheet is designed to teach your child to work adeptly with scissors and move beyond just snipping or cutting in a straight line. Tip: if you print it on cardstock, it is easier than plain paper.

Best Ages for This Activity

Three to five

How to Make It

You will need

Let’s get started

  • Print one copy of the game on cardstock paper
  • Cut the hearts individually
  • Place the hearts and the scissors in a bright space where your child can work
  • Invite your child to “break” the hearts! Notice together that there are lines across each heart to indicate where to cut exactly.

Learning Opportunities

Children learn a lot by practicing cutting with scissors. They develop fine motor skills, which are essential for your child to learn to write. They also develop hand-eye coordination and bilateral coordination (using both sides of the body at the same time while each hand (or side) is performing a different task).  All of these skills are a fundamental part of our CEFA Early Learning writing curriculum, as well as our physical education curriculum.

Extended Learning Opportunities

  • Once your child has cut all the hearts, you can mix up all the pieces and put the puzzles back together! Use tape to tape them back together – most children love using tape, and it is an excellent fine motor activity as well! Learning to match the hearts and to understand that two halves make a whole will also teach them math and problem-solving Plus, it’s always good to know how to fix a broken heart
  • For added scissor skills practice, invite your child to cut the heart into more pieces and make an even more complex puzzle to solve (or several). Count the pieces and put them back together for added math and problem-solving


As an Amazon Associate I earn from qualifying purchases


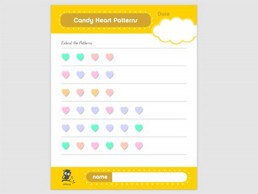
Candy Hearts Patterning

An important part of our S.T.E.M. curriculum at CEFA Early Learning schools is working with patterns. Understanding patterns is a foundational math skill.

Best Ages for This Activity

Three to five

How to Make It

You Will Need

Optional

Let’s Get Started

  • Print one copy of the game on cardstock paper
  • Put candy hearts of the same colour found in your game, in a bowl where your child can see them and pick them to place on the patterns.
  • Invite your child to complete the patterns on the sheet, using the candy. Name the colours as you go. If your child has difficulty, you can help by asking them to tell you what they see, then what comes next, and what comes next, etc. until they understand the pattern.

Learning Opportunities

Children will learn S.T.E.M., especially in the area of mathematics. In this game, the greatest learning opportunities are in reasoning, comparison and prediction. As always, the use of mathematical vocabulary greatly enriches these activities.

This activity also encourages your child to focus and stay on one task (increases attention span) which contributes to your child’s social and emotional development.

CEFA tip: Although patterning can be a great activity for your child to do alone (once the concept is clear), remember that at this age, children must always be supervised.

Books Your Child Might Like


As an Amazon Associate I earn from qualifying purchases


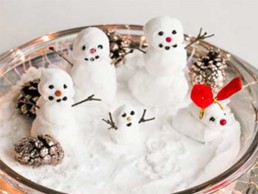
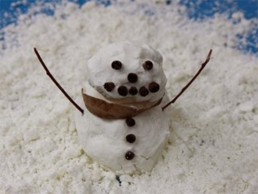
How to Make Fake Snow

No snow yet? No problem! At our CEFA Early Learning schools, we don’t wait for snow – we make our own! Treat your child to a snow day in the comfort of your own home with this simple, easy to make recipe. This is an excellent sensory learning activity which appeals to all children, young and old.

Make sure to save the snow once you are finished as it keeps a week or two, even longer sometimes.

This is an activity that is inexpensive to make and has no chemicals in it.

Best Ages for this Activity

Zero to five

How to Make It

You will need

  • 2 cups Cornstarch
  • 2 cups Baking soda
  • Water
  • A sensory bin. Use anything you might already have at home. I like the ones with lids because they are easy to store and put away when you need (under the bed is the perfect place). We use these bins for so many different sensory activities in the classrooms, and when my children were little, I always had one in their room that I changed every week or two. Now that they are 18 and 21 years old, that poor bin retired and found its way to one of our CEFA Early Learning schools. If you don’t have something to use around the house, you can purchase one here. We will use it for most of the sensory activities on this site. Otherwise, use a large tray, bowl or pan.

Let’s get Started

  • Decide how much snow you want to make. As long as you keep a 1 to 1 ratio between the cornstarch and the baking soda, you can make as much or as little as you like.
  • Invite your child to make “snow”
  • Make sure that during this process, you encourage your child to do as much as they are capable of (for example, measuring, pouring, mixing, etc.) Help as little as you can so they learn the most from this activity.
  • Explain that you will you the same amount (math concepts: equal, measuring, comparing) of cornstarch and baking soda, and decide how much snow you want to make.
  • Measure 2 cups of each and pour into your sensory bin.
  • Mix using your hands (sensory learning). Meanwhile, ask your child to describe how it feels on their fingers (vocabulary).
  • Add water, a tiny bit at a time. You want to add a little and mix, until the consistency is such that you can form a snowball that does not disintegrate.
  • Find any clumps and loosen them also using your fingers – this too is a good sensory exercise.
  • Voilà! You have amazing snow to play with for the next week or two. Now why not build tiny snowpals (S.T.E.M.)? you could also recreate the scene of snowmen at night – this is ideal for it, and an excellent dramatic play and reading comprehension activity.

Learning Opportunities

Children will learn S.T.E.M. while making the snow. Questions you can ask your child during the experiment are:

  • What happens when we add more water?
  • What will you make with it once it is done?

By helping you measure, mix and describe textures, they will be learning math. As they are mixing and pouring, following all the steps, they are learning sequencing, which is great for reading as well as math and science.

Natacha’s tip: Remember to let your child do as much of the process as they are capable of. This means they measure, mix and pour (not you).

The process of making the snow offers your child sensory learning by using their senses to feel the texture.  Sensory learning is especially important for writing. While you play with your child, use vocabulary to describe how it feels.

Don’t forget to use math vocabulary such as:

  • Measuring
  • Quantities (more than, less than, the same amount, 1 cup, etc.)
  • Soft/softer/softest
  • hard/harder/hardest

Describing while using vocabulary is one of the most important learning outcomes at this age. It teaches them reading and mathematics.

This activity improves your child’s ability to focus on one task (attention span) – especially once they get to do other activities with the snow – which contributes to your child’s social and emotional development and artistic development. They love knowing that they can “make” something to play with, it fosters a sense of independence and self-reliance.

Extended Learning Opportunities

Once it is ready and your child gets to play with it, they will gain writing skills by using their fine motor skills, and dramatic arts through pretend play. If you use the snow to build, you learn S.T.E.M., especially engineering.

Here are some examples of how to use your snow:

Use it with tools to work on fine motor skills and hand-eye coordination.

This snow is wonderful for dramatic play as it reminds your child of all the wonderful things that they can do in the winter and re-create a mini version of those activities right in their sensory bin. Presentation is everything, so set it up in a way that inspires your child to be creative with it and imagine all the things that can be added to it or built with it.

They can also imagine and recreate a construction site, a winter world with wildlife, and so many other things. Encourage them to look around the room and see what they can play with in their fresh new snow!

Read the book snowmen at night and re-create scenes of the book for dramatic play. This will teach your child reading comprehension and dramatic play. Here’s more snowmen at night activities you can do, plus a video link to the book read aloud if you don’t have it. If you build the scenes described in the book (for example, the skating rink, or the mountain where they go sledding), you add S.T.E.M. learning to this reading comprehension activity. You don’t have to use play dough to build everything! Use anything you find around the house, from big milk jugs to make hills to a mirror for the skating rink, or cups, wood and sticks. Use pine tree branches you find outside to make the trees if you like.

Invite your child to make your whole family out of snow. In addition to the fine motor skills required to make snowballs out of snow (which is harder than doing it with play dough) and then snowpals, it is a great social and emotional development activity and is often used by child therapists for role-play and for bringing issues to the surface. Ask questions like: if we were snowmen for a weekend, what would we do as a family? What would you do? What friends would you invite? Then why not build the places to go and what you will need? (for example, a snowy mountain to slide from and sleighs for the family). This is excellent for S.T.E.M. as well!

Another excellent S.T.E.M. activity is to use a very small pipette and add food colouring to your snow (you can use a little bit of the snow so you still have the rest to play with) then play with it to watch it blend and mix together, until you get a uniform colour. Add another colour to see what colour you get, and learn about primary and secondary colours that way.

Use your fine motor skills by using molds in the snow!

Have fun!


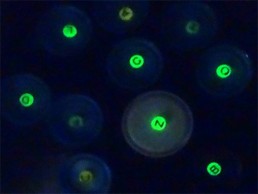
Glow in the Dark Alphabet Scavenger Hunt

This is such a fun way to teach your child the alphabet! It’s inexpensive, and it is thrilling!

All you need is recycled bottlecaps, glow-in-the-dark alphabet beads and a little glue! You can re-use these over and over, and you can play indoors or outdoors.

This activity is used at our CEFA Early Learning schools for our 2, 3 and 4 year old children (Junior Kindergarten One, Two and Three), so they have plenty of practice with alphabet letters at first, then start using the letters to build words.

If your child is not attending our schools (or if they are but like playing with this game) and you would like to try this game at home, make sure you supervise closely as the bottlecaps can be a choking hazard.

If you are playing with your child, use the phonetic sound of the letters to refer to them: ah, b, k, d) rather than their names. This will teach your child to read sooner. Once your child can read, you can use the letters’ names (ay, bee, see, dee). Have fun!

Best Ages for this Activity

Two to five

How to Make It

What you will need

Optional:

Print our bottlecap alphabet (in color if possible) so once your child finds the caps, they can place them on each letter. Here is my free printable.

For that, you will need:

Let’s get Started

  • First, prepare the material. Find a bead for each letter and glue it to the inside (or outside) of a bottlecap:

  • Place all the bottlecaps (letter size up towards the light) under a light or simply in a well light room for several hours so they can absorb the sunlight.
  • When your child has some time to play (but before you tell them), hide the letters in a dark room. You can make it as easy or as difficult as you like, depending on your child’s developmental level. For example, you can scatter them over the floor, or you can hide some under a bed, or on top of the bed, so it is more of a challenge.
  • Invite your child to play a game called “find the alphabet” and go to the dark room – your child will be quite excited at this point!
  • Call out each letter in order and see if your child can find it. Use the phonetic sound of the letters to refer to them: ah, b, k, d) rather than their names. This will teach your child to read sooner. Once your child can read, you can use the letters’ names (ay, bee, see, dee).
  • If your child can’t find one letter, just skip it and go to the next one, for example, “let’s find sssssssss… - can’t find sssssss? Ok let’s try the next letter! Let’s find ttttttttttt… where are you tttttttt??” once you find all the letters, you can place them in order on top of the printed bottlecap alphabet sheet, or make a long alphabet train with all the bottlecaps!

Learning Opportunities

This activity will give your child literacy skills. They will learn how each letter looks and sounds, which prepares them for reading as well as writing. They will also use their fine motor skills as they manipulate the bottlecaps and place them carefully side by side. This is harder than it looks for a young child.

Extended Learning Opportunities

  • Invite the child to place the letters in order from a to z on the floor.
  • Find out which letters are in your child’s name
  • See which letters are in your name, in their siblings’ names, etc.
  • Use the glow in the dark bottlecaps to spell your child’s name (in the dark too!)
  • Use the bottlecaps to write simple words like mom or dad or bib (you will need to make more bottlecaps, so you have more than one of each letter)
  • Make two sets and match the letters – this your child can do on their own


As an Amazon Associate I earn from qualifying purchases


6 Ways for your Child to Connect with Friends and Family During COVID-19

When the pandemic first started at the beginning of 2020, most families welcomed the opportunity to spend time at home. As the year progressed, children began to realize that staying home also meant not seeing their friends, and sadly, not seeing their extended family either. No visits from grandparents or cousins, no one coming for play dates, no extra-curricular activities, and nowhere to go to see their friends and have fun either. This left many children longing for social interaction.

I noticed that when more children began attending our schools this September, they were so happy to see their friends and finally be able to play with children their own age! But not all children have had that opportunity yet, and if your family is living in Canada like mine, you are probably preparing for a holiday without your whole family around to celebrate it with. I had made plans (months ago) to have my family over at Christmas (more than twenty of us) and now no one can come, especially not my 93-year-old grandmother!

It may still be a while before we can see our friends and family in person again, but here are 6 ways to help your child connect to loved ones during the pandemic:

1. Make Video Playdates via WhatsApp
Even my grandma learned to use WhatsApp during the pandemic, which allowed her to stay close to her sister and to all of us. The app is free (download here) and you can use it to phone, video, and text. My whole family has a group chat where we keep in touch every day and share our lives through texts and photos.  When it comes to using your phone or tablet, your child has much better skills than my grandmother, so talk to your child about who they would like to talk to and make virtual playdates! This works at any age! My son plays chess with his girlfriend using facetime, and my daughter (bonus daughter) facetimes with her best friend for hours each day! They stay on the phone while doing homework, even if they don’t talk – just to be close. My youngest son also has gaming dates with his friend who has been in Poland since the pandemic, and chats with her for hours while they play. My youngest (bonus) daughter makes dance videos (yes, on Tik Tok) that she shares with her friends every day, and they learn new dances from each-other, as well as from all kinds of other internet sensations. This provides her with an opportunity to exercise as well as to stay connected. My children are older, and needed no help figuring out how to stay close to their loved ones – both friends and family. If your child is young, you may have to introduce them to new ways of staying close. Encourage them to call their cousins, or their classmates, and even do an activity together (for example, you could have a tea party, bake cookies together, or even make snowpals out of playdough), each in their own homes! Don’t underestimate your child’s need for social interaction, even at a young age. My son found one of his best friends at age one, at his CEFA Early Learning school, and they are close friends to this day, 20 years later. Back then, they were inseparable, and had sleep-overs every week, even though they spent all day together at school for four years!

2. Throw a Zoom Party!
By now, if you have had to work from home, you are probably very familiar with Zoom, which is another free app (download here). Why not organize a virtual party for your child? Invite a few friends to log in at the same time. Let the families know the theme of the party ahead of time (if you have one) so they can prepare (or you could just make it a friends get-together without a specific activity – your child would like it just as much). Here are some ideas you could try:

  • A hot chocolate decorating party (each family would get whipped cream, marshmallows, sprinkles, and a cup of hot chocolate for each child)
  • A pajama party – all you need to do I show up in your pajamas
  • A dance party – choose your child’s favorite songs and invite everyone to dance in their own living rooms!
  • A gingerbread house decorating party – all you need is a gingerbread house decorating kit.
  • A cookie decorating party – get some plain cookies and all the icing and sprinkles you can find!
  • A games night – agree on the game and have everyone play!

3. Mail Holiday Cards
In order to save some trees, I have been sending my holiday cards by e-mail for years now. This year, why not buy or make holiday cards with your child, write a message in each one for the people you love (or a drawing) and teach your child how to address each card and mail them! You could walk together to the mailbox to post them! Also ask some friends and family members to write back to your child so they have “snail mail” to look forward to! If the experience is great, why not keep it going by writing letters this way during the pandemic? It is an excellent writing activity! If your child can’t write, they can draw their message and they can tell you what they would like to write, and you can write a few words below their drawing.

4. Have the Grandparents Sing your Baby to Sleep
My sister had a baby during the pandemic, and all of us are desperate to spend time with her, which we can’t. What she does sometimes is call my mom when the baby is ready to sleep and have her sing the baby to sleep – such a nice thing for the baby and for my mom!

5. Invite a Friend for “Dinner”
Arrange with another family to all have dinner at the same time and place the tablet at one end of the table so they virtually join the whole family for dinner. This is perfect for family dinners! If not, then make a special dinner for your child and have them invite a friend to eat together. Your child can eat dinner while watching their friend on the screen have dinner too, and chat.

6. Read a Book with a Friend
Invite another parent to have story time together once a week (or as often as you like!) and take turns reading a story to your child and their friend. Once you read a story (your child can choose which one) and once the other parent reads a story (and your child’s friend can choose which one).
If you what, you can also do that with an aunt or uncle, or a grandparent, and have them read a story to your child. They can even read a longer book, just ten minutes each night. Your child will look forward to the call each night and maintain a close relationship with their family.

Young children crave social interaction just as much as adults do – sometimes more. Try these few ideas and see which ones your child likes best, then do them as often as you want, varying the friends and family. Your child will be so excited to try these with everyone.

I’d love to hear of ways that you found for your child to stay close to friends and family during the quarantine. Please share with me below in the comments!


The 20 Minute New Year’s Resolution That Will Make You a Great Parent

The allure of a new calendar clear of past commitments and failures, brings high hopes to parents who aspire to be better for their children.

While becoming a better parent is one of the most admirable resolutions one can adopt, it is also one of the most difficult. Unlike diet or exercise, the outcome of improved parenting is not solely dependent on the parent’s actions, but also on the child’s reaction.

Not only that, but children’s reactions change as they grow. Add in the fact that no two children respond to one parenting technique the same way, and the thought of solving the perfect parent equation seems near impossible. However, there is one time-tested way for parents to strengthen relationships with their children and that is – quality time.

Between soccer games, text messages, doctor’s appointments and lunches, it’s easy for quality time to get cut. Below are 10 tips to ensure it doesn’t.


  1. Commit to 20 Minutes

During this time, let your child choose the activity, whether it’s a game, a walk or a chat. Be mindful of your child’s regime by choosing a time of day that is also good for them. During these 20 minutes, see the world from your child’s perspective. Listen with empathy, even during play. Why 20 minutes?

We all have it. This time is dedicated to just you and your child. It’s meant to form an unbreakable bond between the two of you. Of course, you can spend more time with your child if you want to, but commit to at least 20 minutes.


  1. Participate in their world

If your child does not know what they want to do, suggest going to their room where you can discover an activity together. Good activities are ones where you can still talk. Drawing or coloring together, playing a board game, building or baking are all good options, as long as they are of interest to your child.

If your child is older and this is a new habit for you, you may be met with some resistance and suspicion. Persevere until you find a way. Asking your child to walk with you to the coffee shop for a steamed milk or hot chocolate is a great chance to connect. Or ask if you can help them organize or re-decorate their room just the way they like it. Choose any activity that allows you to share a piece of their world.


  1. Be present

Forget your own schedule for these 20 minutes. Don’t text or talk on the phone. Don’t check on dinner or laundry. Focus on your child and nothing else.


  1. Plan for a one-on-one

It’s important that each child gets their own 20 minutes with you. This may require some planning, particularly for parents with more than one child. If one child hasn’t yet developed the emotional maturity to understand that you are choosing to spend time just with their sibling (during your one-on-one time) without feeling rejected, in the beginning you can invite them to join in and continue your one-on-one time with your other child later. Eventually when your children learn that they are each entitled to one-on-one time, it will become easier for them to respect the time you share with their siblings.

Why one child at a time? We are often guilty as parents of grouping our children together and not seeing them as individuals. Children want you to know them deeply, and understand that they are different from their siblings. Spending one-on-one time sends a strong message that says “you are important to me; I love you; I support you.”


  1. Choose Interactive Activities

It’s better to play a game together, where you can interact with each other, than to watch television, which offers no opportunity to talk. If you choose to go to the swimming pool, then it’s time to jump in.  Spending quality time with your child means participating. The more you take a genuine interest in your child, the closer you will become.


  1. Separate Work from Play

These 20 minutes are not well spent driving your child somewhere or watching your child’s football practice. Scratch out tucking your child into bed at night or even helping with homework. The best thing to do during these special 20 minutes is play. If you don’t like to play, learn how. Ask your child to teach you a new skill like how to ride a skateboard. There is nothing children love more than teaching their parents something new.


  1. Be a friend, not a parent

During this time, refrain from teaching and giving advice, unless you are asked. Treat your child like you would your best friend. Would you constantly tell your friend how to do things? No. You would respect them and view them as a capable person who can make their own decisions. This is how you should see your child. Take this time to learn from your child and find out what they are thinking about, what their dreams are. Don’t assume you know better as the parent.


  1. Keep a secret

If your child shares something with you during this time, don’t bring it up in an argument later, or worse, tell other people about it. Respect your child as you would any adult.


  1. Make it a Habit

By committing to this one simple habit, you will notice a much stronger connection to your child. Twenty minutes is the minimal amount of time you should spend with each child, each day. Even if you have three children, this amounts to one hour of your time. As a parent you will develop great confidence and pride in knowing no matter how busy life gets, you make time for your children.

When my children were young, I had set an alarm on my phone for each of the boys so I would not lose track of time and end up cramming an activity too late in the day. Each one had a different ring tone, and I remember to this day how excited my sons would get when they hear the alarm! They would race up to me and say “this is my time! I know what I want to do! Let’s play!” – great memories.


  1. Communicate Change

If you have to work late or be away from home, make sure your children know when and how their time will be made up. This tells your children their one-on-one time is an important commitment for you. Likewise, if your child is busy with friends, don’t interrupt their play by getting involved, or ask the friend to go home so you can spend time with your child. Instead, offer to bring homemade popcorn to them, or something else that will show your child you care about them.

For working parents, committing to this time will ensure you have a balance between home and work. It will also ease the guilt of having to say “no” when your child wants to play and you have to make dinner, for instance.

For parents who stay at home, these 20 minutes will ensure you are consciously making the effort to do something your child chooses to do, not something you have planned or need to do. If your spouse wants to do this as well, they can do it at a different time than you, or spend 20 minutes with one child while you spend 20 minutes with the other.

As simple as this resolution may sound, it is extremely effective if you do it well. Consistently spend 20 minutes each day with your child and you’ll be surprised at how much closer you feel and how much easier it becomes to understand each other’s point of view in any situation.

Happy New Year!


How to Make Sparkly Snow Cloud Dough

Cloud dough is wonderful for little ones and older children. It is similar to play dough but is much lighter, softer and has a crumbly texture to it that is perfect for snow day play! You can also squeeze it together and it will hold its shape, which is great for making snowmen. You can smooth it out and it becomes a very soft, flat surface, and you can use your hands and fingers to make it all crumbly again. Children at our CEFA Early Learning schools love playing with it for days on end and are always excited when we make it together!

It offers an amazing sensory experience, and hours of independent fun. This is the fail-safe recipe we use at our CEFA Early Learning schools.

Best Ages for This Activity

Zero to five

How to Make It

You will need

For white cloud dough:

  • 4 cups of flour
  • 1 cup baby oil (or use vegetable oil to make it taste-safe)
  • White glitter (opt out to make it taste-safe)

For whiter cloud dough:

  • 4 cups of corn starch
  • 1 to 2 cups baby oil (or use vegetable oil to make it taste-safe)
  • White glitter (opt out to make it taste-safe)

Let’s get Started!

  • Invite your child to make cloud dough with you
  • They can measure the flour and add it to a bowl.
  • Then they can measure the oil and slowly add it as they mix with their hands
  • Teach them to crumble the flour well with their hands so the oil gets evenly distributed (this is also an excellent fine motor activity).
  • They can add the white glitter when the cloud dough is ready
  • Voilà! You have cloud dough!
  • If you want to make more, simply double the recipe, following the exact proportions.
  • Put it in a sensory bin for your child to play with. It lasts at least two weeks. If you don’t have a sensory bin, put it in any container flat enough for your child to play in, and add some toys.


Learning Opportunities

Making the cloud dough is a great S.T.E.M. activity, teaching your child science and math. Ensure that your child does most of the work, such as measuring, mixing, pouring, and everything in between, so they really learn those S.T.E.M. concepts hands-on. Use as much math vocabulary as you can, such as:

  • How much, how little
  • Slowly, fast
  • Measurements words

It is also an excellent way for your child to acquire fine motor skills, which are essential for writing.

Once the cloud dough is done, it is a nice sensory activity, a precursor to writing. Playing with the cloud dough, especially once you add kitchen utensils, moulds (to build with) or any other tools, will develop your child’s fine motor skills even further, as well as provide opportunities to learn S.T.E.M. and literacy.


Extended Learning Opportunities

  • Practice making snowballs (fine motor skills, S.T.E.M.), then snowmen (fine motor skills, S.T.E.M., dramatic arts) – add props! Here are some ideas, but let your child use their imagination:

  • Add winter cookie cutters to help your child create their own universe of winter fun (dramatic arts) during play, all while gaining fine motor skills (essential for writing)

  • Make it a snowy construction site (dramatic arts) during play and see what you can build in the snow! (S.T.E.M., engineering)

Toys Your Child Might Like

For 0+

For 1+


As an Amazon Associate I earn from qualifying purchases