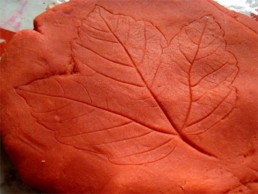
Leaf Prints on Play Dough

This activity seems quite simple but your child can gain fine motor skills, learn math, and even learn about natural science! Plus, you will need a nice outdoor walk by a park or forest near you to collect these beautiful autumn leaves to begin with, which gives you and your child a chance to connect with nature. Take a camera for your child  to photograph all the leaves, the trees where you found them, the beautiful scenery around you (an excellent visual arts activity), and take the time to play and jump on the biggest pile of leaves you can find (gross motor play) and feel how the weight of your child’s body makes them crackle (sensory learning). We love using nature to learn at our CEFA Early Learning schools.

Best Ages for This Activity

One to four

How to Make It

You will need:

Let’s get started!

  • Go on a walk outside and take the time to play with leaves before you collect them (optional). During play, ask your child about the way the leaves feel on their hands, or how they sound when they walk over them. Chat about the scents of fall, the colours they see, the shapes of the leaves, the size of the trees and of the leaves, the different sorts of leaves and trees they find, etc. Don’t “quiz” your child, just talk about these things as if you were chatting to a friend about it. These types of conversations are the ideal way for your child to increase their vocabulary as well as they math language and math knowledge. Your child will also learn about nature, about why the leaves fall, about the trees and how many years it takes for them to be as tall as they are (if you are not sure, google is your friend here). Explore, explore, explore. Enjoy nature with your child and they will develop a lifelong love for the outdoors, and respect for the natural world. Don’t rush this part of the activity – fully immerse yourself in it!

  • Take the time to take beautiful photos (on your phone is perfect) show your child how to look through a lens, how to capture what they find beautiful through a photograph. This will make a perfect visual arts activity.
  • See if you find any friends amongst the leaves and find out how they live. You will at least fin a few interesting insects

  • In a basket or recyclable bag, collect a few leaves of various kinds that are not yet dry. This is important because you will have to “peel” the leaf apart from the play dough to see the print, and a dry leaf will just crack and break. Out of respect for nature, only take leaves that have fallen.
  • When you get home, look at all the leaves you found. This is where you could introduce math activities such as:
    • Counting the leaves
    • Sorting by colour
    • Sorting by size
    • Sorting by type/shape
    • Sorting by level of dryness
    • Etc.

  • Invite your child to make prints on play dough with the leaves they choose.
  • Demonstrate if needed, or play alongside your child to show them how to do it:
    • First, flatten a ball of play dough with your hands, then use the rolling pin to flatten it evenly.
    • Next, carefully place one leaf, right side up, on the flattened play dough. Flatten gently with your hand.

    • Use the rolling pin to gently go over the play dough (and the leaf) without damaging your leaf.
    • Lift the leaf to look at the print it made!

    • Try with different kinds of leaf, and experiment mixing the pressure you apply on the leaf. Try pressing with your hands instead of the rolling pin, observe what happened (science), etc.

Learning Opportunities

Making an even imprint with a leaf is harder than you think for your child. It is an excellent fine motor activity. Pulling the leaf apart from the play dough also requires fine motor skills as your child has to be delicate enough not to break or rip the leaf.  Your child will also learn math, creativity, art, S.T.E.M., natural science, literacy, independent play and so much more.

Extended Learning Opportunities

  • Once the leaf is placed, try cutting around the play dough in the shape of the leaf before pulling the leaf out:

  • Instead of play dough, try the same activity using clay, which dries and be painted afterwards (another fine motor skill that will help with writing) – it is a beautiful art piece.

  • Try threading leaves (activity here)

  • Make a beautiful leaf collage (visual arts) with the leaves you have left

  • Make a leaf garland and teach your child to tie knots (fine motor skills and practical life skills)

  • Learn about the trees and leaves in your neighborhood, and about why leaves change colour (natural science, nature appreciation) and classify them (math)

  • Make a beautiful leaf mobile (visual arts) for a baby brother or sister (empathy and contribution)

  • Paint with leaves, or paint the leaf itself (visual arts and sensory activity)

  • Learn to draw the different leaves (art, math, fine motor skills – a precursor to writing)

  • Colour match (math)

  • Make graphs of your findings (math)

  • Make your leaves come to life (dramatic arts, creative play and art)

  • Using the play dough, make sculptures using leaves, branches and other outdoor treasures:


As an Amazon Associate I earn from qualifying purchases


Go on A (Real) Virtual Safari

I traveled to South Africa last December and was really excited to go on a safari – watch the animals in their habitat, and how they interact with one another. It has been a dream of mine since I was a little girl. More than anything, I wanted to take my own children to see it, and when they could not come, we decided to wait until we could all do it together on another occasion.

In looking for interesting activities for your children, I found this site which offers live safaris hosted by experts in real time. You can even ask them questions as you go! It is the perfect way to spend a rainy afternoon and see a little bit of our beautiful planet, at least until we can go again in person one day.

So, next rainy day, why not get ready to go on a safari. Pack a lunch, dress accordingly, bring a notebook to take notes and draw what you see, bring a camera to capture the animals, and settle into your family room sofa (which we are now pretending is a jeep) to go along for the ride!

We will certainly try it at our CEFA Early Learning schools when we study the animals of Africa. Please share with me how you did it at your house (pictures too, if you dare!) The best part of this home safari is you can pause and start the video as many times as you want to look at an animal in particular, or a scene. I bet you’re going to love it so much that if and when you go on a real African safari, you will wish that the zebras had a pause button too!

It is beginning to get warm in South Africa, so go on, take a virtual trip in the sun!

Best Ages for This Activity

One to five

How to Make It

You will need:

  • A computer, tablet or smart TV
  • This link
  • Your best khakis to wear on your safari - optional
  • A picnic and snacks (remember not to feed the animals) - optional
  • Binoculars – optional
  • A notepad (for notes and drawings)
  • A camera or phone (to take photos of the animals that can then be glued to the notepad afterward).
  • A card for your child to find the animals while on the safari (I included one here)

Let’s Get Started!

  • View the video first to make sure that it will be of interest to your child. If so;
  • Invite your child to go on a (pretend) Safari (the more you get into the role-play, the more dramatic play opportunities for your child. Get into your safari clothes (khakis or even camouflage clothes, binoculars, cameras, etc.)
  • Turn on the video
  • Comment on the animals you see as the video is playing, ask questions, take photos (yes, of your TV screen), listen to the sounds that the animals make, roar like a lion, run like a gazelle – whatever you feel like doing.

Learning Opportunities

Children will learn about our natural world in this activity, especially, about how animals live in the wild, and about animals from Africa. They will learn S.T.E.M. as they use technology to learn about the world, and natural science. Also, because of all the trouble you went into to get into character, they will have an opportunity for dramatic play. If you explore new vocabulary, they will learn literacy. Plus, they will learn that grown-ups too can pretend play.

Extended Learning Opportunities

For the next few weeks, learn about animals that live in Africa using an atlas, books or the internet (check this link here).

  • Print the poster of African animals included here and hang it in your child’s room so you can study the animals together, talk about them according to your child’s interests. The point is not to memorize every animal’s data, it is to develop in your child a curiosity about the natural world, and to open the conversation so your child can ask questions about what really interests them about the safari experience (for example, one child might be fascinated with how fast each animal can run, while another might want to know what they eat, and another how large or small each animal is, or your child might be interested in absolutely all of these things, it depends.) go with the interests of your child, explore the world through their eyes, and enrich it where you can. The poster can act as a conversation starter.
  • Use the notebook you started for your child to gather all the information they are learning. For instance, they might want to glue the photos of all the animals on it, then write below what they learned about them, then also try drawing them. This extension of the activity is excellent for teaching vocabulary and S.T.E.M. (particularly natural science and math) as well as reading and writing
  • Incorporate math into the activity by actually measuring (on your floor or on your wall, with painter’s tape or string) how tall each animal is, and comparing them, organizing them by height, seeing how much room they would take up in your house (“could we have a rhinoceros in our living room? Let’s measure how much room they would take!”; or “how many lions could fit in our bathtub?”; or “would a giraffe fit through the door if we invited it in the house?”)
  • Another math activity would be to see how fast each animal is, and try to run as fast as they do (use a chronometer or your phone timer)
  • Invite your child to learn about Africa, its culture, its history, its geography, its people and everything your child wants to know! Show them on the globe where it is, what bodies of water surround it, where the animals live mostly, etc. you can use some of the books I suggested below for this. Culture immersion is something we teach at our CEFA Early Learning schools.
  • Another excellent activity for dramatic play, creativity, problem-solving, reasoning, literacy, S.T.E.M. and natural sciences is to invite one of the animals to live with you for a day or two. To help your child conceptualize it, try giving them the actual animal they choose to carry around, like a stuffed animal or a figurine of one. You most likely have one of these around the house. Take the animal with you all day long – to breakfast, lunch and dinner (“what does your lion eat?” “how many times does your lion eat each day? Is it as many times as you? Is it less than once a day? Why?”) and in each scenario, figure out what your animal needs (this is where google, an encyclopedia or a book come in to save us!) take the animal to sleep with you (“where does your lion like to sleep? On top of a hill? In a cave? In a pile of grass? Do they get cold? Do they use a blanket like you? Let’s find out!”) and to the bath (“does your lion use a shower? Does he use a bath? How does he get clean? Where does he get clean? Does he brush his teeth? Does he brush his mane? Etc.) – your child will learn about the animal and draw comparisons between a wild animal’s lifestyle and their own. Next time, you can invite a different “animal” for a day and do the same.
  • Draw or paint African animals in their natural habitat for writing and visual arts.

  • Invite your child to add to their notebook, under each animal, pictures of parents and their babies. This fascinates young children. You can also compare sizes (birth to full grown) for an added math Talk about how long babies stay close to their moms, and how long until they are independent. This is a wonderful natural science activity and also teaches empathy. There are plenty of videos online that teach you about the animals and show you real footage, just screen them first to make sure you don’t show your child something they are not ready to see (like a gazelle being ripped apart by a couple of lions.)

With your child, build a safari or a jungle for them to play in or with, in their room. It does not have to be professional, just anything you have around the house or anything you can build or draw to stir their imagination! You can also build it out of lego together! Here’s a set


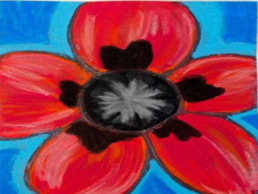
Draw a Poppy with Pastels for Remembrance Day

In honour of Remembrance Day, here is a beautiful visual arts activity we do at our CEFA Early Learning schools.  I also wrote an article on how to help your child contribute on Remembrance Day, which would give this activity a bit more context instead of just being an art project. you can find the article, plus other ideas to try on that day, here.

This activity is excellent for learning visual arts techniques such as how to use pastels, how to blend colours together, how to use mixed mediums and how to cover every space of a page. The colour are also very intense, which leaves you with a beautiful piece – Georgia O’Keeffe would be proud! Please let me know in the comments below if you try it at home and if your child enjoyed it!

Best Ages for This Activity

Three to five

How to Make It

You will need:

Let’s get started!

  • Talk to your child about the significance of Remembrance Day. This article will give you some pointers on the matter.
  • Show them the photos of real poppies (here) and notice the different colours, the petals, etc.
  • Show them the paintings of poppies by Georgia O’Keeffe (here) and study her work. Did she use more than one shade of red when painting them? What other colours? Did she draw the flowers to cover the whole page? Sometimes they were so big that they didn’t even fit on her canvas! What do they think of her paintings? What do they like? What would they change I they were to paint or draw poppies? Etc.
  • Ask them if they would like to try drawing a poppy using pastel colours and glue.
  • Cover your table or working surface with newspaper as the pastels can be a bit messy. Choose a work area that is not carpeted.
  • Set up the material together (paper, pastels, pencil and glue)
  • Begin by drawing a very large poppy on your sheet of paper with your pencil:

  • Trace the outline of the poppy with white glue and let it dry completely before continuing to the next step. To dry it, leave it very flat so the glue does not run.

  • When completely dry, colour the inside of the petals in red, then add a different type of red on top of it to give it depth.

  • Once both colours fully cover each petal, blend them using your fingers. If your child does not like to get their fingers dirty, you can use a q-tip or a blending stick to do it. Most children love this technique of blending colours right on their drawing! Once finished, blow off the drawing to remove the excess pastel on it (you might want to do this outside or above the kitchen sink)
  • Add the rest of the details in black, then grey (blend the grey into the black):

  • Colour the rest of the page in any colour you choose. It can even be black and look beautiful!
  • You can also add in a third red colour and blend, on the petals. Try a dark red!

Learning Opportunities

This activity is a bit more directed than I would like for visual arts, it teaches your child so many techniques to use that it is more than a “craft”. If you’d like, once you finish the drawing, why not leave the pastels accessible to your child and encourage them to draw something else – anything they want! The pastels provide a great opportunity for sensory learning. ask your child how it feels as they are using them, and blending the colours together, for added vocabulary and sensory awareness. Drawing is always an excellent fine motor skill and great precursor to writing as well. Your child will learn math if you focus on the colours used, the intensity of the colours and the pressure applied.
If you discuss Remembrance Day and explore it using the article for help (which was the whole purpose of this activity in the first place), your child will learn the habits of contribution and empathy.

Books Your Child Might Like

Toys Your Child Might Like


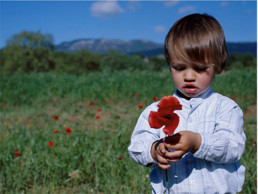
4 Ways to Help your Baby Contribute on Remembrance Day

November 11th every year is Remembrance Day. Your child may ask about this day after seeing people wearing poppies or selling them or seeing you observe two minutes of silence on that day. Yet, many parents feel conflicted about how much to share with their young child when it comes to Remembrance Day. To explain Remembrance Day, they have to explain World War I, and to explain that, they have to explain why there are wars in the world, and how many people and soldiers die because of war, even to this today. This can be overwhelming and confusing to a two-year-old who is just learning to be kind to others. The horror of war and the notion that grown-ups (the people they look up to) fight each-other in wars is not simple to explain to a child, so most parents simply go about wearing their poppies and paying tribute without involving their children.

It is, of course, a parent’s decision how much to share with their child and when, but in my opinion, unless a young child has grown up in a war zone, or has parents or relatives in the military, or other similar circumstances, it is too early to tell a child that grown-ups fight in wars, and that often they die or are severely injured. Our young children are just learning how to solve conflicts peacefully, how to share, how to be kind to one-another, and to see that we, as adults, have not always been able to do that is quite discouraging and sends mixed messages.

Having said that, I created my CEFA Early Learning schools with the belief that children are also citizens, and that from a very young age, they should be encouraged to participate in and to contribute to our world. The more children can be a part of finding solutions to world problems, the more practice they will have, and the more prepared they will be to change the world as adults. I think there is a way to include our children in thanking our troops that is both sensitive and developmentally appropriate. Here is what I recommend:

Explain to your child that “Soldiers are like police officers, but instead of protecting our cities, they protect our entire country, and sometimes other countries too. For example, when there are natural disasters, like hurricanes, or tsunamis, or earthquakes, or very large fires, our soldiers are the ones who rescue the people and help prevent more damage. Some soldiers go by ship, or even submarines, some go by helicopters or planes, some by trucks or tanks. They train very hard at military school to become really strong and also really good at fixing things and operating complex machines. They have to exercise everyday sometimes for many hours to be that strong, so they are prepared in case of emergencies. They are ready for disaster and humanitarian relief. Sometimes, while they are helping, they get burned, or get badly injured, and lose a leg, or an arm, or sometimes both. This makes it difficult for them to continue being soldiers (for example, they can’t run without their legs, or they can’t lift things without their arms) and they have to retire. They become veterans. On November 11th every year, at 11am, we observe two minutes of silence to thank those soldiers who have risked their lives to help keep our country safe. Some people also sell poppies that we can wear to show that we thank our soldiers, and the money they collect from selling poppies goes towards helping veterans after they come back injured and can’t work anymore. Would you like to buy a poppy to wear on Remembrance Day? You can also draw your own poppies and sell them, and I can help you send the money to our veterans.”

It is a little simplistic as an explanation, but it is one way to introduce very young children to Remembrance Day without introducing them to the horrors of war, be it WWI or current conflicts. It also explains the concept of people wearing poppies to raise funds and gives them an opportunity to participate in this activity. Plus, it means they can honour our veterans and understand what events taking place on November 11th are for. This gives them a much clearer picture of Remembrance Day.

Remembrance Day is observed on the 11th day of the 11th month (November) at the 11th hour. At that time, we pause for two minutes to remember all the brave soldiers who risk their lives to keep us safe.

Now is the part I find most important – teaching your young child to contribute, to be part of a solution, to help others. On this day, there are a few things you can do: 

1. Buy a Poppy, Wear a Poppy or Sell a Poppy
Poppies are worn on this day because a Canadian soldier, many years ago, after a great disaster (we know it is after World War One but are not talking to our children about war just yet) saw a field full of poppies, and felt that it was a symbol of hope, and of the beauty of our world. He wrote a poem about it called in Flanders Fields. Since that day, people make poppies to sell to support our veterans, and also wear them on their Left side (close to their heart) to show that they will always remember the effort that our soldiers make in order to keep us safe, and that they appreciate it.

Here are three things you can do:

  • Invite your child to earn some money to buy a poppy to wear, knowing that the money they donate goes towards helping our soldiers.
  • Invite your child to wear the poppy they purchased, and talk about the meaning of wearing it.
  • Invite your child to make a poppy to sell and help them send the money they collect from the sale to the troops (or drop it in one of the receptacles for donations they have where they sell them. Here is a template you can use.

2. Invite your Child to Participate in the Peace Crane Project

I believe every child, even the little ones, can a part in changing the world and ensuring it is a peaceful place to live for everyone. I know your child is ready to make a difference! Invite them to participate in the Peace Crane Project. This initiative every child on the planet to fold an origami crane (some might need a little help with the folding), write a message of peace on its wings, then exchange it with another student somewhere in the world. The Project builds friendships, strengthens hand-eye coordination and writing skills, teaches geography, exposes students to new languages and cultures, and empowers children to make a difference in their community, country, and world. It is free and its website also offers many interesting resources you can adapt for your young child. You can join here.

3. Send a Letter or Thank-you Card to our Troops
Your child can write a letter or send a drawing to our Canadian soldiers or veterans to express their thanks for their service, and send it using this website.

4. Talk about Peace and What it Means
This is an amazing discussion you can have with your child and will build in your child the habit of contribution. Practice looking inward to see what they can give of themselves to others in order to achieve peace. It will also foster empathy in your child. There are some books you can read together on the subject, to get you started. As you read, discuss the book and find examples your child can relate to from their everyday life.

Here is one of the books read by its author:


And here are a few more books:

When your child is older, here are some books you can read to them about Remembrance Day and war, but there is time for that, let’s preserve their innocence for a little while longer.

I hope your family has an opportunity to get involved and make a difference!
As an Amazon Associate I earn from qualifying purchases


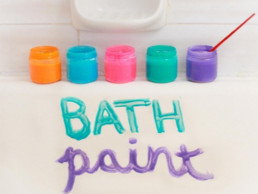
How to Make Safe Bathtub and Body Paint

I wish I had this recipe when I was little, it would have been so much fun to try! My boys loved playing with paint in the bathtub, as well as painting themselves!

This is a great recipe for bathtub paint, we have used it at our CEFA Early Learning schools to cover ourselves in paint more than once! It is easy to make and easy to wash off and will not stain, so don’t be afraid to give it a try at home. Imagine the fun your child can have while you sit near the bathtub and enjoy a hot cup of coffee.

Best Ages for This Activity

One to five years (they may not want to give it up even when they are five, so you may be making more batches over the years)

How to Make It

You Will Need

  • 1 cup of dish soap (make sure your child does not react to the soap you choose as it will be all over their body. If not, use ¼ cup child safe shampoo and ¾ cups child safe conditioner instead)
  • ½ cup of cornstarch
  • ½ cup of water
  • Food colouring or other dye
  • Containers to store the paint in once you make it
  • A paintbrush (optional, they can use their hands, feet, fingers or any part of their body they choose)
  • A saucepan (to cook the paint in)
  • A whisk

Let’s get Started

  • Invite your child to make bathtub paint with you
  • Your child can pour the ½ cup water and the ½ cup cornstarch in a saucepan and mix very well using a whisk or whatever you like, until there are no clumps.
  • Take the pan and heat the mixture on medium heat until it boils. Stir constantly to make sure there are no clumps.
  • Add the soap and mix, still keeping the heat on medium, until it boils again. Remove from the stove and divide into containers (as many containers as you want colours).
  • Your child can carefully mix a few drops of food colouring in each container until they like the intensity of the colour obtained (after they stir it in).
  • If you don’t want to use food colouring, you can also use non-toxic tempera paint or any other water-based paint.
  • After playing, you can stir the rest of the paint (if you have any left) in an airtight container. It will separate when stored but you can mix it again and it will be good as new.
  • Test on a little part of your tub to make sure the food colouring you use does not stain, and then get your child in the bath to paint anything from tiles to tub to body with their new creation.
  • In the future, you can make batches of different intensities of blue or yellow for example, instead of several colours – you can try so many things!

Learning Opportunities

Making the paint is a great S.T.E.M. activity, teaching your child science and math. Ensure that your child does most of the work, such as measuring, mixing, pouring, and everything in between (except the parts over the stove or around a hot container), so they really learn those S.T.E.M. concepts hands-on. Use as much math vocabulary as you can, such as:

  • How much, how little
  • Measurements words
  • Intensity
  • Counting (drops, for instance)
  • Colours
  • Etc.

Once the paint is done, it is a nice visual arts and sensory learning activity for your child.

The purpose of visual arts is to invite your child to express themselves, to bring the inside, out, as I like to teach our CEFA Early Learning school Teachers. Your child will discover themselves, the beauty they are capable of expressing through art, and that is an amazing thing to witness – enjoy every moment of it!

Books Your Child Might Like

Toys Your Child Might Like


As an Amazon Associate I earn from qualifying purchases


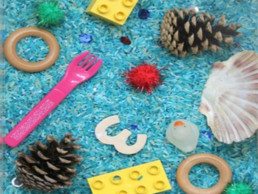
I Spy Pairs Sensory Math Bin

Sensory exploration is essential for young children, as they learn through their senses. I explain why in this article.This activity also teaches your child reading (visual perception) and math (matching and pairing). At our CEFA Early Learning schools, we use it with our one and two year old children and they love it. It is a really simple activity that you can make more or less complex depending on the level of your child. Try it and let me know how it goes in the comments below!

Best Ages for This Activity

One to three

How to Make It

What you will need

  • A sensory bin. Use anything you might already have at home. I like the ones with lids because they are easy to store and put away when you need (under the bed is the perfect place). We use these bins for so many different sensory activities in the classrooms. If you do not have something to use around the house, you can purchase one here.
  • 2 kilos of rice (enough to cover the bottom of the sensory bin, and to hide objects in). you can save the rice and use it for many other sensory bins we will explore in the future. It lasts at least a year.
  • Eight or more pairs of identical objects. You can find these around the house. They can be, for example, two acorns, two identical pieces of lego or duplo, two macaroni noodles, two crayons (same colour), two pompoms, two marbles, two identical buttons, two feathers from a duster (they look exactly the same), two identical spoons, etc.. Make the items unique and interesting, for the delight of your child. This will provide an added sensory learning element.

Let’s get Started

  • Prepare by adding the rice and the objects to your sensory bin and placing the bin on the floor or a low table that makes it easy for your child to access.
  • I also like to provide white bowls or plates (from my kitchen) so that children can put the objects they find in them. It is a more visual way for them to separate the pairs (the math concept they are trying to learn) than by just simply setting it on the floor or table next to the other objects they find. This is optional, but it helps.
  • Invite your child to play an “I spy” game. You can demonstrate by running your hands through the rice inside the sensory bin and looking at the objects that are hidden in there. Find one and say, for instance, “I spy a small white button” – be descriptive. You could say just button, but the words small and white are all attributes (they let you know more about the object) and attributes are very important for your child to learn, as they are the foundation for sorting, comparing, matching, and many, many more math skills your child is trying to master. The richer your vocabulary, the better. Having said that, if your child is having difficulty, keep it simple for this game and focus on the object (“I spy one button”).
  • Pick up the button and place it in one of the white bowls (make sure the bowls are white or at least a plain colour, no patterns to distract from the object inside them.) then say “I wonder if we can find one more button… do you see one?” to engage your child to search for another button in the sensory bin.
  • Once you find the matching button, you can say “we found another button! Yay! – do you want to put this button with its friend?” put it in the bowl with the other button you found earlier: “one button, two buttons! They match! Now we have a pair of buttons! Let’s see what else we can find hidden in the rice…”.
  • Repeat the entire process but this time, your child can be the one to say “I spy” then find an object, place it in the bowl, etc. If your baby is very young, try to slow it down instead of taking over.
  • Important note: If your baby does not want to find pairs but instead, wants to just look at the objects in the bin and play with them, bury them in the rice, discovering them again, that is also perfect! It means they are learning about the objects using their senses and enjoying their sensory bin. You can leave the sensory bin with the objects inside for them to explore for a few days, then try playing the “I spy” game again, once they’ve had a chance to play with it. You can also explore each object with them as they pick them up from the bin, which will further their vocabulary, sensory learning and mathematical knowledge about attributes. For example, you can say “how does the feather feel when you touch it?” or “look how small this little pompom is” etc.
  • Stay close and supervise as some of the objects can be a choking hazard.

Learning Opportunities

With this activity, children learn S.T.E.M., particularly math. They also enrich their sensory learning, language and vocabulary, math language and visual perception - all important for literacy and reading and math. Playing with the rice and the objects in the bin also will give them a chance for free play, creativity, dramatic play, calm and focus.

Encourage your child to describe how each object feels to the touch, how heavy or light they are compared to one another, and just chat in general, for added vocabulary and sensory awareness

CEFA tip: Supervise at all times!

Books Your Child Might Like

Toys Your Child Might Like


As an Amazon Associate I earn from qualifying purchases


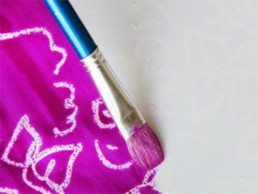
Pastel Resist Art (Magical Drawing)

There is nothing more irresistible than working on a wax resist art piece! Our students love it at our CEFA Early Learning schools and can spend hours working on one.

It is very inexpensive to make and there are many variations of it so your child will never tire of it. Plus, there is an element of magic and surprise to it, that is sure to fascinate your little one, at the same time teaching them S.T.E.M., writing and art. Give it a try and let me know how it goes!

Best Ages for This Activity

One to five

How to Make It

Ingredients

Let’s get Started!

  • Arrange all materials neatly on the table to make it inviting for your child.
  • Invite them to make a magical drawing. Explain that at first, they will hardly see what they draw on the paper, but then, as they paint over their work, their drawing will magically appear!
  • Depending on the child, choose the colours to use. If you draw with a white pastel or crayon on a white piece of paper, your child will not see the drawing until it is complete. If you use a different colour (or several), the drawing will be visible at all times but it will still be beautiful and exciting to see that even if they paint over their drawing with the watercolours, the drawing will still appear (meaning it will not be covered by the paint).
  • Take your time with the drawing. They can choose to do an abstract piece or draw whatever they like. They can also choose to use only lines, or they can choose to fill them in (colouring them)
  • Once the drawing is complete, show your child the magic trick: if you paint over the drawing with the watercolour, their drawing will appear! Your child can choose to paint the entire sheet in one colour or use several colours to do so.
  • Voilà, your masterpiece is complete!
  • Look below to try this activity in different ways.
  • Together, find out why the paint did not paint over the pastel lines for an added S.T.E.M. component. Also explore what happens if you draw firmly with the pastel as opposed to softly:

Learning Opportunities

This is a great way to add an element of surprise or magic to a visual arts activity. Drawing will also provide practice in drawing and fine motor skills, both important for learning to write. If your child is very young and just learning about colours, it will teach them S.T.E.M. and math vocabulary (learning about the different colours, about pressure, about the reaction between oil or wax and water, about spatial awareness and other scientific and mathematical concepts). It is also a great activity for your child to express themselves (creativity) as well as to focus and to practice mindfulness, both of which are important life skills.

Make sure you use as much math vocabulary as you can (for example, compare using different pressures while drawing, measure the intensity and thickness of the lines as well as the paint.

Extended Learning Opportunities

  • Try the activity again using more colours (vary the pastels as well as the watercolours) like the examples below:

  • Try drawing the sea life in the ocean:

  • This winter, try the activity for drawing snowflakes:

  • Try drawing fireworks, then paint a night sky over them with your watercolours:

  • Try drawing concentric circles in the style of Kandinsky:

  • Try using this technique to paint like Van Gogh:

  • Make it into a fun writing activity by being spies and writing secret messages to each-other:

  • Try more elaborate drawings:

  • Try using fine sandpaper instead of paper to draw, to get a really vivid contrast:

Books Your Child Might Like

Toys Your Child Might Like


As an Amazon Associate I earn from qualifying purchases


Toys I Recommend for 4 Year Olds

By the time your child is four, their physical, cognitive and emotional skills will have improved dramatically. They can dribble a ball, run, jump, and also write, lace beads, color inside the lines, and do a variety of activities that were difficult just one year before! They like toys that engage them in content, toys that are social, toys that help them express their creativity as well as toys that challenge them to innovate. They are capable of critical thinking and working on making close friends. At four, your child is delightful to be around (at any age, really), and quite independent already.

Here are some toys grouped by learning outcomes:


As an Amazon Associate I earn from qualifying purchases