Children learn through their senses and this activity is perfect for sensory play and exploration. Plus, if your child makes the slime, it is a great S.T.E.M. activity, especially for learning math and science! If you are already carving pumpkins for Halloween, why not use the insides to make this easy activity?
I especially recommend this activity for you to try at home this year since our CEFA Early Learning schools are not making any slime or other sensory recipes that your child can sink their hands into, due to COVID-19 (it is hard for children to not want to share). This is easy to make (you can do it in less than five minutes), rich in learning and will last you at least until Halloween!
Best Ages for This Activity
One to five
How to Make It
Ingredients
- A pumpkin (a smaller one is fine)
- ½ cup water
- ¼ cup liquid starch
- ½ cup clear washable school glue – Elmer’s glue works better than other glues.
- A measuring cup
- A washable bowl or container (glass is best as we will be mixing glue)
- A pumpkin carving kit (you can also get these at the dollar store. Or if you don’t plan to carve your pumpkin for Halloween, just a spoon and knife is fine.)
Let’s get Started!
- Invite your child to use the guts of the pumpkin to make pumpkin slime (or pumpkin guts J)
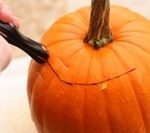
- Cut the top off your pumpkin (you will need to help with this step, for your child’s safety)
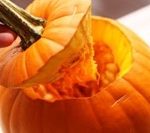
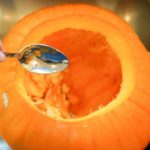
- Using their hands, or the pumpkin carving tool, or even just a spoon, your child can scrape the insides of the pumpkin, taking out all the inside (seeds, fibre, etc.)
- Invite your child to measure ¼ cup of liquid starch, then pour it into the pumpkin.
- In a bowl, mix ½ cup of glue with ½ cup warm or room temperature water until it is well mixed. Pour it into the pumpkin also.
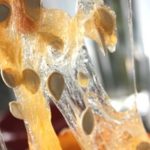
- Measure 1 cup of the pumpkin “guts” (strings and seeds) and pour back into the pumpkin.
- Invite your child to mix everything very well, using their hands. This is a fun sensory activity and a chance for your child to experience how the substances change as they mix together.
- Once you have a uniform mixture, invite your child to knead the slime. You can do this inside the pumpkin or take it out and knead it on a table. Kneading it will improve its consistency. You can simply pick it up with your hands. For best results, try adding a few drops of the liquid starch onto your hands before picking it up. Not too much, or else your slime will become stiff instead of stretchy. This is what it will look like after just a few minutes of handling it:
- Enjoy playing with the slime! Ask your child how it feels on their hands, how it smells, what the texture reminds them of, etc. (this will work on their vocabulary). Ask your child if the slime feels like a liquid or a solid to them (if they are young, give them examples, like this: “does the slime feel liquid like water, or solid like this elastic band?). Is it more or less liquid than the glue? You can share with your child that slime is not quite a liquid, but it is not quite a solid either – it is called a “non-Newtonian fluid” because it is a little bit of both.
- Try counting how many seeds are in the slime (math), what colour it is, how long they can stretch it for, etc. – these are all math concepts to explore. You can even use a measuring tape or a ruler to measure how far you can stretch the slime!
- Talk about where the pumpkins came from, about how to grow a pumpkin and about where the best place to plant them is (you can use the seeds from those very pumpkins to plant your pumpkins for next fall). This will teach your child about nature, the cycle of life and science.
- To teach life skills, you can roast the rest of the pumpkin seeds (the ones that you did not add to the slime) to eat them later as well.
- Carve the pumpkin after you made the slime if you wish, for an added learning activity. This will teach your child life skills as well as provide a chance for practicing fine motor skills (essential for writing.) It is also a great way for your child to express their creativity!


Learning Opportunities
Children will learn life skills as well as natural science. They will learn S.T.E.M., particularly math and science. If you plant the seeds, they will learn about gardening and about where our food comes from. This will develop an appreciation for food and what it takes to grow it. They will practice fine motor skills by using their wrist and hand movements to mix, cut, scrape, carve, empty and knead. Through play, they will learn new vocabulary as they describe their experience and math vocabulary when measuring and comparing. This improves their literacy and math skills. This is a really good sensory activity as well.
The Science Behind Slime
The glue is a polymer. Polymers are made of long, identical and repeating strands of molecules. These molecules flow past one another, keeping the glue in a liquid state. But, once you add the borate ions (which are contained in the activator you use – in this case, the starch), it starts to connect the long strands of molecules of the glue together. These connected strands start to mix together and get tangled up and even longer and that is why it feels less like a liquid and more like a viscous slime – more rubber-like to the touch and thicker. Slime is a polymer.
Books Your Child Might Like
Toys Your Child Might Like
As an Amazon Associate I earn from qualifying purchases