The S.T.E.M. experiments detailed below can teach your child about physics and engineering. Even babies learn about physics as part of learning about the world around them. For example, a baby throwing different objects on the floor from their bed or their chair, just to see how they fall, is experimenting with physics and learning about gravity. This is one of the S.T.E.M. challenges we present our children with at CEFA Early Learning schools, with great success.
What children will learn is that objects (even inanimate ones) need energy in order to move.
Your child already knows, even innately, that we need energy in order to move. They know, for example, that when you run, you “burn” more energy than when you walk, or that they feel more tired (less energetic) after going up a steep hill than after going downhill. They also know that food (especially good food) gives you energy, and that we sleep when we run out of energy and need to recharge. They understand the concept of energy output even if you have not explained it to them.
These S.T.E.M. challenges will teach your child that a force (in this case, the force of gravity) can give an object (even an inanimate object) energy and make it move.
What is gravity? It is the force that attracts a body toward the center of the earth, or toward any other physical body having mass.
Best Ages for This Activity
Three to five
How to Make It
You Will Need
- 2 identical ramps (you can make these using plywood planks, or thick and firm cardboard)
- 2 identical Lego or Duplo car (or train) bases like the ones found in this set (or something similar). You just need to be able to add bricks to one of them, which is why simple cars or trains won’t work as well. Something like this is perfect:
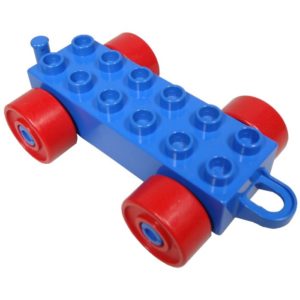
Any Lego or Duplo bricks that can be built on the car bases that you are using. These will also be included in the same set.
- Any measuring tape or long ruler
- Anything to lean the ramps against (it could be large blocks, or a box – anything).
- Painter’s tape or any other non-transparent tape that you can easily remove from the floor.
Let’s Get Started!
Invite your child to play with ramps and cars. If they want to explore the ramps and the cars on their own first, give them time to explore, then come back later to invite them to explore the ramps. After all, the more they play with them (even on their own), the more they learn about ramps, friction, gravity, and how it all works! Once your child is ready to take it one step further, follow the steps below:
Step 1: Does the car move is the ramp is flat?
- Set up the two identical ramps side by side on a flat surface. The surface cannot have any inclination or be uneven, or else the cars will move when put down. Try a non-carpeted area like the kitchen floor. Make sure the ramps are identical in every way: same length and same material. Observe with your child that the two ramps are exactly the same.
- Take 2 identical Lego car or train bases. Make sure they are identical in every way: same size, same length, same wheels, etc. Observe with your child that the two cars are exactly the same.
- Without pushing the cars, place one car on each ramp. If the surface is flat, the cars won’t move.
- Wonder with your child (this is the S.T.E.M. learning part):
-
- Why don’t the cars move?
- Why don’t the wheels of the car roll on their own?
- What can we do to make them move? (your child will probably suggest pushing the cars by hand)
- Is there any other way we can make the cars move without touching them?
- Help your child figure out, on their own and in their own words, that the cars won’t move on their own because they have no energy or force to make them move. If your child seems to understand why the cars are not moving (even if they can’t put it into words) move on to Step 2.
Step 2: Does the car move if the ramp is not flat?
- Without moving anything else, encourage your child to lift one of the ramps from the end where the car is and with the car still on it. They will notice that as soon as they lift the ramp even a little bit, the car starts rolling!
- Wonder with your child:
-
- What happened when you lifted the ramp on one side?
- What made the car move?
- Was it the wheels? (if they say yes, then ask):
- Why did the wheels of the other car not move (the one you kept flat)
- Help your child figure out, on their own and in their own words, that the car moved once they angled the ramp because it rolled towards the floor. Help them figure out why it rolled towards the floor. Ask: Where did that energy come from? What made the car roll? They will probably equate the movement of the car to something falling to the floor. You can then discuss gravity and how it works if your child shows an interest to understand more. Otherwise, just the fact that they are reasoning and trying to come up with a hypothesis to explain why the car moved, and tried to test that hypothesis, is learning enough.
- Before moving on to Step 3, keep playing with one of the cars and ramps, while leaving the other one flat. Observe how the car rolls faster down the ramp if you lift the ramp higher (using your hands to lift the ramp). And how it rolls more slowly if you don’t lift the ramp as high. Try to figure out why together.
Step 3: Understanding gravitational potential energy (GPE)
Using the same two ramps, set them both up on an incline this time. The angle of the incline for the two ramps must be exactly the same. This can be done easily if you lean both ramps against the same surface. For example, you can use the same low table, or the same box, to lean the two ramps against, side by side.
- With the same 2 identical Lego car bases, test the ramps again:
- Without pushing the cars down the ramps, let each car roll down the ramp (one in each ramp) and let them stop where they stop.
- It is important that your child release the car at the top of the ramp without pushing it, otherwise the movement of the car will not depend only on the GPE (Gravitational Potential Energy) alone, but also on the force your child employed to push the car. This will not give you valid results because you won’t be able to guarantee that your child used the exact amount of force (energy) for each push. Plus, it won’t make it clear for your child that what actually made the car roll down the ramp was the force of gravity and not their own force.
- This is the S.T.E.M. learning part: Wonder, with your child, asking questions like:
-
- What happened when you placed the car on the ramp this time?
- What made the car move?
- Help your child figure out, on their own and in their own words, that the car moved because the ramp was on an angle, which made it roll towards the floor. Help them figure out why both cars rolled towards the floor. Where did that energy come from? What made them roll? This will probably lead to the same explanations they came up with in Step 2. If they did not fully understand it in step 2, this will give them another opportunity to observe and understand what is happening.
- When the cars stop rolling, place a piece of tape where the car stopped.
- This time, add a math component (measurement) by inviting your child to measure, using the tape measurer, how far the cars went past the ramp. They will measure from the end of each ramp to the end of each piece of tape. Because you used the exact same cars on the exact same ramps, with the exact same inclination, and on the exact same floor surface, both cars should land approximately at the same distance from the ramp. This is important for your child to observe.
- You can try rolling the cars several times (following the same steps above) and observe that the cars will stop more or less where you placed the tape the first time you measured. Your child can begin to predict what will happen and confirm it each time they see the car stop near the same place.
- You are now ready for your S.T.E.M. experiments:
Experiment 1: Varying the height of the ramp and comparing results
- Question to ask: How does the height of the ramp affect the distance the car goes?
- With the same two ramps, set them both up on an incline, but this time, vary the incline of one of the ramps (you can make it higher or lower) without moving the other one, still keeping both ramps side by side as before.
- With the same 2 identical Lego car bases, test the ramps again:
- Without pushing the cars down the ramps, let each car roll down the ramp (one in each ramp) and stop where they stop.
- It is important that your child release the car without pushing, otherwise the movement of the car will not depend only on the GPE (Gravitational Potential Energy) alone, but also on the force your child employed to push the car.
- The car placed on the higher ramp will go further. This will be easy for your child to observe as it will go further than the tape they had placed on the floor when first testing the ramps.
- Your child will be able to compare how much further one car went, compared to the other, as well.
- Wonder, with your child, asking questions like:
-
- What happened when you placed the cars on the ramps this time?
- Why did one of the cars go further than the other?
- Help your child figure out, on their own and in their own words, that the higher ramp gave the car more energy (because more gravitational force was applied to it).
- When both cars stop rolling, place a new piece of tape where the car stopped, and measure which car went further (with the tape measurer).
- The important observation your child will make here is that the higher the ramp, the further the car goes.
- Leaving one of the ramps always in the same position, vary the height of the other one. Try higher, try lower, try even higher, and then even higher than that. Encourage your child to play with the ramps as much as they want, varying their angles.
- Your child can record their observations on paper or keep looking at the tape pieces on the floor to understand the data they collect. They can even write on the piece of tape the number on the tape measurer.
- You can stop here and talk about what you observed, then leave the ramps, cars, tape and measuring tape set up so your child can play on their own and make further observations. Next time, you can try a different variable:
Experiment 2: Varying the weight of the car and comparing results
- Question to ask: how does the weight of the car affect the distance the vehicle goes?
- With the same two ramps, set them both up on an incline. The angle of the incline for the two ramps must be exactly the same. This can be done easily if you lean both ramps against the same surface.
- This time, add five Lego bricks on top of one of the car bases and leave the other base as it was, with no bricks on it.
- Test the cars on the ramps again:
- Without pushing the cars down the ramps, let each car roll down the ramp (one in each ramp) and stop where they stop.
- Once the cars stop, place a piece of tape where each car stopped, then measure the distance they traveled using the measuring tape.
- This is the S.T.E.M. learning part: Wonder, with your child, asking questions like:
-
- What happened when you placed the cars on the ramps this time?
- Why did one of the cars go further than the other?
- Help your child figure out, on their own and in their own words, that even though both ramps were on the same angle, the car that had bricks on top did not go as fast or as far, because it was heavier than the other car.
- The important observation your child will make here is that the lighter the car, the faster and further it will go.
- Leaving both ramps always in the same position, vary the weight of one of the cars by adding or subtracting bricks. Keep measuring. Ask your child: What happens if we add only one brick? What happens if we add two? Etc. Encourage your child to play with the ramps as much as they want, varying the weight of their cars with Lego bricks.
- Your child can record their observations on paper or keep looking at the tape pieces on the floor to see the data they are gathering. They can even write on the piece of tape the number on the tape measurer.
- You can stop here and talk about what you observed, then leave the ramps, cars, Lego bricks, tape and measuring tape set up so your child can play on their own and make further observations. Next time, you can try changing a different variable:
Experiment 3: Varying the texture of the ramp and comparing results
- Question to ask: how does the surface texture of the ramp affect the distance the car goes?
- Using the same two ramps, set them both up exactly the same way and on the same incline.
- Make the two cars the same again by removing any of the Lego bricks you may have added to them, and keeping only the car bases.
- Now use a thick scarf to cover the top of one of the ramps. This will make it harder for the car to roll down as it adds friction to a previously smooth surface. Leave the other ramp as it was.
- With the same 2 identical Lego car bases, and the two ramps set up exactly the same but with a different texture, test the ramps again:
- Without pushing the cars down the ramps, let each car roll down the ramp (one in each ramp) and stop where they stop.
- The car placed on the ramp with no texture (no scarf) will go further.
- This is the S.T.E.M. learning part: Wonder, with your child, asking questions like:
-
- What happened when you placed the cars on the ramps this time?
- Why did one of the cars go further than the other?
- Help your child figure out, on their own and in their own words, that the scarf made it harder for the car to roll down. The scarf added friction (a force opposed to that of gravity, slowing down the car). They don’t need to use words like friction if they are not ready. As long as they understand the concept of what is happening.
- When both cars stop rolling, place a new piece of tape where the car stopped, and measure which car went further (with the tape measurer).
- The important observation your child will make here is that the smoother the ramp, the further the car goes.
- Try different textures on the ramp. For example, try wrapping one of the ramps in bubble wrap, then try a t-shirt, sandpaper, mud (if you are brave) or any other material your child wants to try. Leaving one of the ramps always bare (without any added texture), vary the texture of the other one. Try smoother textures, then rougher ones. Encourage your child to play with the ramps as much as they want, varying the texture.
- Your child can record their observations on paper or keep looking at the tape pieces on the floor to see the data.
- You can stop here and talk about what you observed, then leave the ramps, cars, tape, materials you used to create friction, and measuring tape set up so your child can play on their own and make further observations.
You can leave the ramps set up for your child to play with all the new concepts they learned. They will probably try combining the concepts (varying the weight of the car and the surface of the ramp, for example) and once they have tried everything they wanted to try, offer different objects to roll down the ramp and compare. You can try an orange and a golf ball, or a ball and a teddy bear, or anything else your child would like to try. See what rolls and what doesn’t, try to understand why.
Learning Opportunities
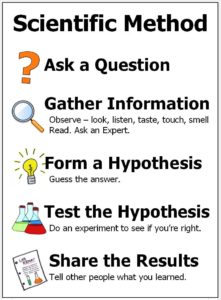
This is a fun S.T.E.M. activity where your child can manipulate the different variables to understand how objects move. They will have plenty of opportunity to experiment with and exercise their engineering skills, use the scientific method, math to measure and compare and use their reasoning skills. It also provides an opportunity to work independently, to focus on an activity and to self-correct, all of which are important social and emotional development skills to learn.
Use as much math language as possible, introducing words like: fast, slow, faster/slower than, heavy, light, heavier/lighter than, high, low, higher/lower than, numbers, distance, centimeters, millimeters, weight, angle, measurement, etc.
Extended Learning Opportunities
Invite your child to take the two car bases (or a ball) with them next time you go for a walk, and find ramps around your neighborhood to try: maybe a street on an incline, or a slide?
CEFA tip: Remember to wait long enough for your child to “figure out” what is happening. They will learn much more and understand it much better than if you rush in to explain the concepts to them. Give sufficient time for them to explore the materials without your involvement after each experiment. Don’t intervene if they use the materials in a different way, or if in the middle of the experiment they feel like doing something else entirely with the ramps or the cars. It is all part of the learning experience. Just come back to the experiment when they are ready.
Books Your Child Might Like
Toys Your Child Might Like
For Infants +
For 1 +
For 2+
For 3+
For 4+