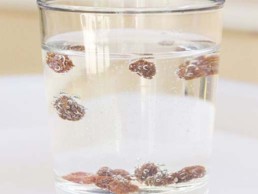
Dancing Raisins Experiment
Parents will love this science experiment because it only needs 2 ingredients, it’s so easy it’s fail-proof, it’s mess-proof and it can be done in a few minutes – what’s not to love? Your child will love it because it’s fun and unexpected – plus you might even let them eat the raisins when they finish.
We do it at CEFA schools, and I have yet to meet a child who didn’t enjoy it. And the raisins can definitely dance – they keep going even after 20 minutes!
Best Ages for This Activity
Two to five, but younger children also love it (who doesn’t love dancing raisins?).
How to Make It
Ingredients
- Any clear soda (enough to fill the glass) – open a new can or bottle as it won’t work if it’s flat.
- A small box of raisins – you only need 10 small ones, separated (if they are stuck together, they will be too heavy)
![]()
Let’s Get Started!
- Invite your child to try a science experiment first by pouring a glass of soda and putting on some music (Ok, you don’t have to put on music but it’s more fun, so why not?)
- Give your child a box of raisins and ask them what they think will happen if they put the raisins in the glass full of soda (try not to put more than five to ten raisins so they can really see what is happening).
- Wait for the answer – this is the best part! Will the raisins:
- Sink to the bottom and stay there?
- Float to the surface?
- Turn back into grapes?
- Explode?
- Shrink?
- Disappear?
- Change colour?
- Start dancing?
- Time to put the raisins in and observe
- Yes! The raisins start dancing!
- Was that one of your hypotheses? If so, congratulations!
- Can your child find the conclusion to this experiment? Why did that happen?
- Did the raisins hear the music and feel the urge to dance?
- Did adding the raisins to the soda cause it to start boiling?
- Were those magic raisins instead of regular raisins?
At first, the raisins drop to the bottom of the glass because they are more dense than the soda, but then, the bubbles of carbon dioxide (gas) from the soda attach to the raisins’ rough surface and lift them up. This is due to an increase in buoyancy (an upward force exerted by a fluid that opposes the weight of a partially or fully immersed object).
Once the bubbles reach the surface, they pop, releasing the gas into the air. Now that they are not as buoyant, they fall back down, but once new bubbles attach to them, they float back up to the surface until those bubbles burst, and on and on it goes until all of the carbon dioxide has escaped, leaving the soda flat, and the raisins left to their own devices.
Just to be sure that the raisins didn’t start dancing because of the music, you might want to try the experiment again, this time with the music off.
Learning Opportunities
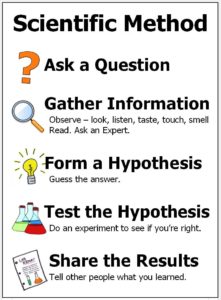
Children will learn S.T.E.M. while trying this science experiment. They will have the opportunity to apply the scientific method, see below.
Extended Learning Opportunities
If you tried making my magical glow in the dark goop before, you will have a black light. Repeat the experiment, this time using tonic water instead of sprite, and doing I under the black light… watch your drink glow in the dark as the raisins begin their dance number!
CEFA tip: Remember to let your child do as much of the process as they are capable of.
Things to Keep in Mind
- Separate the raisins
- Use a fresh can or bottle of soda as it has to have a lot of gas
Books Your Child Might Like

Backyard Picnic
This is an activity we did every couple of weeks at my house, weather permitting, when my children were little – they loved it! Instead of making dinner, I would prepare a picnic and put it in a beautiful picnic basket that still, to this day, is one of my most prized possessions. At dinner time, we would set a picnic blanket outside in our yard and have a picnic as a family. Every week-end in the summer, I would also prepare a picnic, pack a blanket and invite my mom to spend time with us at the park or at the beach, while we enjoyed all of the contents of the picnic basket – from fancy cheeses to fruits to whole baguette loaves and charcuterie. There is something truly magical about a picnic for a child. I remember being 9 years old and packing in the basket of my bike, sandwiches I had prepared, a juice box and a treat, and biking to a nearby park with my friends to enjoy our picnic. Sometimes we each brought our own, sometimes it was a potluck, but there was always sharing involved. I never lost the habit of going for picnics, and even to this day, it is something I do with my family and even as a romantic date.
You don’t have to make it fancy and you don’t have to go very far to make it special. If you’ve never tried it, I encourage you to do so with your children, even if you just have a balcony – you will see how much fun it is! There are so many different picnics to have, as you can vary the food, vary the guests, vary the settings – you could do this every week and never grow tired of it!
Best Ages for This Activity
Any age! It’s an excuse to spend time outside together, so don’t wait until your child is born. Go while expecting, or even before, and never give up the habit.
How to Prepare
What You Will Need
- A picnic basket, backpack or a cooler. Here are some of my favourite baskets, some even come with a blanket included:
- A picnic blanket (or an old tablecloth)
- Sandwiches and drinks (see below for some ideas)
- Disinfecting wipes to clean your hands
What to Do
- Prepare the food for either dinner, brunch or lunch, or even just an afternoon snack. I have selected some ideas, but of course, it can be anything you like! This is more for inspiration that anything else.
- Invite your child (and family) to go for a picnic in your backyard. To the park, to the beach, to your balcony or deck – the point is to set camp outside somewhere instead of at your dinner table. If you have the choice, choose somewhere where your child can be surrounded by nature. The advantage of doing it in your backyard is that you always have time to do it – you don’t have to prepare much, plan, or bring a diaper bag – you’re home.
- Set aside about 30 minutes so you can enjoy your time as a family
- Set your blanket down somewhere under a tree (or wherever you decided to have your picnic).
- Spend time as a family, conversing, enjoying each-other’s company, and relaxing.
Learning Opportunities
This activity seems simple, but it connects your child with nature, and more importantly, with you as a family. It develops a love for spending time in nature in your child, which in itself has a multitude of health benefits. It also teaches them to be in the moment, an essential social and emotional skill. Being present and in the moment with you teaches your child mindfulness. Plus, if you do any of the activities I suggested after your meals you will get some exercise, which is good for your child’s physical development.
Extended Learning Opportunities
- Pack one or two books for each family member so you can read in the sunshine after your picnic. Or read a story (or three) to your child. This will improve your child’s reading and literacy
- Play badminton with your child, to exercise, which is good for your child’s physical development.
- Play frisbee with your child
- Play soccer with your child
- Play baseball or practice catch and throw with your child
- Play a tossing game
- Observe insects in their natural habitat – draw what you see. This will teach our child about nature, and drawing will improve their fine motor skills, good for writing.
- Do a nature scavenger hunt. [HERE LINK TO MY GAME] This will teach your child about nature, and drawing will improve their fine motor skills, good for writing.
- Look at the birds and squirrels on the trees (bring a pair of binoculars to make it more fun) – draw what you see. This will teach your child about nature, and drawing will improve their fine motor skills, good for writing.
- When you get home after your backyard picnic, invite our child to have a teddy bear picnic Either inside or outside. This will be great for dramatic play!
- You can teach your child the song “Teddy Bear Picnic”. If you play the guitar, even better! Here is a video of it if you don’t know it.
- Next time invite your child to make sandwiches and put together a picnic for the whole family. This encourages your child to be independent, learn to cook and think of others. It teaches S.T.E.M., especially math, and science, the habit of contribution and fine motor skills, which leads to writing.
Books You Might Like
Toys I recommend
Below are some educational toys I recommend.
MATH
Age 0 to 1
SHAPE-SORTING
Ages 1 to 2
Ages 2 to 3
Ages 3 to 5
FOR NEWBORN
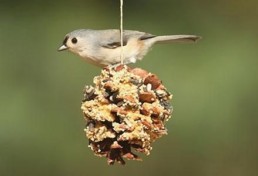
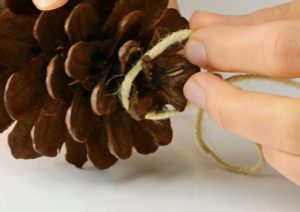
How To Make A Pinecone Bird Feeder
It is important to put a high emphasis on developing a love of nature in children. These pine cone bird feeders are easy to make, inexpensive and perfect for young children. They are also a wonderful way for children to learn what birds eat and to be able to take a closer look at birds when they come feed in your backyard! What an great opportunity to watch nature at work.
These bird feeder are simple to make they only take about 10 minutes. This makes them the perfect activity for little hands.
Best Ages for This Activity
This activity is great for 2 to 5-year-old children.
How to Make It
Supplies
- A pinecone
- You should find plenty of these outside. Otherwise use an ice cream cone. Any cone will work, but the best ones are the larger, broader ones, because they hold more food and are easier for birds to cling to, swaying less as they feed. Do not use anything other than natural pinecones as processed, glittered or sprayed pinecones can be harmful to the birds.
- String or twine – a piece long enough for hanging it from a tree or hook. Yarn or ribbon works too.
- Don’t use dental floss or fishing line as the birds can get entangled in it.
- Peanut butter (It doesn’t matter if it is crunchy or smooth. If peanut butter is not available, suet, lard, vegetable shortening or any other nut butter will do.)
- Birdseed or black oil sunflower seeds. You can also add (not necessary) pieces of nuts or small bits of fruit. This will attract more species of birds. If you don’t want to buy bird seeds, just use nuts, fruit or even just the peanut butter.
- A butter knife or plastic knife for your child to spread the peanut butter on the cone (of course, no one said you couldn’t use your fingers)
- A bowl or Tupperware to put the seeds in (then you will roll the pinecone in it)
Prepare
- Tap the pinecone lightly to remove debris. Trim off any loose scales.
- Tie the string or twine around the feeder. The top of the string can be left open in order to tie it to a branch for hanging.
- Use the knife or spreader to coat the cone with a layer of peanut butter, as thick or thin as your child wishes (ask them what they prefer, what they think the birds would prefer).
- Once the cone is coated with peanut butter, roll it into the bowl with birdseeds. Add larger seeds, nut pieces, or fruit pieces if you wish, pressing them into the peanut butter. The birds will have no trouble removing them.
- If you made too many bird feeders, you can freeze them
- Once you finish, you can hang your birdfeeder anywhere. I would suggest near a window, where your child can see, so they can feel the joy and satisfaction of seeing the birds eating the food they made for them! This is the most important step of all. Find an area in the shade if possible, so the peanut butter doesn’t melt. This feeder can be hung any time of the year, especially during winter, when birds don’t find food as easily.
- Before you know it, your new feeder will be a hotspot for chickadees, titmice, nuthatches, crossbills, woodpeckers, and other birds! Once they finish one cone, you can hang another one. This is one more thing your child can do to take care of nature around them.
Learning Opportunities
Making the bird feeders is a good fine motor skills activity, a precursor to writing. The spreading of the peanut butter, the rolling evenly in the seeds, all are good fine motor movements, as is tying a string to a pinecone as well as to a tree.
Getting close to nature is the most important aspect of this learning activity, so take your time discussing birds and nature with your child. Your child will learn about birds (what they eat, when they eat, where they live, if and when they migrate) and can be a great precursor to learning about wildlife. Teach them to observe the natural world around them, and to contribute to it in a non-invasive, kind, natural way.
Extended Learning Opportunities
- Learn about the birds that live in your area and see if you can spot them. Use a cheap pair of binoculars if you need to. You can learn about Canadian birds here and see what birds you can spot in your backyard.
- Learn about what birds eat and see if that is available in your backyard
- Draw the birds you see
- Take photos and paste to a journal
- Modify the recipe (add fruits or nuts) and see of you attract different birds
- Help your child monitor the bird feeder and see when it’s a good time to switch it for a new one
- See if your neighbourhood has a nature program that you can attend with your child, to learn more about wildlife in your area
- Learn to recognize different bird songs that you can hear from home
- Learn to whistle (to sing like a bird)
- Tell your child a story about your childhood that involved a bird (Mine is when I was three and my grandfather came to visit. We were walking down the street and saw a bird on the ground that was injured. We picked it up and nursed it back to health. I have other stories about birds, but I will never forget that one).
- Ask your child what they think of birds, what they feel when they think of birds, what birds they like, what birds they heard, etc.
- Next time you travel, pay attention to the local birds, and see how they differ from the ones you learned about back home.
- Look for feathers on your next walk, and take them home – start a collection of beautiful feathers and try to find out what bird they might have come from
- Visit an aquarium or zoo near you to see different species of birds
- Talk about flying. Would your child like to know how to fly? Would it feel the same as going on an airplane? A hot air balloon? A helicopter? What other things fly? How do birds fly? How long can they fly for?
- What other things do birds eat?
- What birds can we have as pets? How do they feel about having birds as pets? Would they like to live in a cage?
- Visit a bird sanctuary or rescue centre
- Learn how birds make nests
Things to Keep in Mind
The more of this activity that your child can do independently, the better but please keep in mind that young children need adult supervision at all times.
Books You Might Like

How to Make Ice Cream
This is a fun and easy activity that you can do at home with your little chefs! It is so easy, in fact, that they will barely need your help. We do it at CEFA schools during the summer camps, and it is always one of our students’ favourites. All you need is 5 ingredients and a few Ziploc bags.
Best Ages for This Activity
Two to five, but younger children can also follow along with some help.
How to Make It
Ingredients (for two servings)
- Ice (enough to fill half of a large freezer bag)
- 1 ½ tsp vanilla extract if you want vanilla ice cream. Otherwise use the same quantity of chocolate syrup to make chocolate ice cream.
- 1 tbsp sugar
- 1 cup half and half cream (or one-part cream and one-part whole milk). If you don’t want to use cream, you can make it with only whole milk, although it won’t be as creamy.
- ¼ cup salt (coarse salt is best but any salt is fine)
- Freezer bags, large and small, one of each per child. Use freezer bags of good quality or the salt will mix into the ice cream and you will have to restart.
You Will Also Need
- A pair of gloves (or oven mitts) for each child as the ice is quite cold to the touch, especially once you add the salt to it.
- Ice cream cones (these ones are easy for your child as they can stay standing while they decorate or you can use ice cream bowls)
- Things to decorate the ice cream with. I know that sprinkles are not necessary, but they are magical! I have a drawer full of them at home, as we still to this day bake at least once a week, and it is an absolute pleasure to make things beautiful once they are baked. When I have to choose between practical and magical, I’m afraid I am the kind that always chooses magical. Here are some of my favourites to have at home:
Other tasty toppings you could add are:
- Caramel syrup
- Chocolate syrup
- Fresh berries
- Banana slices
- Pineapple
- Goji berries
- Any fruit
- Grate a small piece of chocolate on top to make chocolate curls (or use chocolate chips)
Let’s Get Started!
- Give your child the small freezer bag
- As you hold the bag, your child can pour the cup of cream, the sugar and the vanilla into the bag.
- Seal the bag tightly and get any excess air out of it then set it aside. If you suspect your child will be quite vigorous with the bag (there’s shaking involved) double-bag it to prevent the salt from getting into the ice cream bag).
- Give your child the large freezer bag
- As you hold the bag, your child can fill half the bag with ice, and pour the salt into it as well.
- Put the small bag with the cream mixture inside the large bag with the ice mixture
- Fill the rest of the large bag with ice
- Seal the large bag while your child puts gloves on and shakes the bag for 7 to 10 minutes (best to use a timer)
- After 6 minutes, remove the small bag and rinse it in very cold water, including (and especially) near the opening, to make sure that all the salt is gone.
- Carefully open the bag of ice cream, and mix with a spoon so it becomes less icy and more creamy
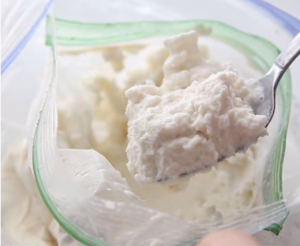
- Pour the mixture into your small containers, cups or cones
- Decorate with fruit, sprinkles, nuts, or anything your child loves. The decorating is just as exciting for them as the making
- Your child can now proudly serve the ice cream they made to the whole family! What a wonderful way to contribute
Learning Opportunities
I love helping children learn to cook because it is a great life skill and an incredible way to contribute, to give of yourself to others, to do something for someone other than yourself, which children both love doing and need to do. Children will of course learn S.T.E.M. while trying this science experiment, including math as there is a lot of measuring (time, ingredients) involved. Shaking a bag vigorously for 10 minutes is also a good physical activity, a great arms workout, especially for little arms!
Questions you can ask your child during the experiment are:
- What do you think happens to the cream once we make it cold by shaking it inside an ice bag?
- How can salt make the ice colder?
I also love that this activity needs a lot of parental help (especially holding bags with liquid), so you get a good 20 minutes with your child, where you can share life stories, ask them about them, their plans, and get closer. You can ask, for example:
- Who are you preparing ice cream scoops for?
- What is your favourite flavour? What is theirs?
- How will you decorate it? With sprinkles? With fruit? With gummy bears? (encourage them to be creative!)
- Do you remember a time when we had ice cream as a family? What did you like about it? (you can also share your favourite ice cream family time from when you were a child)
- Who else likes ice cream? (Grandma? Uncle? Friends from school?)
By doing this experiment mostly on their own, children can form many hypotheses of what will happen, why it will happen, what will happen next, etc. This is how they learn science. As they are following all the steps, they are learning sequencing, which is great for reading as well as math. Sealing the bags tightly, as well as scooping the ice and the ingredients, pouring the liquids, mixing, and all those actions are amazing for fine motor skills, which are essential for writing. Distributing the ice cream equally amongst all family members is also 1 to 1 correspondence – a math concept. It also works on the math concepts of estimating quantities, measuring, division, and many others.
Extended Learning Opportunities
Dramatic Arts: set up an ice cream truck, store or stand (you can make it out of cardboard if you wish, and paint it with your child)
Make ice cream out of play dough and decorate it, serve it, play pretend! (good for writing, math and dramatic play)
CEFA tip: Remember to let your child do as much of the process as they are capable of.
Things to Keep in Mind
- You may have to take turns to shake the bag, as it gets quite cold. You can also try putting the bag with cream into a Tupperware with ice instead of a large freezer bag, but it may not be as effective.
Toys Your Child Might Like
Books Your Child Might Like

Leak-Proof Bag Experiment
This is one of my favourite experiments. I chose it because it is a great S.T.E.M. game and it is also one we can all do at home, since all you need is a plastic Ziploc bag, a few pencils and some water. It is so fun to watch the children’s reaction when they pierce the bag with the pencil, expecting all the water inside to come pouring out, and instead finding that not a drop spills out! How can that happen, you ask? Polymer chains work together to prevent water from leaking out of the bag.
Best Ages for This Activity
This activity is great for three to five-year-old children (or older).
How to Make It
Ingredients
- Water
- A few pencils – three or four are fine, but you can do more if you wish, or you can try with just one if that is all you have.
- A pencil sharpener
- A medium Ziploc bag or use any containers with tight lids you have around the house
- Uncooked pasta noodles of any shape and size
- Packets of Kool-Aid
Let’s Get Started!
- Find a workspace where children expect a giant mess (outside on the grass, or above the kitchen sink, or in your bathtub)
- Sharpen your pencils very well (of course, this is something your child can do). Make sure all the pencils are sharpened to a point or it won’t work.
- Fill the bag with water and seal it closed (1/2 the bag should be full of water when closed. No need to fill to the top).
- Invite your child to form a hypothesis by saying: “I wonder what will happen if we pierce the bag with this pencil” – you can write down their hypothesis (for example, the water will pour out of the bag, or whatever they think will happen)
- Here comes the fun part: while you (or your child) hold the bag up by the top, your child can slowly pierce a pencil through one side of the bag and halfway out the other side (like in the picture). You can ask “What happened?”
- Much to your child’s amazement, you will see that the pencil can go right through without leaking a drop of water!
- What actually happened, though? How is it possible? The long chains of molecules that make up the bag (they are called polymer chains) actually seal back around the pencil and prevent water from leaking out. Magical! – see below for a more elaborate explanation.
- Now try putting another pencil through, and another! You can put lots of pencils through.
Learning Opportunities
Children will learn S.T.E.M. while trying this science experiment. Questions you can ask your child during the experiment are:
- How is it possible for the water to stay in the bag after we pierced the bag with a pencil?
- Why is the water not leaking out?
- What happens if we take the pencil out? (save this one for last as this will be the end of your experiment – bye-bye water)
Here is what actually makes this possible:
The Ziploc bag you used, like many plastic bags, was most likely made out of a polymer called low-density polyethylene, which is very flexible. When you push a (sharp) pencil through, these long, flexible polymer chains (strands) get pushed apart by the pencil, but don’t break. Instead, they re-seal around the pencil.
By doing this experiment mostly on their own, children can form many hypothesis of what will happen, why it will happen, what will happen next, etc. This is how they learn science. As they are following all the steps, they are learning sequencing, which is great for reading as well as math.
CEFA tip: Remember to let your child do as much of the process as they are capable of.
Things to Keep in Mind
- Make sure you are doing this experiment outside or over a sink, as the water may spill! Also keep in mind that the pencils are sharp, and your child needs to be supervised.
Extended Learning Opportunities
Try with different types of bags (for example, grocery bags, or very thick produce bags) and follow the same scientific process:
- Hypothesis
- Test
- Conclusion
Now try different types of pencils (some are perfectly round while some have edges). Which pencil works best?
Books Your Child Might Like
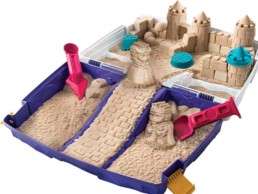
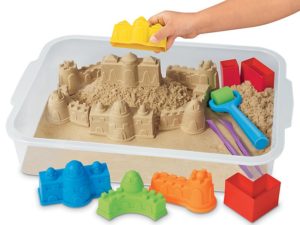
How To Make Kinetic Sand
Have you ever tried kinetic sand? I used it all the time with my children when they were younger. It is an amazingly satisfying sensory experience. Kinetic sand can be molded more easily and makes much less of a mess than real sand (bonus). It also does not dry or stick to surfaces, which makes it perfect for indoor use. All it takes is a few simple ingredients to make. The recipe I am sharing with you was developed as a soothing tool for children with special needs.
Best Ages for This Activity
This activity is great for 1 to 5-year-old children (in fact, it feels so good to play with kinetic sand that I won’t be surprised if the adults in your household can’t help playing with it too!)
How to Make It
Supplies
- 5 cups of play sand – you can use any kind of sand as long as it is sanitary for your child to play with. The one you purchase can be coloured too!
- 1 cup + 3 tablespoons of corn starch (you can substitute flour for cornstarch if you’d like)
- ½ teaspoon of dish washing soap
- 1 cup of water
- 2 large bowls for mixing
Optional Supplies
- Any airtight container for storage (or a large freezer Ziploc bag)
- You can also add a teaspoon of essential oil to make it scented and even more soothing!
Prepare
- Pour the sand in a large bowl (if you don’t use purchased play sand, which we recommend, make sure the sand you use is completely dry)
- Mix in the cornstarch, in the same bowl
- In a separate bowl, mix the water with the dish soap
- Add the soap mixture to the sand mixture and combine thoroughly
- Voilà! Your sand is ready for play
Store
Store kinetic sand in an airtight container to keep its consistency. If you feel it is getting too dry, you can add a few drops of water and mix well. If you sand starts to smell, throw it out and make a fresh batch.
Learning Opportunities
Kinetic sand is used for children with special needs, as it develops their sensory awareness, and has a calming effect. It is wonderful for babies for the same reason – it is ideal for sensory play as well as fine motor skills, which are both critical for writing. As its name implies, thanks to the addition of a polymer, regular play sand develops properties of motion (becoming kinetic). Your child will experience, through playing with kinetic sand, how force affects motion (engineering). Making the sand is excellent for math (measuring, quantities, mass) and science (by seeing how the different ingredients interact with each-other). Kinetic sand is a wonderful S.T.E.M. activity!
Children and adults alike will like the calming effects of manipulating the sand through their fingers and experience its calming effects. This type of play helps regulate emotions and encourages mindfulness. It also provides a great activity for children to play on their own.
Extended Learning Opportunities
- You can add cookie cutters and other kitchen molds and utensils to the sand, to further fine motor skills learning.

- Have a pretend “day at the beach”. Put on your swimsuits, sunglasses, set up a large Tupperware by a sunny window, bring all your sand toys and build sandcastles! (dramatic play and writing)

- Further play by making and storing different colours of sand. Try mixing the colours to see what happens (science and math)

- Add trucks for a construction site! (dramatic play)
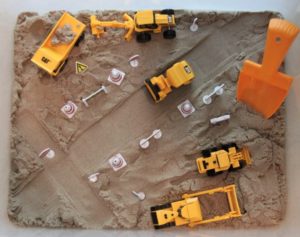
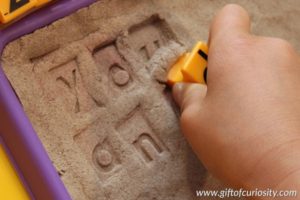
- Further play by adding toys your child can stamp with (science and writing). You can also stamp animals or dinosaurs for dramatic play using rubber stamps (see toys suggested below for ideas).

- Practice writing words with letter stamps (writing)
Things to Keep in Mind
Please keep in mind that young children need adult supervision at all times. Sand is better in the sandbox and not in the mouth.
Books and Toys You Might Like
Click the images below to purchase these products.
Books for babies to 2-year old’s
Books for 2 to 5-year old’s


Toys for 2 to 5-year old’s


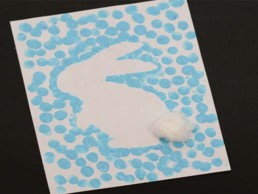
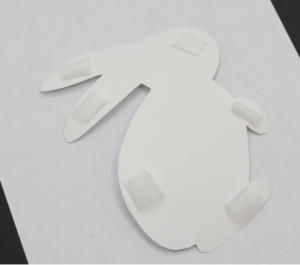
Bunny Finger Painting
Painting is such great fun for children, and an essential activity for the early years. Finger painting is wonderful for the young, as it feels good, is easier than having to handle a paintbrush, and is a good sensory activity.
When I was young, I loved doing crafts, and I find many children do, but their main benefit as far as learning is writing, because it works with fine motor skills, scissor skills, and other skills we practice during writing.
Try doing this activity outside for a little fresh air!
Best Ages for This Activity
This activity is great for 1 to 3-year-old children, but feel free to try if your child would enjoy it, regardless of their age.
How to Make It
Supplies
- White paper
- Washable paint Washable paint or Finger paint
- The silhouette of a rabbit, or “bunny” which you can download here
- A paper plate or other washable container to put some paint in
- Tape to hold the bunny silhouette in place
- Scissors for your child (or you if your child is too little) to cut the bunny silhouette for them
Optional Supplies
- A printer – you can always draw and cut out your own bunny silhouette, bypassing the need for a printer
- One cotton ball for the tail
- Glue to glue the cotton tail
Prepare
- Make sure your child is in clothes you can wash the paint off
- Print or draw the bunny silhouette from the template provided above
- Cut around the silhouette
- Tape the bunny silhouette to the centre of a sheet of paper
- Place the sheet of paper on a wipeable surface (a table is fine)
- Put some paint on a paper plate or container your child can dip their fingers in
- Describe the activity to your child
- Have fun!
- Once your child puts their fingerprints all over the sheet, let it dry and carefully remove the taped-on bunny silhouette so you are left with your final painting.
Learning Opportunities
Children will learn to use finger paint and make an art piece with it. They will feel the paint on the tip of their fingers, a nice sensory activity. They will also use their fine motor skills by cutting and by making fingerprints of the same proportion. Fine motor skills are critical for writing. They will learn about math by trying to space out their fingerprints evenly, and by making “circles” with their fingers.
Extended Learning Opportunities
- Learn about rabbits with your child
- Visit a farm or petting zoo to see where and how rabbits live, feed them, and learn more about them, hands-on
- Watch a child-friendly video to learn more about rabbits, like this one
- Learn how to draw a rabbit (or several) with your child. I prepared a document you can access here, with different styles of drawing rabbits (including some classics) where you and your child can discuss the different styles they like, the details, the paintings versus drawings, and so much more – enriching your child’s vocabulary while learning about drawing and illustration. This exercise is an immense opportunity to discuss, elaborate, exchange ideas, thus enriching your child’s vocabulary.
- Make a book of rabbits with your child: use a beautiful but inexpensive notebook with blank pages like this one
- Help your child write the title (or write it for them if they are too young), draw a photo and write their names as authors of the book (ex: Bunnies by Emily Jones). Inside, you can paste photos of rabbits cut out from magazines (I prepared a document you can access here with some photos I found myself that you can print and cut out). You can also have your child’s drawings of bunnies, a photo of the finger painting, and of your child working on the painting, and you can also help your child write the things they learned about rabbits, or the things they want to remember.
- Once the book is done, display it proudly in your child’s library. Your child just wrote their first book! Watch as your child picks up their book time and again, and relives all the learning you did together, adding as they go along. According to the Reggio Emilia early learning philosophy, documentation is an essential step in your child’s learning, and by helping your child document what they learned in this book, you did exactly that.
Things to Keep in Mind
Please keep in mind that young children need adult supervision at all times. Although you can use non-toxic paint, it is still best not to ingest.
Books You Might Like
Click the images below to see where you can buy these products.
Books for babies to 3-year old’s

Books for 2 to 5-year old’s


Books for 3 to 5-year old’s


Toys for Any Age


Toys for 0 – 18 months old


Toys for 1 to 3-year old’s
Toys for 3 to 5-year old’s
Toys for 4-year old’s and older


5 Tips to help your baby learn at home
Even when spending the whole day with your child at home, hours seem short and finding the time to help your child learn new things can sometimes be tricky.
The good news is, young children are constantly learning from their environment, whether we facilitate it or not. We don’t consider many of our daily tasks learning experiences, but they are some of the richest in content for your child. The trick, however, is to know when to involve your child, or what types of activities are the ones that will make a difference in your child’s development. If you find that your child is mainly watching you go through your chores all day, it’s time to plan your day a little better.
Here are 5 tips to help your baby learn at home:
1. Re-Organize Your Home
Your home environment should be accessible to your child, so they can do most things independently. For example, they can choose their own clothes and get dressed, help themselves to a drink of water or to a healthy snack, go to the bathroom, wash their hands, and find things to play with and learn from. Organize your fridge and your kitchen cupboards in a way that fosters independence. Open cupboard doors (just make sure you remove anything sharp, dangerous, or poisonous from the shelves and drawers your child has access to). Do the same in their bedroom so they don’t need your help every time they want to do something. As your baby becomes comfortable around the house, teach them to put things back where they belong (this will teach them essential math skills), and encourage them to gradually take more responsibility. This will not happen overnight. You can start by making a few things accessible and teaching your baby how to use them and how to put them away, then gradually increase the number of cupboards and drawers your child can access responsibly.
2. Take Longer at The Grocery Store
Ask any parent if they like going to the grocery store with a young child and they will most likely tell you it is their least favourite things to do. The grocery store, however, is a place of enchantment for children, just as long as they are not hungry, tired or hurried. Set aside plenty of time to go so your child can help you choose fruits and vegetables, weigh them, bag them, and feel included in the process, nor rushed along. Ask your child’s opinion (Should we take apples this week or grapes? Which ones do you think your brother would like best?). Introduce them to new smells, flavours, textures, colours, names and sounds. Compare items, count them together, weigh them with your hands or with a scale if you find one, and discuss what is good to eat and what might not be so good. You don’t have to go through every isle in the same fashion, pick a new one every time. This time visit the fruits, next time look at cereals instead. Your child will most likely ask you for things you don’t necessarily want to buy. Encourage independence and control by giving the responsibility of choosing to your child. You can give your child a small amount of money and ask them to choose one thing to buy for themselves, or simply tell them you have just enough money for one thing that is not already on your list. Little by little, your child will begin forming these concepts and understanding what is essential to buy and what is “extra”. In the meantime, your child will learn an incredible amount of vocabulary. Your child will also learn about health, nutrition, budgeting, social interaction, culture, and even contribution, by simply saying “yes” to the $1 contribution your teller asks for on behalf of Children’s Hospitals, or choosing one item from your bags to add to the food bank.
3. Enlist Your Child’s Help with Laundry
Laundry is an exciting activity for children, and one that is brimmed with learning opportunities in both language and math. Your child will learn so much from sorting (whites and darks, for instance), measuring (how many clothes fit in the washing machine), pairing (your child can pair socks together), talking about the textures and colors of the clothes, and notice the scent, texture and temperature of clothes when they just come out of the washing machine and then the dryer. Talk about everything your child notices, using rich language, math vocabulary and full sentences. Engage in conversations with your child rather than “teaching moments”. Encourage your child to follow suit. Once they have mastered these experiences, it is time to learn to fold, sort by family member and put away the clothes.
4. Invite Your Child to Cook
Cooking is pure science in action. Children love to help wash fruits and vegetables, cut and peel (you can start with a plastic knife), mash, beat, crack, and knead, even at a young age. Measuring, pouring, scooping, mixing, counting, and reading are all valuable learning opportunities, and can all be found in the art of cooking. Help your child feel needed and important in their role in the kitchen and encourage creativity. As your baby matures, teach them how to cook, how to follow recipes, and even how to invent new ones. Your child can gradually be given more responsibilities in the kitchen, and even prepare full meals, starting with breakfast and snacks. One of the things I did with my sons from the age of two, was ask them if they wanted to cook or set the table. They almost always chose cooking, and the rule was: If I help you cook, you help me set the table, and vice-versa. Both boys today love cooking and proudly take part in cooking for the family.
5. Teach Your Child to Have A Sense of Order
The most precious gift your can give your child is a sense of order. This means that they internalize how a space (workspace, play space) should be organized, and are able to put it back together when that order is disrupted. This can be learned by asking your child to help you clean up. For example, if your child had a wonderful time playing with the bath toys and is now ready to do something else, invite them to clean up first, and make it easy to do. For example, if your child is young, have a colorful bucket by the bathtub for the toys to go back to, instead of a small drawer in another room. The easier you make it for your child to clean up, the faster they will be able to understand it and do it alone. Teach your child that when you play with something, you put it away before you take out something else. Model how to do it, and do not let too many different toys pile up; otherwise it becomes too difficult for your child to re-organize. A tidy house teaches your child to respect the order of things, and to restore it when it is out of balance. It also motivates you as a parent to allow your child to play with different things, because you know they will clean it up when they finish.
There are many more chores and activities your child can partake in. This may require more time from you, but is essential learning for you child, and will save you time in the long run. It equips your child with excellent practical skills, math and science skills, the opportunity to learn new vocabulary, and gives them independence and confidence. Look at your daily activities and find ways for your child to participate. You will raise a lifelong learner, and a responsible and giving person in the process.
As published in Urban Baby and Toddler March 2012

What to do when your child is afraid of the dark
Is your little one suddenly afraid of the dark? Just yesterday, they were able to peacefully fall asleep on their own, and today they’re afraid – very afraid. What happened?
Understanding Your Child’s Fear
I will never forget the first time I went to sleep in the new house I had just bought. After moving and cleaning all day, I set the mattress down in one of the bedrooms and tried to sleep. The windows did not have curtains yet, and although the front door was locked, I had a hard time falling asleep. There were so many shadows coming through the windows, so many unfamiliar noises, I felt vulnerable. It took days to get used to sleeping in my new house. And if we, as adults, can feel scared at night until we can familiarize ourselves with our environment, imagine how children must feel!
Why It Happens
Being scared of the dark is very common in young children. Fear is a normal part of development, and almost every child goes through that phase. Usually it happens at around age two, coinciding with when children develop a rich fantasy life, and a strong imagination.
They also become more aware of their surroundings and remember things (especially things that evoke strong emotions, like being scared of a large dog in the park or surprised by a loud noise) much better than when they were babies. A negative experience can trigger a long-lasting fear.
It is their wonderful imagination that makes the books you read fascinating, but it is also their imagination that keeps them up at night, thinking of that big bad wolf, a witch, or a thunderstorm. To make matters worse, young children sometimes have difficulty distinguishing fantasy from reality, so no matter how much you tell them that monsters aren’t “real”, it is a concept they can’t yet comprehend. To them, everything seems very real.
At night, when everything is calm and there is nothing else to stimulate them, their imagination becomes very active, which is why their fears seem worse at nighttime.
What Can Trigger It
Television and video games are the big culprits. The news also has strong content in the mind of a child. Be mindful of what you watch when your child is around, even if they are just in the same room and not actively participating – they can hear and feel. Children are very capable of picking up what is happening on the screen even if they don’t seem like they’re paying attention. Make sure they are not exposed to violence, directly or indirectly, either in video games, television or the internet.
It is also a good idea to carefully choose the books you read to them (yes, including fairy tales), the songs you sing, and the sayings you use. Sayings like, “Don’t let the bed bugs bite” might not be what you would consider scary, but it definitely can be for your young child. And don’t even think of threatening your child with the boogeyman, or any other child abducting creatures’ parents innocently use to get their child to behave or comply. Even if these things don’t seem scary to your child during the day, once they are lying alone in their room in the dark, those same images will most likely contribute to their fear of the dark. Be mindful of what you expose your child to and choose content that is not likely to be over-stimulating or provoke unnecessary stress.
If your child sees that their sibling is afraid of the dark, they will most likely begin feeling afraid as well. If one of your children is scared at night, the best option is to ensure your other children are not sharing the same bedroom.
If your child or your family are going through a stressful situation, the stress your child feels will exacerbate their fears. Make sure you take time to bond with your child and talk about their feelings. If the situation persists or you feel you are not able to help your child with their anxiety, discuss it with your pediatrician. Dismissing your child’s fear will not make it go away.
What to Do
Telling your child that monsters and bad guys are “just pretend”, or are not real, won’t help. It is important that you listen to your child and show them that you understand how they feel. Empowering them to talk about their fears will often help your child feel much better. Help them remind themselves when they feel scared, that they are not alone, that you are just in the next room.
Leave a night light on in their bedroom, and if a night light is not sufficient, you can even leave a light on, either in the hallway (and leave the door ajar), or in their room if it can be dimmed. A bright light at night might interfere with their circadian rhythm, but just a little light, and the sounds of the house can greatly comfort your child and do wonders to alleviate their fears.
A note on night lights: A recent scientific study showed that children who sleep with a room light on before the age of 2 are more likely be short-sighted than children who sleep in the dark. Night lights were also linked to short sight but not as strongly as full overhead lighting. Although this is not conclusive evidence, I encourage you to look at research findings on your own, in order to make a decision that you are comfortable with. Keep in mind, however, that this risk applies for children younger than two, and that fear of the dark often starts at two or later. For children older than two, there is no evidence to show that it can affect your child’s eyesight.
If the room is still too dark for your child’s liking, leave a flashlight by their bed, or a lamp that they can easily turn on when they feel scared.
When my sons were little, we had “magic dust” that protected their room of any scary creatures. They sprinkled some on their bed before going to sleep (it was a very fine iridescent glitter I only used for that purpose – like this one). Indulge their imagination and help them gain control of their fears. Some disagree with this approach, but I don’t see any downside to it. It is no different than believing in Santa Claus, the tooth fairy or the Easter bunny. If you feel uncomfortable with making things a bit more magical in your child’s world, don’t do it. I feel that it greatly empowers children to allow them to contribute in managing their fears.
Ask them what makes them feel most safe. Sometimes it can be a favourite blanket, a stuffed animal, white noise, or some of that magic dust they can keep in a container in case they need to use it again at night. Make sure their bedtime routine is calm, and set aside a few minutes to ask your child what they liked about their day, their favourite moments, what they feel grateful for, or ask them to tell you something they look forward to the next day or week (like a trip to the zoo, or a friend coming to play). Help them focus their minds on positive thoughts before bedtime. Don’t make it too exciting or they won’t be able to sleep from their excitement!
Help your child feel safe by offering to check on them throughout the night. You can help them feel more in control by asking how often they would like you to check on them (for example, every ten minutes).
You can always offer to stay by their bed until they fall asleep, or for a few minutes, whatever you prefer. I used to meditate in my child’s room when they went to bed (after we read and chatted). This helped them feel safe and gave me twenty minutes a day to meditate. When my children felt they did not need me to stay anymore, they let me know. Whatever your preference is, you should know that staying with them will not “spoil” them or prolong their fear. It’s okay to be with your child when they need you. There are plenty of other opportunities to help your child confront uncomfortable situations independently. In fact, they do that every day when they are little, and everything is new to them.
What NOT to Do
Do not try to convince them that there’s nothing scary, or that nothing is “out there”. You can look and say, “I see a branch moving with the wind – that is the noise you heard, or the shadow you saw”. If you keep telling them you saw and heard nothing, your child might think you can’t see the danger, and therefore can’t help – or even worse, are in danger yourself. The things they fear might not be real, but their fear certainly is.
Never belittle, laugh, or tease your child. This is not advised in any situation, and in this case, it will not only show you don’t understand, but also greatly hurt their self-esteem. Don’t say things like “Big kids are not afraid of the dark”. Always be respectful and show compassion and understanding. Sometimes children regress – know that this too is normal and will pass. They need to know that their feelings are okay to feel.
As frustrating as it is to have to come back a million times and reassure your child, do not reprimand them, or show impatience. This will not alleviate their fear and can make them feel guilty or ashamed. It helps if you comfort them in the dark when you come to their room (instead of turning on the light) so they learn to stay calm and begin to feel safe in the darkness.
Celebrate Your Child’s Progress
When your child lets you know what they did to confront their fear (ex: “I covered my head with my sheet and didn’t feel scared anymore”), celebrate the fact that they were very brave, and that they found a solution on their own. Also point out instances throughout the day where your child demonstrates bravery. This will build their confidence in being able to manage their fears on their own.
With your understanding and support, your child will eventually feel safe at night and the fear of the dark will pass. This will take anywhere from a few weeks to a few months. If their fear persists, discuss it with your child’s pediatrician. Soon you will see that when you tell your child “good night”, it will be just that – a good night.