CEFA Early Learning schools use play dough almost on a daily basis, from the time our students are very young. We make our own, and I will share with you one of our recipes so you can make it at home with your child. They will really enjoy spending time making it with you! Make sure to save the playdough once you are finished as it keeps a week or two, even longer sometimes.
This is an activity that is inexpensive to make and has no chemicals in it.
Best Ages for This Activity
One to five
How to Make It
You will need
- 1 ½ cups water
- 1 ½ cups flour
- 1 tbsp vegetable oil
- ¾ cups salt
- ½ tbsp cream of tartar
You will also need
- Wax paper (or any other non-stick surface to protect your countertop). You can easily use a cookie sheet
Let’s get started!
- In a pot, help your child (if they need you to) mix all of the ingredients together until you have a uniform batter.
- Cook on low to medium heat for 7 to 9 minutes until it can form a ball.
- Put your new ball on the wax paper and let it cool off until it is cool enough for your child can handle
- Knead the play dough until smooth (1 minute or so) and voilà! You can start playing with it!
- Store in an airtight container (Tupperware is fine) or in a freezer bag (then seal it)
This will give you white play dough.
To make coloured play dough, follow these steps.
To make extra white play dough, you can add 3 tablespoons of white tempera paint before cooking. The paint not specifically labeled washable (like this one) works best, but they all work.
Learning Opportunities
Children will learn S.T.E.M. while making the playdough because it’s a science experiment. Questions you can ask your child during the experiment are:
- Will the batter harden enough to make it like playdough?
- What colours would you like to make?
- Which colours do you think we need to mix in order to make (for example) purple playdough?
- How long will it take to cook?
- How long do you think it will take to cool off?
- How many drops of food colouring do you think we will need to make it an intense colour?
- What will you make with it once it is done?
By helping you measure, mix, describe textures and colours, as well as the intensity of the colours as they get absorbed, they will be using math. As they are mixing and pouring, following all the steps, they are learning sequencing, which is great for reading as well as math and science. Kneading is quite an intense process, so it counts as a physical activity.
CEFA tip: Remember to let your child do as much of the process as they are capable of. This means they measure, mix and pour (not you).
The process of making the playdough offers your child sensory learning by using their senses to feel the texture, mix in the colour, feel the temperature changing, etc. Sensory learning is especially important for writing. While you play with your child, use vocabulary to describe:
- How the play dough feels
- The temperature of it
- The intensity of the colour (how it changes from white to extra white once you add in the paint)
Don’t forget to use math vocabulary such as:
- Measuring
- Volume
- Quantities (more than, less than, the same amount, 1 cup, etc.)
- Cool
- Warm
- Hot
- Intensity (of colour)
- Soft/softer/softest
- Hard/harder/hardest
Describing while using vocabulary is one of the most important learning outcomes at this age. It teaches them reading and mathematics.
This activity also teaches your child patience as they have to wait until the playdough is cool enough to mix, and perseverance as they knead it to obtain a smooth texture. This activity also improves your child’s ability to focus on one task (attention span) – especially once they get to do other activities with the playdough, like making things, making an art piece or using it for building – which all contribute to your child’s social and emotional development and artistic development.
Extended Learning Opportunities
Once it is ready and your child gets to play with it, they will gain writing skills by using their fine motor skills, and dramatic arts through pretend play. If you use the play dough to build, you learn S.T.E.M., especially engineering. You can add beads, shells, tiny branches, pebbles or anything else you and your child like, to make it piece of art.
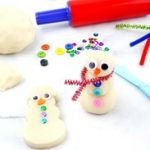
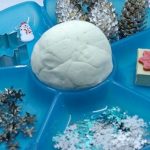
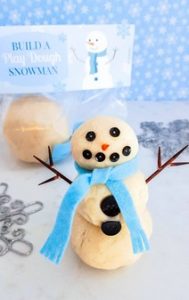
This white play dough is wonderful for dramatic play as it reminds your child of snow, and all the wonderful things that can be built with it! Presentation is everything, so set it up in a way that inspires your child to be creative with it and imagine all the things that can be added to it or built with it!
Here are some examples of how to use your white play dough:
Use it with tools to work on fine motor skills and hand-eye coordination.

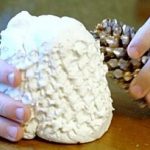
Use it to stamp and also work on fine motor skills this way, as well as dramatic play. Explore the difference between stamping and cutting. You can try lots of everyday objects to stamp your play dough – not pre-made just stamps. Try branches, a pinecone, leaves, the edge of a popsicle stick and see what amazing patterns they create!
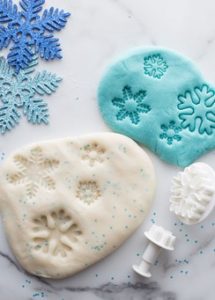
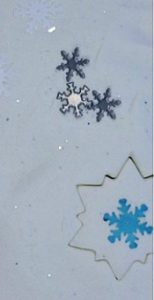
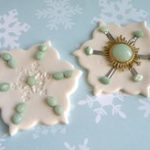
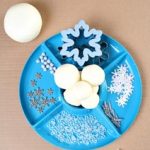
Decorate snowflakes or whatever else your child wishes to make. This is excellent to work on fine motor skills and hand-eye coordination, both necessary in order to learn to write. Plus, sequencing and the understanding and prediction of patterns is an important math skill to learn.
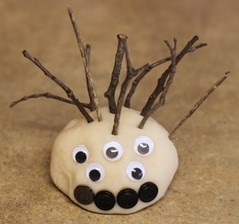
Make snow monsters!
Read the book snowmen at night and re-create scenes of the book for dramatic play! This will teach your child reading comprehension and dramatic play. Here’s more snowmen at night activities you can do, plus a video link to the book read aloud if you don’t have it. If you build the scenes described in the book (for example, the skating rink, or the mountain where they go sledding), you add S.T.E.M. learning to this reading comprehension activity. You don’t have to use play dough to build everything! Use anything you find around the house, from big milk jugs to make hills to a mirror for the skating rink, or cups, wood and sticks. Use pine tree branches you find outside to make the trees if you like!


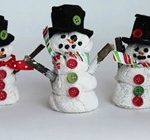
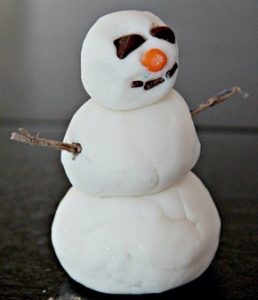
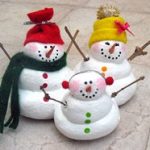
Invite your child to make your whole family out of play dough! In addition to the fine motor skills required to make snowballs out of play dough and then snowmen, it is a great social and emotional development activity and is often used by child therapists for role-play and for bringing issues to the surface. Ask questions like: if we were snowmen for a weekend, what would we do as a family? What would you do? What friends would you invite? Then why not build the places to go and what you will need? (for example, a snowy mountain to slide from and sleighs for the family). This is excellent for S.T.E.M..
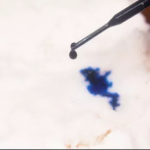
Another excellent S.T.E.M. activity is to use a very small pipette and add food colouring to your white play dough, then play with it to watch it blend and mix together. Add another colour to see what colour you get and learn about primary and secondary colours that way.
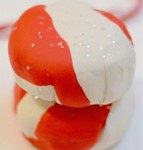
Make candy canes and teach your child how to make snakes (lines with play dough, as well as how to twist it – this is wonderful for fine motor skills (a precursor to writing) as well as for life skills. Also, you can add a few drops of peppermint extract or essential oil for added sensory learning.

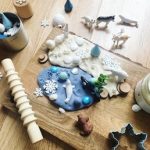
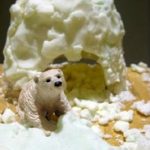
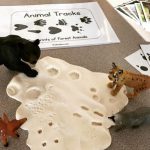
Use it to learn about natural science, exploring which animals live in the snow. You can also make footprints of those animals in the snow! Build their habitats for added S.T.E.M. learning and natural science.


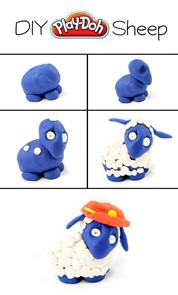
Make a sheep with your white play dough! This is a great fine motor skills exercise as your child has to roll tiny balls with the play dough, using their fingers.
For more ideas on how to play with play dough, please see this activity, where you will also find the recipe for coloured play dough. Have fun!
Books Your Child Might Like
Toys Your Child Might like
As an Amazon Associate I earn from qualifying purchases