Learning with Ramps and Cars
The S.T.E.M. experiments detailed below can teach your child about physics and engineering. Even babies learn about physics as part of learning about the world around them. For example, a baby throwing different objects on the floor from their bed or their chair, just to see how they fall, is experimenting with physics and learning about gravity. This is one of the S.T.E.M. challenges we present our children with at CEFA Early Learning schools, with great success.
What children will learn is that objects (even inanimate ones) need energy in order to move.
Your child already knows, even innately, that we need energy in order to move. They know, for example, that when you run, you “burn” more energy than when you walk, or that they feel more tired (less energetic) after going up a steep hill than after going downhill. They also know that food (especially good food) gives you energy, and that we sleep when we run out of energy and need to recharge. They understand the concept of energy output even if you have not explained it to them.
These S.T.E.M. challenges will teach your child that a force (in this case, the force of gravity) can give an object (even an inanimate object) energy and make it move.
What is gravity? It is the force that attracts a body toward the center of the earth, or toward any other physical body having mass.
Best Ages for This Activity
Three to five
How to Make It
You Will Need
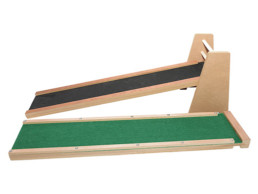
- 2 identical ramps (you can make these using plywood planks, or thick and firm cardboard)
- 2 identical Lego or Duplo car (or train) bases like the ones found in this set (or something similar). You just need to be able to add bricks to one of them, which is why simple cars or trains won’t work as well. Something like this is perfect:
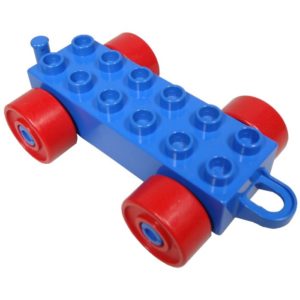
Any Lego or Duplo bricks that can be built on the car bases that you are using. These will also be included in the same set.
- Any measuring tape or long ruler
- Anything to lean the ramps against (it could be large blocks, or a box – anything).
- Painter’s tape or any other non-transparent tape that you can easily remove from the floor.
Let’s Get Started!
Invite your child to play with ramps and cars. If they want to explore the ramps and the cars on their own first, give them time to explore, then come back later to invite them to explore the ramps. After all, the more they play with them (even on their own), the more they learn about ramps, friction, gravity, and how it all works! Once your child is ready to take it one step further, follow the steps below:
Step 1: Does the car move is the ramp is flat?
- Set up the two identical ramps side by side on a flat surface. The surface cannot have any inclination or be uneven, or else the cars will move when put down. Try a non-carpeted area like the kitchen floor. Make sure the ramps are identical in every way: same length and same material. Observe with your child that the two ramps are exactly the same.
- Take 2 identical Lego car or train bases. Make sure they are identical in every way: same size, same length, same wheels, etc. Observe with your child that the two cars are exactly the same.
- Without pushing the cars, place one car on each ramp. If the surface is flat, the cars won’t move.
- Wonder with your child (this is the S.T.E.M. learning part):
-
- Why don’t the cars move?
- Why don’t the wheels of the car roll on their own?
- What can we do to make them move? (your child will probably suggest pushing the cars by hand)
- Is there any other way we can make the cars move without touching them?
- Help your child figure out, on their own and in their own words, that the cars won’t move on their own because they have no energy or force to make them move. If your child seems to understand why the cars are not moving (even if they can’t put it into words) move on to Step 2.
Step 2: Does the car move if the ramp is not flat?
- Without moving anything else, encourage your child to lift one of the ramps from the end where the car is and with the car still on it. They will notice that as soon as they lift the ramp even a little bit, the car starts rolling!
- Wonder with your child:
-
- What happened when you lifted the ramp on one side?
- What made the car move?
- Was it the wheels? (if they say yes, then ask):
- Why did the wheels of the other car not move (the one you kept flat)
- Help your child figure out, on their own and in their own words, that the car moved once they angled the ramp because it rolled towards the floor. Help them figure out why it rolled towards the floor. Ask: Where did that energy come from? What made the car roll? They will probably equate the movement of the car to something falling to the floor. You can then discuss gravity and how it works if your child shows an interest to understand more. Otherwise, just the fact that they are reasoning and trying to come up with a hypothesis to explain why the car moved, and tried to test that hypothesis, is learning enough.
- Before moving on to Step 3, keep playing with one of the cars and ramps, while leaving the other one flat. Observe how the car rolls faster down the ramp if you lift the ramp higher (using your hands to lift the ramp). And how it rolls more slowly if you don’t lift the ramp as high. Try to figure out why together.
Step 3: Understanding gravitational potential energy (GPE)
Using the same two ramps, set them both up on an incline this time. The angle of the incline for the two ramps must be exactly the same. This can be done easily if you lean both ramps against the same surface. For example, you can use the same low table, or the same box, to lean the two ramps against, side by side.
- With the same 2 identical Lego car bases, test the ramps again:
- Without pushing the cars down the ramps, let each car roll down the ramp (one in each ramp) and let them stop where they stop.
- It is important that your child release the car at the top of the ramp without pushing it, otherwise the movement of the car will not depend only on the GPE (Gravitational Potential Energy) alone, but also on the force your child employed to push the car. This will not give you valid results because you won’t be able to guarantee that your child used the exact amount of force (energy) for each push. Plus, it won’t make it clear for your child that what actually made the car roll down the ramp was the force of gravity and not their own force.
- This is the S.T.E.M. learning part: Wonder, with your child, asking questions like:
-
- What happened when you placed the car on the ramp this time?
- What made the car move?
- Help your child figure out, on their own and in their own words, that the car moved because the ramp was on an angle, which made it roll towards the floor. Help them figure out why both cars rolled towards the floor. Where did that energy come from? What made them roll? This will probably lead to the same explanations they came up with in Step 2. If they did not fully understand it in step 2, this will give them another opportunity to observe and understand what is happening.
- When the cars stop rolling, place a piece of tape where the car stopped.
- This time, add a math component (measurement) by inviting your child to measure, using the tape measurer, how far the cars went past the ramp. They will measure from the end of each ramp to the end of each piece of tape. Because you used the exact same cars on the exact same ramps, with the exact same inclination, and on the exact same floor surface, both cars should land approximately at the same distance from the ramp. This is important for your child to observe.
- You can try rolling the cars several times (following the same steps above) and observe that the cars will stop more or less where you placed the tape the first time you measured. Your child can begin to predict what will happen and confirm it each time they see the car stop near the same place.
- You are now ready for your S.T.E.M. experiments:
Experiment 1: Varying the height of the ramp and comparing results
- Question to ask: How does the height of the ramp affect the distance the car goes?
- With the same two ramps, set them both up on an incline, but this time, vary the incline of one of the ramps (you can make it higher or lower) without moving the other one, still keeping both ramps side by side as before.
- With the same 2 identical Lego car bases, test the ramps again:
- Without pushing the cars down the ramps, let each car roll down the ramp (one in each ramp) and stop where they stop.
- It is important that your child release the car without pushing, otherwise the movement of the car will not depend only on the GPE (Gravitational Potential Energy) alone, but also on the force your child employed to push the car.
- The car placed on the higher ramp will go further. This will be easy for your child to observe as it will go further than the tape they had placed on the floor when first testing the ramps.
- Your child will be able to compare how much further one car went, compared to the other, as well.
- Wonder, with your child, asking questions like:
-
- What happened when you placed the cars on the ramps this time?
- Why did one of the cars go further than the other?
- Help your child figure out, on their own and in their own words, that the higher ramp gave the car more energy (because more gravitational force was applied to it).
- When both cars stop rolling, place a new piece of tape where the car stopped, and measure which car went further (with the tape measurer).
- The important observation your child will make here is that the higher the ramp, the further the car goes.
- Leaving one of the ramps always in the same position, vary the height of the other one. Try higher, try lower, try even higher, and then even higher than that. Encourage your child to play with the ramps as much as they want, varying their angles.
- Your child can record their observations on paper or keep looking at the tape pieces on the floor to understand the data they collect. They can even write on the piece of tape the number on the tape measurer.
- You can stop here and talk about what you observed, then leave the ramps, cars, tape and measuring tape set up so your child can play on their own and make further observations. Next time, you can try a different variable:
Experiment 2: Varying the weight of the car and comparing results
- Question to ask: how does the weight of the car affect the distance the vehicle goes?
- With the same two ramps, set them both up on an incline. The angle of the incline for the two ramps must be exactly the same. This can be done easily if you lean both ramps against the same surface.
- This time, add five Lego bricks on top of one of the car bases and leave the other base as it was, with no bricks on it.
- Test the cars on the ramps again:
- Without pushing the cars down the ramps, let each car roll down the ramp (one in each ramp) and stop where they stop.
- Once the cars stop, place a piece of tape where each car stopped, then measure the distance they traveled using the measuring tape.
- This is the S.T.E.M. learning part: Wonder, with your child, asking questions like:
-
- What happened when you placed the cars on the ramps this time?
- Why did one of the cars go further than the other?
- Help your child figure out, on their own and in their own words, that even though both ramps were on the same angle, the car that had bricks on top did not go as fast or as far, because it was heavier than the other car.
- The important observation your child will make here is that the lighter the car, the faster and further it will go.
- Leaving both ramps always in the same position, vary the weight of one of the cars by adding or subtracting bricks. Keep measuring. Ask your child: What happens if we add only one brick? What happens if we add two? Etc. Encourage your child to play with the ramps as much as they want, varying the weight of their cars with Lego bricks.
- Your child can record their observations on paper or keep looking at the tape pieces on the floor to see the data they are gathering. They can even write on the piece of tape the number on the tape measurer.
- You can stop here and talk about what you observed, then leave the ramps, cars, Lego bricks, tape and measuring tape set up so your child can play on their own and make further observations. Next time, you can try changing a different variable:
Experiment 3: Varying the texture of the ramp and comparing results
- Question to ask: how does the surface texture of the ramp affect the distance the car goes?
- Using the same two ramps, set them both up exactly the same way and on the same incline.
- Make the two cars the same again by removing any of the Lego bricks you may have added to them, and keeping only the car bases.
- Now use a thick scarf to cover the top of one of the ramps. This will make it harder for the car to roll down as it adds friction to a previously smooth surface. Leave the other ramp as it was.
- With the same 2 identical Lego car bases, and the two ramps set up exactly the same but with a different texture, test the ramps again:
- Without pushing the cars down the ramps, let each car roll down the ramp (one in each ramp) and stop where they stop.
- The car placed on the ramp with no texture (no scarf) will go further.
- This is the S.T.E.M. learning part: Wonder, with your child, asking questions like:
-
- What happened when you placed the cars on the ramps this time?
- Why did one of the cars go further than the other?
- Help your child figure out, on their own and in their own words, that the scarf made it harder for the car to roll down. The scarf added friction (a force opposed to that of gravity, slowing down the car). They don’t need to use words like friction if they are not ready. As long as they understand the concept of what is happening.
- When both cars stop rolling, place a new piece of tape where the car stopped, and measure which car went further (with the tape measurer).
- The important observation your child will make here is that the smoother the ramp, the further the car goes.
- Try different textures on the ramp. For example, try wrapping one of the ramps in bubble wrap, then try a t-shirt, sandpaper, mud (if you are brave) or any other material your child wants to try. Leaving one of the ramps always bare (without any added texture), vary the texture of the other one. Try smoother textures, then rougher ones. Encourage your child to play with the ramps as much as they want, varying the texture.
- Your child can record their observations on paper or keep looking at the tape pieces on the floor to see the data.
- You can stop here and talk about what you observed, then leave the ramps, cars, tape, materials you used to create friction, and measuring tape set up so your child can play on their own and make further observations.
You can leave the ramps set up for your child to play with all the new concepts they learned. They will probably try combining the concepts (varying the weight of the car and the surface of the ramp, for example) and once they have tried everything they wanted to try, offer different objects to roll down the ramp and compare. You can try an orange and a golf ball, or a ball and a teddy bear, or anything else your child would like to try. See what rolls and what doesn’t, try to understand why.
Learning Opportunities
This is a fun S.T.E.M. activity where your child can manipulate the different variables to understand how objects move. They will have plenty of opportunity to experiment with and exercise their engineering skills, use the scientific method, math to measure and compare and use their reasoning skills. It also provides an opportunity to work independently, to focus on an activity and to self-correct, all of which are important social and emotional development skills to learn.
Use as much math language as possible, introducing words like: fast, slow, faster/slower than, heavy, light, heavier/lighter than, high, low, higher/lower than, numbers, distance, centimeters, millimeters, weight, angle, measurement, etc.
Extended Learning Opportunities
Invite your child to take the two car bases (or a ball) with them next time you go for a walk, and find ramps around your neighborhood to try: maybe a street on an incline, or a slide?
CEFA tip: Remember to wait long enough for your child to “figure out” what is happening. They will learn much more and understand it much better than if you rush in to explain the concepts to them. Give sufficient time for them to explore the materials without your involvement after each experiment. Don’t intervene if they use the materials in a different way, or if in the middle of the experiment they feel like doing something else entirely with the ramps or the cars. It is all part of the learning experience. Just come back to the experiment when they are ready.
Books Your Child Might Like
Toys Your Child Might Like
For Infants +
For 1 +
For 2+
For 3+
For 4+
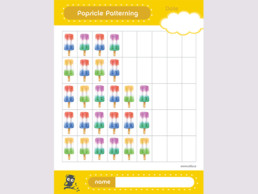
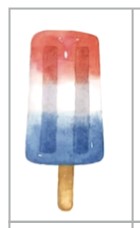
Popsicle Patterning
An important part of our S.T.E.M. curriculum at CEFA Early Learning schools is working with patterns. Understanding patterns is a foundational math skill. You can learn the importance of patterns in this article, or you can just dive straight to the fun part, which is this patterning game.
Best Ages for This Activity
Four to five
How to Make It
You Will Need
- A colour printer
- Cardstock paper
- Scissors
- The free printable game I made for you: print me
Optional
- A laminator
- Two sheets of laminating paper
- Small magnets
- A baking tray
- Super glue
Let’s Get Started
Version One:
- Print two copies of the game on cardstock paper
- Keep one copy as is, and cut the popsicles (each square) of the second copy, like this:
- Invite your child to complete the patterns on the sheet, using the little popsicles you cut. If your child has difficulty, you can help by asking them to tell you what they see, then what comes next, and what comes next, etc. until they understand the pattern. If the pattern is too difficult for your child to understand, simply use the cut-out single popsicles to make your own patterns first, then offer the game the following week, after having practiced various patterns with the cut-out single popsicles.
Version Two:
- Print two copies of the game on cardstock paper
- Laminate both copies
- Once they are laminated, keep one copy as is, and cut the popsicles (each square) of the second copy, like this:
- Tape the full sheet onto the cookie sheet
- Glue a small magnet behind each of the single popsicles
- Now your little popsicles will be attracted to the metal of the cookie sheet, and will stay in place when your child puts them in the empty squares to complete the pattern!
- You can also attach the cookie tray to the wall (we use removeable velcro strips at the schools) at your child’s height, so your child can have an activity to do on one of their walls – we call them “wall games” at our CEFA Early Learning schools, and children love to spend hours working on a game, perhaps because it is presented differently.
- Invite your child to complete the patterns on the sheet, using the little popsicles you cut. If your child has difficulty, you can help by asking them to tell you what they see, then what comes next, and what comes next, etc. until they understand the pattern. If the pattern is too difficult for your child to understand, simply use the cut-out single popsicles to make your own patterns first, then offer the game the following week, after having practiced various patterns with the cut-out single popsicles.
Learning Opportunities
Children will learn S.T.E.M., especially in the area of mathematics. In this game, the greatest learning opportunities are in reasoning, comparison and prediction. As always, the use of mathematical vocabulary greatly enriches these activities.
This activity also encourages your child to focus and stay on one task (increases attention span) which contributes to your child’s social and emotional development.
Things to Keep in Mind
Although patterning can be a great activity for your child to do alone (once the concept is clear), make sure you always supervise, as it can be a choking hazard. Plus, at this age, children must always be supervised.
Books Your Child Might Like
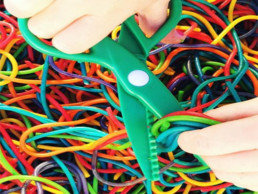
Practice Scissor Skills with Spaghetti
Children need to learn how to use scissors before starting kindergarten. At our CEFA Early Learning schools, we introduce our young students to scissors by first offering material other than paper to cut, as cutting paper is more difficult. One of the materials our children love to explore is cooked spaghetti!
This activity will offer your child an opportunity to practice their scissor skills, and at the same time, provide plenty of sensory stimulation!
Best Ages for This Activity
Two to five
How to Make It
Ingredients
- Water
- 1 box if uncooked spaghetti (you don’t have to make that much, you can make enough just to fill a large bowl of you prefer)
- If you want to make coloured spaghetti, here are the directions
- A bowl or sensory bin. If you tried the soft spaghetti sensory bin activity, you already have the spaghetti, so all you need to do is add scissors and supervise!
Let’s Get Started!
- Cook your spaghetti as you usually do. Once al dente, run under cold water to stop the cooking process.
- Shake off any excess water.
- Add 1 tbsp of oil (any oil you like) to the pasta to stop it from becoming sticky.
- Put your pasta in the sensory bin or bowl and offer your child a pair of safety scissors to cut the pasta with. If it is your child’s first-time using scissors, demonstrate how to use them.
Learning Opportunities
Children learn a lot by practicing cutting with scissors. They develop fine motor skills, which are essential for your child to learn to write. They also develop hand-eye coordination and bilateral coordination (using both sides of the body at the same time while each hand [or side] is performing a different task). All of these skills are a fundamental part of our CEFA Early Learning schools writing curriculum, as well as our physical education curriculum.
Because you are using spaghetti, you are providing sensory stimulation. This builds neuronal pathways, which helps your children learn. It also supports language development, cognitive growth, fine and gross motor skills, problem-solving and a way to relieve anxiety, amongst many more benefits.
Extended Learning Opportunities
Next time you make spaghetti for dinner, offer your scissors instead of a knife to cut the spaghetti in their plate – it will be much easier for them, and provide one more opportunity for practicing cutting with scissors!
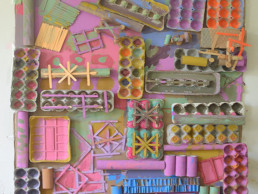
Recycled Materials Art
This activity is easy to make at home and is excellent not only as an art activity, but also as a way for babies to practice their fine motor skills, as they paint over, under and around an uneven surface. At our CEFA Early Learning schools, it is also a part of our writing curriculum for one year olds.
Best Ages for This Activity
One to three
How to Make It
You Will Need
- All kinds of recycled materials, preferably made of wood, cardboard and paper.
- A flattened box or other cardboard to use as the base (where you will glue the recycled items to paint) – you can also not flatten the box and instead, glue your items all around and on top of the box, so your child can make a three-dimensional art piece.
- Any paint
- Paintbrushes and containers
Let’s Get Started!
- Invite your child to make art
- Start by gluing the recycled pieces onto your cardboard or box. If the pieces are large, you can use a stapler.
- Once you are happy with your structure, invite your child to paint it
- If your child is very young, demonstrate by painting together. Make sure you paint inside and spaces, around, on top, and literally paint every angle of each recycled piece. As soon as your child is comfortable painting on their own, just watch and let them paint.
- Let the painting dry
Learning Opportunities
This is a fun visual arts activity for your child. It is also magical to look at, and a great way to experiment with texture. It is also good fine motor activity, a precursor to writing.
As I like to teach our CEFA Early Learning schools Teachers, the purpose of visual arts is to invite your child to express themselves, to bring the inside-out. Your child will discover themselves, the beauty they are capable of expressing through art, and that is an amazing thing to witness – enjoy every moment of it!

How to Make Taste-Safe Cloud Dough
Cloud dough is wonderful for little ones and older children. It offers an amazing sensory experience, and hours of independent fun!
This is the same recipe we use at our CEFA Early Learning schools for our youngest students, as it is taste-safe.
Best Ages for This Activity
Zero to five
How to Make It
You Will Need
For white cloud dough:
- 2 cups of flour
- ¼ cup vegetable oil
For coloured cloud dough:
- 2 cups of flour
- ¼ cup vegetable oil
- 5 drops oil based food colouring (you can add more for a more intense colour. Premix to the oil before mixing it into the flour.)
Let’s Get Started!
- Invite your child to make cloud dough with you
- Put the flour in a bowl, and slowly add the oil as you mix with your hands (if you are making coloured cloud dough, mix the colour into the oil first, then add to the flour)
- Crumble the flour well with your hands so the oil gets evenly distributed.
- Voilà! You have cloud dough!
- If you want to make more, simply double to recipe, following the exact proportions.
- Put it in a sensory bin for your child to play with. It lasts at least two weeks. If you don’t have a sensory bin, put it in any container flat enough for your child to play in, and add some toys.
Learning Opportunities
Making the cloud dough is a great S.T.E.M. activity, teaching your child science and math. Ensure that your child does most of the work, such as measuring, mixing, pouring, and everything in between. That way they really learn those S.T.E.M. concepts hands-on. Use as much math vocabulary as you can, such as:
- How much, how little
- Measurements words
- Intensity (of colour)
- Counting (drops, for instance)
- Colours
Once the cloud dough is done, it is a nice sensory activity, a precursor to writing. Playing with the cloud dough, especially once you add kitchen utensils, moulds (to build with) or any other tools, will develop your child’s fine motor skills even further, as well as provide opportunities to learn S.T.E.M. and literacy.
Toys Your Child Might Like
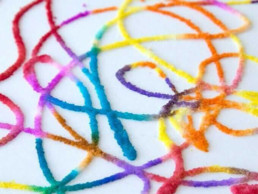
Raised Salt Paintings
This art activity is fascinating to children and beautiful as well! At our CEFA Early Learning schools children love working on it, from the youngest students to the oldest. All you need is glue, salt and watercolours, so give it a try at home.
Best Ages for This Activity
One to five (if your child is older, try it also – it is great for older children too).
How to Make It
You Will Need
- Cardstock or any other kind of thick paper. You can also use a paper plate or recycled tray (preferably white or transparent) if you prefer
- Liquid watercolours or you can use food colouring if you don’t have watercolours (even dilute them a little)
- Table salt
- Glue in a squeeze bottle, like this
- Paintbrushes
Let’s Get Started!
- Invite your child to draw using only white glue. They can draw something specific (like a car or a house) or they can make squiggly lines with the glue, as shown above. Make sure the glue is laid on thick, like a little cable, rather than spread.
- Once your child finishes their work of art with the glue, put their work on a tray (so the salt doesn’t go everywhere) and sprinkle the whole painting with salt, completely saturating their glue drawing with the salt.
- Shake off the excess salt
- Dip the paintbrush into the watercolour, and very gently touch the salt covered lines with it. Watch as it magically spreads in both directions!
- Let the painting dry (it may take longer than 24 hours to fully dry).
Learning Opportunities
This is a fun visual arts activity for your child. It is also magical to look at, and a great way to experiment with texture. It is also good fine motor activity, a precursor to writing.
As I like to teach our CEFA Early Learning schools Teachers, the purpose of visual arts is to invite your child to express themselves, to bring the inside out. Your child will discover themselves, the beauty they are capable of expressing through art, and that is an amazing thing to witness – enjoy every moment of it!
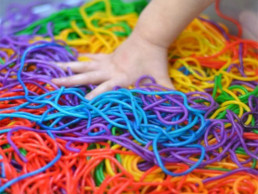
How to Make A Soft Spaghetti Sensory Bin
Sensory exploration is essential for young children, as they learn through their senses. This is a perfect, taste-safe activity even for very young babies, who will delight in exploring the bin with their hands and feet.
There are so many things you can do with this particular sensory bin! I am planning to add other activities that use this beautiful rainbow spaghetti, so if you make it, store it until next week so you can use it for the new games! We use this sensory bin in all our classrooms at CEFA Early Learning schools, and the children love it. For a $1 box of spaghetti and a few drops of food colouring, your child will have hours of fun, and so many opportunities to learn through play. Look at the learning opportunities below.
Best Ages for This Activity
Zero to five, but older children will love it too and you might be tempted!
How to Make It
Ingredients
- Water
- 1 box of uncooked spaghetti
- 5 drops of food colouring for each colour that you want to make (you can make as many colours as you would like)
- 1 Ziploc bag for each colour that you want to make
- A sensory bin. Use anything you might already have at home. I like the ones with lids because they are easy to store and put away when you need (under the bed is the perfect place!). We use these bins for so many different sensory activities in the classrooms. If you do not have something to use around the house, you can purchase one here.
Let’s Get Started!
- Cook your spaghetti as you usually do. Once al dente, run under cold water to stop the cooking process.
- Divide the pasta so you can colour it, using one Ziploc bag per colour that you want to make.
- Add 2 tbsp. of water into each Ziploc bag of cooked spaghetti.
- Add 5 drops of food colouring to each bag – one colour per bag of pasta. You can add more colour if you prefer it more vibrant.
- Seal the Ziplock bag, mix the contents then leave for 5 minutes so the pasta can absorb the colour.
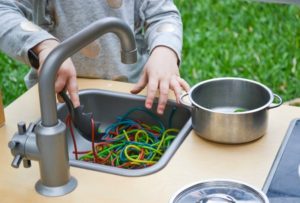
- Run the pasta in a colander under cold water until the water runs clear. The longer you wash it, the less likely the colour will run when playing.
- Shake off any excess water, then pat dry with a paper towel to remove any excess water.
- Add 1 tbsp. of oil (any oil you like) to the pasta to stop it from becoming sticky and stopping (as much as possible) the food colouring from staining hands during play.
- Your pasta is now ready for play! You can put it in the sensory bin for children to play with it on its own, and after a day or two, add kitchen gadgets, tongs or toys to further the play.
Learning Opportunities
Children will learn S.T.E.M. while making and dyeing the pasta, particularly math and science.
By helping you measure, mix, describe textures and colours, as well as the intensity of the colours as they get absorbed, they will be using math. As they are mixing and pouring, following all the steps, they are learning sequencing, which is great for reading as well as math.
Once it is ready to be played with, the soft spaghetti sensory bin will provide learning opportunities such as sensory play (a precursor to writing and other disciplines), colour recognition, dramatic play and fine motor skills.
Don’t forget to use math vocabulary such as:
- Measuring
- Volume
- Quantities (more than, less than, the same amount, 1 cup, etc.)
- Cold
- Cool
- Warm
- Colour
Describing while using vocabulary is one of the most important learning outcomes at this age. It teaches them reading and mathematics.
CEFA tip: Remember to let your child do as much of the process as they are capable of. This means they measure, mix and pour (not you). Except when it involves boiling water and fire, of course!
Things to Keep in Mind
Explore this sensory bin on the floor if possible, so children can use their hands and feet while playing.
Extended Learning Opportunities
- Use the pasta for dramatic play by inviting your child to play with it in a play kitchen, inside or outdoors, and watch as your child cooks, serves, and imagines all kinds of scenarios like a restaurant or a family dinner. This is a great activity for imaginary play, wither on their own or with friends.
- Add tongs, grabbers or jumbo tweezers for your child to practice fine motor skills. Invite them to sort the pasta by colour, using the tweezers, to enhance their math learning.
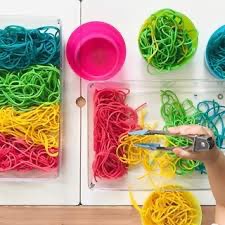
- Give your child a pair of safe scissors to practice their cutting and scissors skills using the spaghetti – very satisfying.

- If your child is too young to use tongs, hide some toys in the pasta for them to find and grab instead, which is how they will practice their fine motor skills.


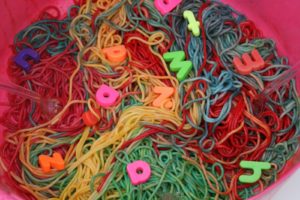
- Add letters for them to discover and name, for a fun reading activity.
How To Make Puffy Sidewalk Paint
This is the best recipe for sidewalk puffy paint, and the one we use at our CEFA Early Learning schools. It is easy to make and wash off the driveway, has the perfect consistency and is great for detailed paintings.
Once made, it provides a great and different outdoor art activity for your child.
Best Ages for This Activity
1 to 5 years (with supervision, as always)
How to Make It
You Will Need
- 3 cups of water
- 3 cups of flour
- 6 to 8 cups of shaving cream
- Food colouring in any colours you want (you could start with yellow, blue and red)
- 6 squirt bottles (or as many as the colours you will make)
- 6 sandwich bags
Let’s Get Started!
- Invite your child to make sidewalk paint with you
- To make blue and green fluffy paint:
- Stir together 1 cup of flour and 1 cup of water until smooth
- Add 15 drops of blue food coloring and stir to combine (remember that the colors will be fainter once all the ingredients are added)
- Fold in 2 cups of shaving cream and stir until it is even. Mix gently to keep your paint fluffy
- Transfer half the mixture into a sandwich bag, clip the end of the bag and squirt the mixture into one of the squirt bottles.
- Add yellow food coloring to the rest of the blue mixture left in the bowl until you obtain the shade of green that you like. If you notice the paint going flat, add a little more shaving cream and fold it into the mixture.
- Pour this new mixture into a new sandwich bag, clip the end and squeeze into a new squirt bottle.
- Now you have blue and green fluffy paint.
- To make red and purple fluffy paint:
- Stir together 1 cup of flour and 1 cup of water until smooth
- Add 15 drops of red food coloring and stir to combine
- Fold in 2 cups of shaving cream and stir until it is even. Mix gently to keep your paint fluffy
- Transfer half the mixture into a sandwich bag, clip the end of the bag and squirt the mixture into one of the squirt bottles.
- Add blue food coloring to the rest of the red mixture left in the bowl until you obtain the shade of purple that you like. If you notice the paint going flat, add a little more shaving cream and fold it into the mixture.
- Pour this new mixture into a new sandwich bag, clip the end and squeeze into a new squirt bottle.
- Now you have red and purple fluffy paint.
- To make yellow and orange fluffy paint:
- Stir together 1 cup of flour and 1 cup of water until smooth
- Add 15 drops of yellow food coloring and stir to combine
- Fold in 2 cups of shaving cream and stir until it is even. Mix gently to keep your paint fluffy
- Transfer half the mixture into a sandwich bag, clip the end of the bag and squirt the mixture into one of the squirt bottles.
- Add red food coloring to the rest of the yellow mixture left in the bowl until you obtain the shade of orange that you like. If you notice the paint going flat, add a little more shaving cream and fold it into the mixture.
- Pour this new mixture into a new sandwich bag, clip the end and squeeze into a new squirt bottle.
- Now you have yellow and orange fluffy paint.
This will give you six beautiful colors of paint. You can create as many colors as you like with your child, experimenting with different shades and intensities of food coloring. Have fun!
Learning Opportunities
Making the paint is a great S.T.E.M. activity, teaching your child science and math. Ensure that your child does most of the work, such as measuring, mixing, pouring, and everything in between, so they really learn those S.T.E.M. concepts hands-on. Use as much math vocabulary as you can, such as:
- How much, how little
- Measurements words
- Intensity
- Counting (drops, for instance)
- Colors
Once the paint is done, it is a nice visual arts and outdoor activity for your child. The movements required for using the squirt bottles will also work with your child’s fine motor skills, a precursor to writing.
As I like to teach our CEFA Early Learning school Teachers, the purpose of visual arts is to invite your child to express themselves, to bring the inside out. Your child will discover themselves, the beauty they are capable of expressing through art and that is an amazing thing to witness – enjoy every moment of it!
Books Your Child Might Like
Toys Your Child Might Like
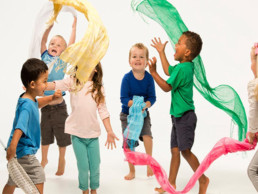
Dancing with Scarves
Dancing is such a great activity for children (and adults!), it’s a good source of fun and exercise. It is also a creative outlet, a way for your child to express all that they are feeling and to discover who they are and what they like and feel passionate about. For children younger than five, dancing does not have to be complicated and can be done anywhere. For this activity, all you will need is music and a scarf. It does not have to be anything fancy, any one of mom’s scarves will do and if you don’t want to use those, any scrap of colorful fabric can do the trick. Our students love dancing with scarves at our CEFA Early Learning schools!
Best Ages for This Activity
One to five
How to Prepare
All you need is a little space anywhere in the house or even outside in the backyard. Make sure there are no sharp objects around in case your child falls. Move the furniture a little if you have to. If your child is young, it is best to dance on a rug as it is less slippery and on a flat surface instead of a bumpy one. Then get a scarf or any light, colorful fabric.
What You Will Need:
- A music player – you can use just your phone, or if you have a speaker, it makes it even better as it is a little louder and clearer.
- A scarf
- Your child in their dancing shoes (or bare feet)
What to Do
- Put the music on, offer your child a scarf, and invite your child to dance to the music! You can join your child, or if friends or siblings are joining, give them their own scarf as well. Your child will love to see the scarf “dance” and will begin making it move to the music. The idea is to feel the music, and interpret it through movement, of the scarf, of your child, and eventually, of both.
- Try playing different types of music, including classical music, and see how your child interprets the music.
Learning Opportunities
This activity is part of our dance curriculum at CEFA Early Learning schools. It is an essential way for children to express themselves creatively and to discover who they are and what they like in the process. This is good for their social and emotional development. It also improves their confidence, general sense of well-being and happiness, develops their self-esteem and if they dance with a friend, improves their social skills also. Besides, starting to dance now leaves them with virtually zero risk of becoming wall-flowers when they grow up.
It also has great physical benefits: It is good for the heart and lungs, increases muscular strength, endurance and aerobic fitness, improves coordination, agility and flexibility, improves balance, gross motor skills and spatial awareness. Dancing also has other benefits like reducing anxiety and depression, releasing stress and dissipating anger.
Books Your Child Might Like
Toys Your Child Might Like
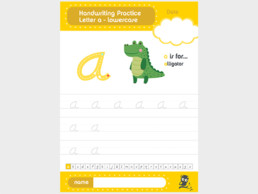
Alphabet Writing Practice Sheets – A to Z Animals
These worksheets are used at our CEFA Early Learning schools for our 3 year old children (Junior Kindergarten Two), and presented only after our students have had practice with lines and curves letters.
If your child is not attending our schools and you would like to try these at home, make sure you follow the directions indicated on the large letters (green means start, red means stop, and the arrows will point you in the right direction.
We teach this to our students one child at a time, as the teacher needs to observe to make sure the child is following the right directions (otherwise they are learning it and practicing it wrong, which will impact their writing skills in the future). Make sure you do the same so your child can learn to write the right way (no pun intended!).
You can download the practice sheets here.
Best Ages for This Activity
Three to five
How to Make It
What You Will Need
- Paper
- A printer
Let’s Get Started!
- Print the worksheets
- Invite your child to practice writing
- Give them a fine felt marker if they are beginners, because a pencil is harder for them
- Only do a maximum of one worksheet a day
- If your child wants to keep working, invite them to draw the animals corresponding to each letter instead. Drawing is an excellent fine motor activity to prepare your child to write.
Learning Opportunities
This activity will give your child literacy skills: they will also learn writing skills as they trace the letters and reading skills as they identify the letter and the sound it makes, as well as try to read the name of the animal, with your help.
Since the worksheets are all about animals, your child will also learn vocabulary, and about natural science.
Extended Learning Opportunities
- Talk about the animals:
- What sound do they make?
- Where do they live? (example, in a jungle, in a forest, in a home)
- Have they ever seen one?
- Where could we go to see animals?
- Why it is important for animals to live in their natural habitats?
- Find a video of each one of these animals (YouTube is your friend here) so your child can see them in their natural habitat, and learn more about them
- Visit a zoo, a pet store, a friend’s house if they are pets, a petting zoo, or other places where you can see some of these animals firsthand.
- Find out which letters are in your child’s name
- See which letters are in your name, in their siblings’ names, etc.
- Help your child write their name at the bottom of the practice sheet