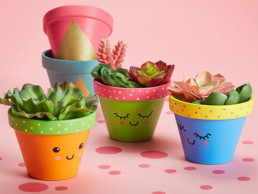
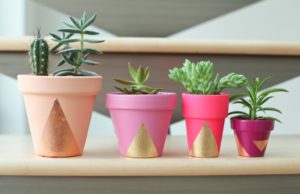
Painting A House for Your Plant
If your child has not had the opportunity to grow a plant from a seed, try this activity. This pot we are making is intended to be a house for the seed that has now grown into a plant. Technically, you don’t need this because you can decorate any flowerpot. But it has so much more meaning if they get to make this little pot for the plant, that they got to nurture from the time it was a seed.
Best Ages for This Activity
Two to five
How to Make It
You Will Need
- A plant pot (terracotta is good as it is easier for them to paint) – you can find very inexpensive pots at the dollar store or even Walmart too
- Tempera paint of any colors your child would like. You don’t need many colors, just the ones your child likes. You can also use acrylic paint
- Metallic paint if your child likes
- Paintbrushes
Let’s Get Started!
- Have a conversation with your child about their plant – how much it grew, how much they think it will keep growing, what it needs as food now, etc.
- You can also watch the video below that explains the process of how plants grow (or watch it again, now that their plant grew, to see what their plant needs next):
- Ask your child if they would like to make a permanent home for their plant. If yes, invite them to decorate that home.
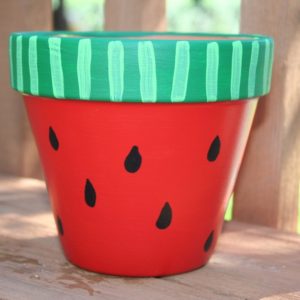
- Your child will have plenty of ideas, so you don’t need inspiration for this one. If you’d like to try and paint one too, here are some ideas:
Learning Opportunities
This is a really nice art project, where your child can express their creativity. You can practice math by talking about the patterns they paint on their pot (if they do), the colors they use, the shapes, etc. It is also a great way for your child to express empathy and to contribute, because they are making a house for the plant they grew, learning what it needs in order to keep growing, and taking care of it. It really adds meaning to this project.
Although it is not the main objective of the activity, painting is also a great fine motor skill which helps your child learn to write. If your child is too young to use a paintbrush, let them paint with their fingers, a sponge, or even their hands. Very young children can benefit from the sensory activity this provides. Just make sure you use non-toxic paint.
Extended Learning Opportunities
- Try making different pots, and go back to growing seeds: what other seed can you try growing now?
- Play classical music during this activity
- Invite each member of the family (grandparents, aunts and uncles if you’d like!) to paint a pot. Then decorate your child’s room with the pots painted by the people they love most.
- Help your child plant their new plant once the pot is dry (the home is ready!)
- From there, introduce your child to gardening and help them plant some fruits (raspberries are easy) and veggies (carrots are amazing to watch), or flowers.
- Read books about children who garden, composting or worms, bees or ladybugs and how they help in the garden (some ideas below).
CEFA tip: Remember to let your child do as much of the process as they are capable of.
Books Your Child Might Like
Toys Your Child Might Like
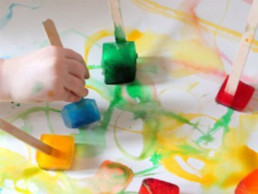
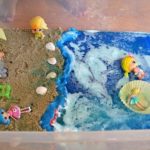
Frozen Paint– A Sensory Art Experience
This activity is so much fun for little ones and engages your child’s senses in so many ways! Try it outside on a hot day, or inside anytime! It is definitely a favorite at our CEFA Early Learning schools!
Best Ages for This Activity
Two to five years (just stay close so your younger child doesn’t eat the beautiful paint popsicles!).
How to Make It
You Will Need
- Tempera paint – choose the colors you and your child like
- An ice cube tray or popsicle mold
- Paper
- Popsicle sticks
Let’s Get Started!
- Invite your child to freeze paint with you
- Pour a color of paint into each cube of the ice cube tray. Do not dilute with water.
- Put the ice cube tray in the freezer, leave for 20 minutes (your child can keep track of the time to learn math) then remove from the freezer and put a popsicle stick in each cube. Put back in the freezer and let it finish completely freezing. Your paint will be ready for the next day.
- Remove the paint popsicles from the freezer and put them on a plate, in glasses or in a muffin tin for your child to paint with. So fun! Your child will explore the ice with their hands, see it melt, feel how it paints differently when the ice is very hard than when it is melting and getting softer. They will love covering their paper with paint, spreading it with their hands, dragging the popsicle paint sticks along the paper – so many opportunities!
Learning Opportunities
This is a fun visual arts activity for your child. It is also a great way to develop their sensory skills. It is also good fine motor activity, a precursor to writing!
The purpose of visual arts is to invite your child to express themselves, to bring the inside, out, as I like to teach our CEFA Early Learning school Teachers. Your child will discover themselves, the beauty they are capable of expressing through art, and that is an amazing thing to witness – enjoy every moment of it and see how they express themselves!
Books Your Child Might Like
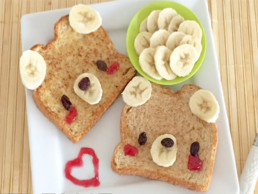
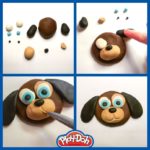
How to Make Bear Toast
Some of the most important parenting advice I can give you is to give your child a sense of belonging, responsibility, and contribution. A great way to achieve this is by having your child make their own and their family’s snacks. One way to show them how they can contribute is asking them if they could prepare “animal toasts” for the whole family, to have with snacks. This one is for bear toast, but you can also find owl toast.
Best Ages for This Activity
Two to five.
How to Make It
Supplies
- Bread or bagels
- A toaster
- A nut butter, butter, or any spread you normally eat
- 1 banana for 4 people
- 3 raisins, blueberries or chocolate chips per piece of toast
- A tiny bit of any red jam (to make cheeks)
Let’s Get Started!
- Your child can, with your supervision and if old enough:
- Toast the bread or bagel (self-help skill)
- Spread the nut butter evenly (fine motor skills and S.T.E.M.)
- Cut the fruit evenly as in the picture (fine motor skills and math)
- Calculate how much fruit is required per slice (S.T.E.M. - mathematics)
- Make the bear by placing the fruit as per the picture shown (fine motor skills, S.T.E.M. and social and emotional development)
If your child is younger, you can leave an image of the toast in front of them for guidance. Here are some other ideas:
Learning Opportunities
Children will learn S.T.E.M., fine motor skills, but more importantly, social and emotional development skills. Your child will:
- Have the opportunity to contribute to their family by preparing a snack for their family, including siblings
- Know that they are helping you at home with important work
- Gain cooking skills
- Gain a great amount of self-confidence and empathy
While they are preparing the snack and you are supervising, make sure you tell them how incredibly helpful this is for the family, as you have more time to finish your work, and thank them. Tell them how proud you are of them that they are able to cook for the family on their own, and once you taste it, tell them how delicious it is! Ask them what they can make next time for the family. The rest of the family (especially siblings) should of course thank them for the meal.
Get them to deliver the snack to each member of the family, with a napkin and a glass of milk for extra learning! It is a difficult task to balance a plate across the kitchen, pour the milk and carry that too, but these are essential self-help skills your child must learn. You might have to show them where to find the mop and paper towels too.
CEFA tip: Remember to let your child do as much of the process as they are capable of. This means they cut (they can use a plastic disposable knife) spread, wash, plate and deliver.
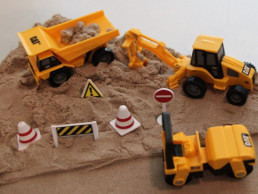
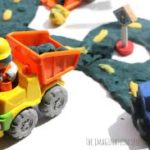
Construction Site Sensory Play
Sensory play is very important in early childhood, and I suggest you always have a sensory bin set up at home. The contents don’t have to be changed until your child is bored of them (it can be weeks before that happens).
Best Ages for This Activity
This activity is great for one to five year old children. Some don’t introduce kinetic sand to children younger than three (not for issues of toxicity, but because they mouth or consume it). I feel that children learn a lot from playing with kinetic sand, and encourage you to try with younger children, but supervise closely.
How To Set Up A Sensory Bin
You can set up a large bin with a lid (you will definitely want one with a lid) like this one. This will hold water, rice, sand, and anything you set up for your child to experiment with. The bigger the better if you will use it outside, and one that fits on a small coffee table is best for inside. The one I suggested above is good for inside and comes with a second one that can be used outside as well!
For this activity, we will try kinetic sand, add small rocks and construction trucks. So simple!
You can use real sand if you wish, or even rice or lentils. Kinetic sand is amazing to the touch and is great for building as well, which is why I chose it. Plus, you can make your own kinetic sand with your child! I show you how to do it here.
How to Make It
To make this sensory bin, you will need very few things.
Supplies
- Kinetic sand of any colour you like. You can buy it or make your own
- Small construction trucks
Optional Supplies
- Rocks from outside
- Popsicle sticks or small wood pieces (be careful of splinters)
Prepare
- All you do is pour the kinetic sand in your sensory bin, add the trucks and invite your child to play.
- To store it, just put the lid on it (with sand, trucks and all) and open the sensory bin when they are ready to play again.
- When your child is ready for a new sensory bin, you can store the contents of this one (with trucks and sand) in a large freezer bag. You can reintroduce it anytime your child would like to try again.
Learning Opportunities
Kinetic sand is used for children with special needs, as it develops their sensory awareness, and has a calming effect. It is wonderful for babies for the same reason – it is ideal for sensory play as well as fine motor skills, which are both critical for writing.
This is a great dramatic play activity as well, where your child can pretend to run a construction site and begin to build structures. Your child will experience, through playing with kinetic sand, how force affects motion, as well as how to build with it (engineering).
This type of sensory play helps regulate emotions and encourages mindfulness. It also provides a great activity for children to play on their own.
Extended Learning Opportunities
Play on a sandbox with bigger construction vehicles!
- Set up a construction site with blocks, on the floor, to extend the play
- Set up Lego or other building blocks (see below for ideas) at the same time so your child can experiment with both, together or separately!
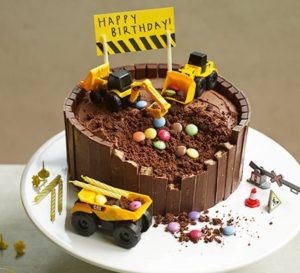
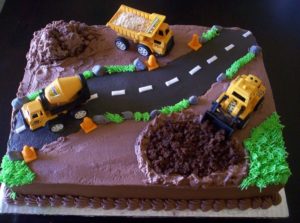
- Throw a construction-themed birthday party, where children can play either with different sensory bins of different colours and with different trucks, or outside in a sandbox with larger vehicles. You can even have a construction themed birthday cake!
Things to Keep in Mind
Please keep in mind that young children need adult supervision at all times. Sand is better in the sandbox and not in the mouth.
Books Your Child Might Like
Toys Your Child Might Like
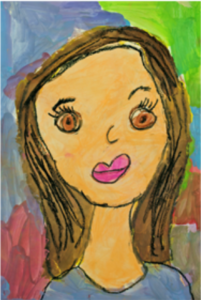
A Portrait for Father’s Day
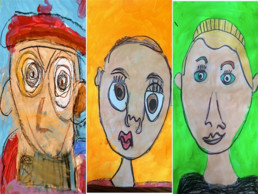
This is a beautiful gift for Father's Day, but it takes a little work (maybe two hours). I did it with my children one summer day, we painted outside, and they made their own self-portraits. My oldest was five and my youngest was two. They turned out beautifully! I framed them and had them as art at my house for years. We also do self-portraits at CEFA Early Learning schools every year when studying Picasso, which are masterpieces every time. This is a gift Dad will be sure not to forget, and an amazing opportunity for you to spend a few hours with your child, taking about Dad, about painting, about life. If you can, take photos of the process (of your child painting their masterpiece).
Best Ages for This Activity
3 to 5 years
How To Make It
You will need
- A canvas or drawing paper (I prefer a canvas because you can hang it once it is finished. You can buy these as single canvasses at an art store or even at Walmart – it does not have to be of great quality. I would recommend at least a 9x12 size.)
- A B pencil (You can use a regular pencil, but the lines will be a lot lighter)
- Acrylic paint. Here's a set with beautiful colours. You can also buy a very inexpensive set at Walmart, or individual colours at an art store. You could also use liquid tempera paint if you have it at home already, but I think it looks much brighter with acrylic paint.
- Chalk pastels
Let’s get started!
I will teach you an easy, simple way to paint portraits for young children.
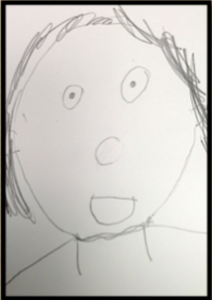
- Invite your child to draw the outline of the face on your canvas using the pencil. Draw lightly at first. If your child needs to erase, you can – It doesn’t matter if it doesn’t erase perfectly as you will paint over it.
- Start with an oval for the face, two lunes for the neck, two semi-circles for the ears (talk to your child about the body parts)
- Add the eyes
- Add the mouth
- Add the nose
- Add the eyebrows
- Add the outline for the hair
Here is an idea of how it will look once your child has drawn the outline (depending on your child’s age – you don’t need as much detail):
- Then begin painting your masterpiece, following the outline
- Paint the skin (face, ears, neck) using acrylic skin colour paint, then let it dry before you paint the features in the face.
- Paint the features of the face with acrylic colours as well (eyes, nose, mouth, hair)
- Paint the clothes (if your child drew them)
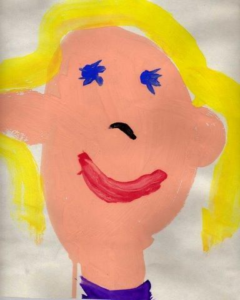
- Paint the rest of the canvas with a beautiful, bright colour. I like to suggest to children to paint the sides of the canvas – leave no white space. Here is a beautiful example:
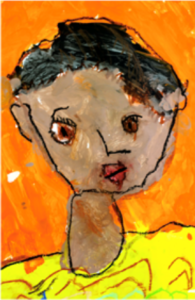
- Once it is complete, here is a little secret that will really define your child’s painting: add the details with the chalk pastel colours! It makes it really pop, giving it texture and depth. You can add eyelashes, eyebrows, outline your painting (the painting above is outlined, for example), add different colours to the hair if you wish (and by you I always mean your child, of course). Here is the difference between using only paint (left) and using pastels to draw the outlines (right):
Learning Opportunities
This is a proper visual arts lesson for your child. The purpose of visual arts is to invite your child to express themselves, to bring the inside, out. Your child will discover themselves and the beauty they are capable of expressing through art, and that is an amazing thing to witness. Enjoy every moment of it. Don’t try to guide your child or “teach” them how the portrait should look like. You can ask them if they want to draw the eyes (for example), the mouth, or lips, but don’t “tell” them to do it – let them express themselves.
It is also a great activity to help your child think of others, namely: their father. This helps your child develop empathy. Also, painting is an excellent fine motor activity, a precursor to writing!
Books Your Child Might Like
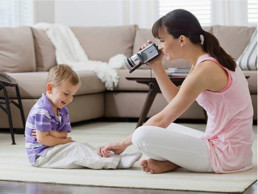
Father's Day Keepsake Video
This is the easiest Father’s Day gift you can do for dad. I love getting this on Mother’s Day for myself! We do it for each child at CEFA Early Learning schools, for Mother’s Day and for Father’s Day. Since most of you are not at school due to the COVID-19 outbreak, I thought I’d share it with you so you can do it at home and surprise Dad on Father’s Day.
Best Ages for This Activity
18 months to 5 years.
How to Make It
You Will Need:
- Your phone
- Your child
Let’s Get Started!
- Make sure your child is nicely dressed (no need for a gown, just clean clothes that fit) and groomed (face washed, hair brushed)
- When Dad isn’t looking (it’s a surprise), find a nice corner of the house, or a blank wall
- Take a video of your child answering one of these questions (or any other question that you feel comfortable with):
- What do you love about Dad?
- What is your favourite thing to do with Dad?
- Voilà! Now send to Dad by e-mail (or post on Facebook and tag Dad, adding why he is the most amazing father ever) on Father’s Day
- If you have more than one child, do one video for each child, or one video with each child taking turns telling Dad why he is so special
- If you are really inspired, you can have your child film you delivering the same message to their Dad, or to your own father.
Learning Opportunities
This is a great activity to help your child think of others, namely: their father. This helps your child develop empathy. Also, you will be developing your child’s public speaking talents as a bonus.
Books Your Child Might Like

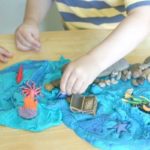
Veterinary Clinic
This is a fun dramatic play set-up you can do at home with very little expense, and it will last you up to a month! Set up a vet’s office in your child’s room and give them the opportunity to feel what it would be like to be a veterinary doctor.
Best Ages for This Activity
Three to five.
How to Prepare
Choose a space in your child’s room or in the playroom where you can set up a dramatic play area and leave it for a few days or weeks. This time let’s set it up as a vet’s office or hospital.
What You Will Need
This is really up to you. Dramatic Play is an activity where your child gets to use their imagination, so you don’t really need to buy all of the items I am suggesting below. Use them as ideas, and then make your own with your child, or use what you already have around the house.
Here are some things we use at our CEFA Early Learning schools when we set up a vet’s office for children to play:
- A lab coat or scrubs and accessories (you an improvise with clothes you have at home).
- A stethoscope or this one (included in the sets above) and medical instruments, like this or this. I will use this set for other dramatic play activities I post in the future
- Crates for your vet’s office (you can get a set like this or this you can look around the house for similar items, like your own pet’s crate. If not, you can make one out of a cardboard box)
- Animals (the patients) – not real ones just soft toys your child already has. If you can, get animals that are generally household pets (like cats, dogs, rabbits, fish, etc.). Here are some:
- Dogs
-
- Cats
-
- Rabbits
-
- Lizards and snakes
- A clipboard and note paper for your child to do the intake of the patients. Here is a free printable intake form that I designed for you to use.
- A small table where they can examine the animals
- Treats to give the animals after their visit, to make them feel more comfortable
- A scale to weigh the animals
- A sign or logo your child can design for their veterinary’s office
- An old phone and computer for them to “admit” the patients
- A chair or bench for their waiting room
- A cozy place for the animals if they need to wait
- X-rays of animals for your child to examine. I have included a few here that you can print for free. Be mindful of what your child is ready to see – some might look a little scary.
- You can also use a tracing pad, which is used for so many activities!
What to Do
- Talk to your child about pets they know (maybe you have a pet, or perhaps a friend or a neighbour does). Talk about what veterinarians do, how they learn to take care of the animals, what happens when animals go to the vet, or to an animal hospital, and see what your child is interested in. Relate the dramatic play to the real life experiences your child has with pets. Even if you don’t have a pet at home, every child has had experiences with pets, even just seeing their neighbours walk their dogs.
- Together, set up a vet’s office. Ask your child what they think they will need.
- Let them play! They can also invite siblings and friends to bring their pets to the vet’s office. Your child will be happy to play on their own as well.
Learning Opportunities
This activity is great for your child’s imagination, as they pretend play (part of our dramatic play curriculum at our CEFA Early Learning schools). It also offers great hands-on learning opportunities. For example, what do rabbits eat? What about cats and dogs? How do you handle a pet as a veterinary doctor? They learn a lot about what makes a pet, versus what animals need to live in the wild. All this teaches your child about nature and develops their social and emotional skills. They also learn to contribute, because they are learning how to help sick animals. It is a great activity to play with a sibling or friend (which builds social skills) or by themselves (which helps with focus, imagination and attention span) all of which are good.
Extended Learning Opportunities
- Your child can read about pets and about vets (I have recommended some books below). This will improve your child’s reading and literacy skills.
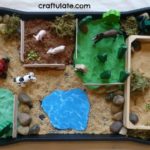
- You can set up a miniature world after you take down the vet’s office, so your child can continue to play. Here are some examples (but you can make it yourself).
- Take the time to connect with your child, ask them questions like the ones below. This opportunity to chat, share ideas, plan together, share stories, laugh and feel pure joy will help you bond with your child and form an even deeper connection. Here are some ideas to get you started:
- What are some of your favourite pets? Why? What do you like about them?
- What would you do if you had a fish (or turtle, or cat, or dog, or snake) for a pet? How would you play with your pet? What would you name it?
- Tell them about your favourite pets if you had some, or tell them which pet you would have
- Look at photos of animal skeletons together.
- Match the x-rays I have included above for free with the animals (for example, by the x-ray of a cat you can put a toy cat like the one in this set).
- Watch videos about pets
Books Your Child Might Like
About Vets
About Pets
Toys Your Child Might Like
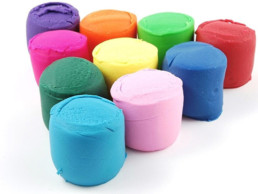
How to Make Playdough
In this activity I will share with you one of my recipes for homemade playdough. Your child will really enjoy spending time making it with you! Make sure to save the playdough once you are finished as it keeps a week or two, even longer sometimes.
This is an activity that is inexpensive to make and has no chemicals in it.
Best Ages for This Activity
Two to five.
How to Make It
Ingredients
- 1 ½ cups water
- 1 ½ cups flour
- 1 tbsp vegetable oil
- ¾ cups salt
- ½ tbsp cream of tartar
- Liquid food colouring in the following colours:
- Yellow
- Blue
- Green
- Red
You Will Also Need
- Wax paper (or any other non-stick surface to protect your countertop). You can easily use a cookie sheet
Let’s Get Started!
- In a pot, help your child (if they need you to) mix all of the ingredients together until you have a uniform batter.
- Cook on low to medium heat for 7 to 9 minutes until it can form a ball.
- Put your new ball on the wax paper and let it cool off until it is cool enough for your child can handle
- Teach your child how to divide (math language) into 6 equal parts
- Make a little nest with each part, to put the food colouring inside before mixing it all together
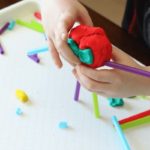
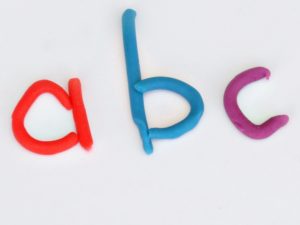
- Now all you need to do is add the food colouring to each one of the 6 parts and kneed the colour in, forming a ball
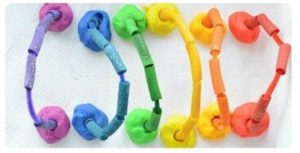
- Here is how much food colouring you will need to make vibrant playdough, like in the picture:
- Red playdough will need 30 drops of red food colouring (help your child count)
- Yellow playdough will need 25 to 30 drops of yellow food colouring
- Blue playdough will need 12 drops of blue food colouring
- Green playdough will need 20 drops of green food colouring
- To make purple playdough, combine 20 drops of red food colouring and 10 drops of blue food colouring
- To make orange playdough, combine 6 drops of red food colouring and 28 drops of yellow food colouring
- If you have food colouring that already comes in fancy colours, you just need to add about 20 drops of the colour and see if you like it. To make it more intense, add more, up to about 30 drops.
- Voilà! You can start playing with it now. Then store in an airtight container (Tupperware is fine) or in a freezer bag (then seal it)
Learning Opportunities
Children will learn S.T.E.M. while making the playdough because it’s a science experiment. Questions you can ask your child during the experiment are:
- Will the batter harden enough to make it like playdough?
- What colours would you like to make?
- Which colours do you think we need to mix in order to make (for example) purple playdough?
- How long will it take to cook?
- How long do you think it will take to cool off?
- How many drops of food colouring do you think we will need to make it an intense colour?
- What will you make with it once it is done?
By helping you measure, mix, describe textures and colours, as well as the intensity of the colours as they get absorbed, they will be using math. As they are mixing and pouring, following all the steps, they are learning sequencing, which is great for reading as well as math and science. Kneading is quite an intense process, so it counts as a physical activity.
CEFA tip: Remember to let your child do as much of the process as they are capable of. This means they measure, mix and pour (not you).
The process of making the playdough offers your child sensory learning by using their sense of touch to feel the texture, mix in the colour, feel the temperature changing, etc. Sensory learning is especially important for writing. While you play with your child, use vocabulary to describe:
- How the play dough feels
- The temperature of it
- The intensity of the colours
- The colours themselves and how they are obtained (if you are mixing colours)
Don’t forge to use math vocabulary such as:
- Measuring
- Volume
- Quantities (more than, less than, the same amount, 1 cup, etc.)
- Cool
- Warm
- Hot
- Colour
Describing while using vocabulary is one of the most important learning outcomes at this age. It teaches them reading and mathematics.
This activity also teaches your child patience as they have to wait until the playdough is cool enough to mix, and perseverance as they knead the colour into the playdough. This activity also improves your child’s ability to focus on one task (attention span) – especially once they get to do other activities with the playdough, like making things, making an art piece or using it for building – which all contribute to your child’s social and emotional development and artistic development.
Extended Learning Opportunities
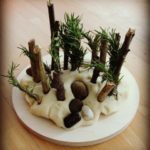
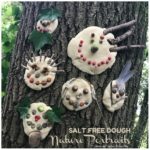
Once it is ready and your child gets to play with it, they will gain writing skills by using their fine motor skills, and dramatic arts through pretend play. If you use the play dough to build, you learn S.T.E.M., especially engineering. You can add beads, shells, tiny branches, pebbles or anything else you and your child like, to make it piece of art.
Here are some examples of what you can do:
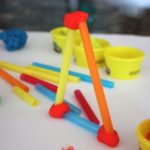
- Building shapes with straws and playdough (S.T.E.M.)
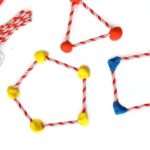
- 2D building

- Building structures with playdough and other elements (like lego, blocks, sticks or straws)
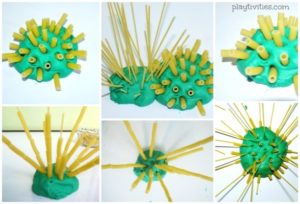
- Create with playdough and pasta (see my recipe for coloured pasta):
- 3D building

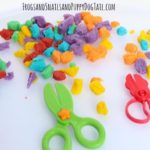
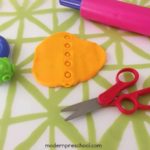
- Practicing scissor skills
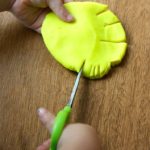

- Working with cookie cutters and other utensils
- Dramatic play
- Writing
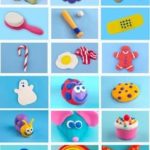
- Stamping (try different things to stamp with – what it stamps is always a surprise to children)
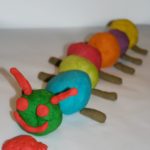
- Trying to make things or animals


- Learning to make balls and “snakes”
- Making mosaics
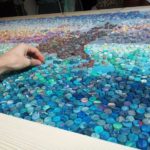
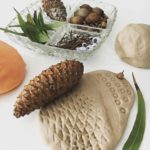
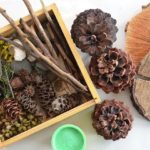
- Exploring nature and making artistic creations with it

- Developing your child’s imagination through dramatic play

![]()
Toys Your Child Might Like
How to Make Maracas
Music is an integral part of a child’s life. This activity is great because, firstly, it’s very inexpensive to make at home, and secondly, it combines music and S.T.E.M.. It will give your child an understanding of how maracas work as instruments, and how you make one.
Best Ages for This Activity
Two to five.
How to Make It
Supplies
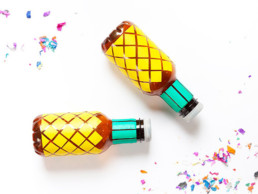
- Two AriZona drink bottles (you can also use any other bottle with a long neck, as long as they are made of plastic and not glass as it is a better sound, less heavy for your little one to hold, and less dangerous of it breaks).
- Super glue
- 1 cup of rice to use as filler. You can also use beans, dried peas or lentils, paperclips, beads… you get the idea.
Optional Supplies
- Stickers to decorate your maracas with. Here are some good ones or here (but use whatever you have).
Let’s Get Started!
- Empty, clean and fully dry the bottles before using them. Also take the wrapping off so you can see through the bottles, plus they look nicer.
- Fill the bottle with ½ cup of rice, put the lid on the bottle and try the maraca. Adjust the quantity of rice to your liking (to get the sound you like).
- Once you are happy with the sound of your maracas, glue the lid on, decorate the bottle with stickers and play!
Each filling produces a different sound, so you could make more than one pair, and try the different sounds. For example, sand maracas will be quiet, whereas beans, macaroni or large bead maracas will be loud. Experiment with the sounds your child likes.
Many sets of professional maracas are pitched differently. In other words, shaking the right hand one will sound different from shaking the left hand one, so you can create some great patterns by playing with the sounds.
You can also make a pair of maracas which have a slightly different sound. You can add beans to one of your rice maracas and make it so that they each have a unique sound. The rice will sound a bit softer and higher in pitch, the beans a bit louder and lower in pitch, so you can build rhythms on those sounds. You can also make patterns with the sounds. For example:
- Rice, rice, beans, rice, rice, beans
- Rice, beans, rice, beans, rice, beans
- Rice, rice, rice, beans, rice, rice, rice, beans
Or you can make several pairs of maracas and mix and match. What sound patterns can you create? Which maracas sound best to you or sound best as pairs? Does a certain pattern sound like a song you know? Or does a song you know inspire a new pattern?
Despite the fact that maracas are simple instruments, they can truly inspire hours of musical fun.
Learning Opportunities
Children will learn S.T.E.M. as well as music. They will learn about music when they’re learning how to play the maracas they made, how different fillers make different sounds, and also creating their own music once the maracas are ready. Making the maracas is the S.T.E.M. challenge, as they will be learning science, engineering and math while they measure, test, fix, and figure out the process. S.T.E.M. questions to ask:
- Do you think each filler (ex: rice or beans) will sound the same? Why?
- Do you think the quantity of filler will affect the sound? Why?
- What other ways can you think of to make maracas? Which ways would you like to try?
- Are there any other fillers you would like to experiment with?
- Is there anything you would like to change?
Once they finished exploring the maracas, they can try to figure out how to make different patterns with them (math) or make different rhythms (music). They can also try playing along to a song, following it rhythm.
CEFA tip: Remember to let your child do as much of the process as they are capable of. This means they pour and count, and they try to figure out how to make different patterns.
Extended Learning Opportunities
- Learn about how to play the maracas:
- Watch a video of professional musicians playing the maracas, for inspiration. Here are some I found:
- Watch another child play the maracas, for inspiration:
Books Your Child Might Like
Toys Your Child Might Like
Dance, Dance, Freeze – Baby Edition
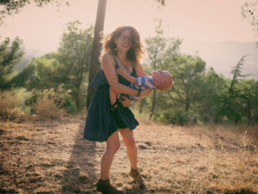
If you want to try the game dance, dance, freeze! But your baby is not yet walking, let alone dancing, don’t let that stop you! I used to play this game with my baby all the time before he could walk. All you have to do is hold your baby and dance to the music, then freeze when the music stops. Watch your baby squeal with delight as you bounce around, and then stop, then start again!
Best Ages for This Activity
Zero to one.
How to Prepare
Hold your baby in your arms, get someone to help you turn the music on and off, and follow the directions below.
What you will need:
- A music player – it can be your phone, or if you have a speaker, it makes it even better as it is a little louder and clearer.
- Someone to help you pause the music in the middle of a song so you can “freeze” while holding baby, then turn it back on a few seconds later.
What to do
- Here is how you play:
- When the music plays, you dance, dance, dance!
- When the music stops, you freeze immediately! Like a statue, in whatever position you are in, and don’t move until the music starts again.
- Put on your favourite, happiest song, and dance till the music stops. Freeze in place for a few seconds, then have your special helper (it can even be an older child) start the song again and start dancing again!
It is like playing musical chairs without the chairs, and with a lot more dancing! The focus is on dancing and having fun. Freezing in place just makes it more fun as it adds the element of surprise, which your baby will love!
You don’t have to play children’s music; choose the music you like to dance to.
Learning Opportunities
This activity is part of our dance curriculum at CEFA Early Learning schools. Of course, our students can already walk so they are the ones doing the dancing, but this is still a great activity for baby, as it will introduce them to dancing, and to the S.T.E.M. concept of cause and effect. Dance improves your baby’s general sense of well-being and happiness and strengthens the bond they have with you, as you are playing with them and holding them.
Books Your Child Might Like