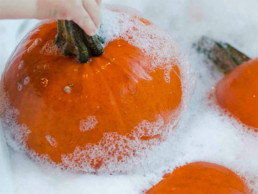
Pumpkin Cleaning Sensory Bin

Sensory exploration is essential for young children, as they learn through their senses. This is the easiest activity you could set up for your child and since you are buying pumpkins for Halloween and Thanksgiving, it is the perfect time to try it!

Typically, our fall curriculum includes a trip to the pumpkin patch at our CEFA Early Learning schools. COVID-19 has made it unsafe for us to do it this year, but our schools are preparing to make their own “pumpkin patch” on their playgrounds and you can do the same at home! Get some pumpkins and hide them around the yard or even a park if you don’t have a yard and invite your child to find them and bring them home, using a wheelbarrow if possible! Your child will love spending time outside with you and finding their pumpkins for Halloween night. The trouble with pumpkins is that they are covered in mud! This is where this activity comes in handy.

All you need is a bin, some dish soap, some water and a few brushes to enlist your child to leave those pumpkins squeaky clean! This has many learning benefits and is a very satisfying activity for children at the same time. Go ahead, try it at home.

Best Ages for This Activity

Zero to five

How to Make It

Ingredients

  • A sensory bin (I love these under bed Tupperware containers that can easily be covered and hidden under your bed if you don’t want a mess when you are not around to supervise).
  • 3 or 4 pumpkins of any size (try to get different sizes to add a math component to this activity)
  • 2 or more tablespoons of dish soap, or to add another layer to this sensory activity, try this beautiful fall-scented soap – make it bubble.
  • You can add red and yellow food colouring to make it orange as well.
  • Old toothbrushes, cleaning brushes or kitchen brushes. You can also add sponges and face towels.

Let’s Get Started!

  • Add the soap to your sensory bin (you can do this with your child)
  • Fill half of your sensory bin with warm water (it will make your soap foam)
  • Add the pumpkins and brushes
  • Invite your child to wash the pumpkins with the tools provided
  • Ask your child what other tools they would like (perhaps something to pour water, or towels to dry the towels afterwards).
  • Watch as they play! Ask them how it feels on their hands, how it smells (this will work on their
    vocabulary) and talk about the textures, the sizes (math), colours, etc.
  • Ask them what techniques they are using to make sure all the mud is cleaned off of their pumpkins (life skills). Demonstrate how to clean something thoroughly if needed.
  • Talk about where the pumpkins came from, about how to grow a pumpkin and about where the best place is to plant them (you can use the seeds from those very pumpkins to plant your pumpkins for next fall)
  • Dry the pumpkins if you want. These can be used to carve and for other activities.

Learning Opportunities

Children will learn life skills by learning to clean an item (in this case, pumpkins of various sizes). They will learn S.T.E.M., particularly math and science. Children will learn about our environment and about gardening, including where our food comes from. This will develop an appreciation for food and what it takes to grow it. They will practice their fine motor skills by using their wrist and hand movements to thoroughly clean the pumpkins and add to their vocabulary, therefore enhancing their literacy skills. This is a really good sensory activity as well.

Don’t forget to use math vocabulary such as:

  • Size
  • Big/bigger/biggest
  • Small/smaller/smallest
  • Intensity (of scent)
  • Temperature
  • Volume
  • Cold
  • Cool
  • Warm
  • Colour

Describing while using vocabulary is one of the most important learning outcomes at this age. It teaches them reading and mathematics.

Extended Learning Opportunities

  • Use the pumpkins once they are clean, to carve them, or even to make pumpkin pie.
  • Explore this sensory bin on the floor if possible, so children can use their hands and feet while playing. You can even try it in the bathtub!

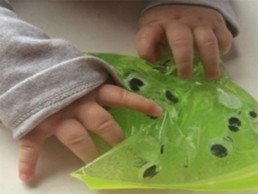
Halloween Googly Eyes Sensory Bag for Baby

This is a really simple activity that will keep baby mesmerized for days and is perfect for Halloween! This is a mess-free activity, that you can take any where, tape it to a sunny window, or just give it to your baby so they can explore with their hands. We have tried this at our CEFA Early Learning schools in our CEFA baby and JK1 classrooms and it inevitably draws the older siblings when they come and visit. Try it at home and let me know how much your baby likes it.

If you are worried about it opening, use duct tape to reinforce all 4 sides of the bag once it is sealed closed. But as you know, no young child should be left unattended, especially not around bags and small items. Always supervise.

Best Ages for This Activity

One to three

How to Make It

Ingredients

  • A medium Ziploc freezer bag. You can make it a large one if you prefer and double the rest of the ingredients. You can even use an extra large one and encourage baby to explore with their hands and feet!
  • 1 jar of inexpensive hair gel. You can find this at the dollar store also.
  • Duct tape for all 4 sides of the bag. We will be making many different many different sensory bags in the future, so keep the roll!
  • Googly eyes of various sizes. Again, keep these as we will be using for many other activities!
  • Food colouring of your favourite colour to make the gel intensely colourful! You will notice that the food colouring I specified is a little more expensive as I use it for many other activities and it blends really well, but you can use any food colouring you already have around the house!

Let’s Get Started!

  • To make the sensory bag, first open the freezer bag, pour the hair gel inside it and add a few drops of food colouring, Mix well, then add the googly eyes. Add enough to give your child different textures and sizes to explore.
  • Squeeze as much air as possible out of the bag before sealing. Once sealed, use the duct tape to tape around all 4 sides of the bag:

  • Decide where you want to leave the bag. At our CEFA Early Learning schools, we normally tape them to a glass window at child height (sitting or standing) first and after a week, we leave them on the floor (taped) for a week so they can play with them from a different angle, plus use their feet, then leave them around, loose, for children to manipulate in a different way and carry them around. One bag can last you a whole month and still provide different options to explore it! You can also take it with you in a stroller, or in the car. You can hide it in a basket, or under a shelf, for your child to find!
  • You don’t even need to invite your child to play with the bag, they will find it on their own and be immediately drawn to it. If you used duct tape, don’t be afraid to let your child manipulate the bag with vigor – it will withstand a little tough love. Just make sure you can supervise in case it punctures.
  • Questions you can ask:
    • What does it feel like? – this will help them build vocabulary, which is necessary for literacy skills. Use words like slippery, squishy, smooth, bumpy, etc.
    • How many eyes can you count? What colours are they? How many of each colour? What size are the eyes? How many large eyes? How many medium eyes? How many small eyes? This will help them gain math vocabulary as well as learn to count, estimate and compare (also essential math skills).
    • What happens when you squish the bag? (S.T.E.M., cause and effect, observation, reasoning)

Learning Opportunities

Sensory bags are a good way of providing a sensory exploration activity for your child which does not make a mess. They can be taped to the floor, to a window and taken in the car or anywhere you have to be patient and wait (for example, a waiting room). Your child can use their imagination, play and use their senses, especially the sense of touch and sight.

Sensory play is important to expand your child’s language skills, therefore developing literacy skills.  They also develop sensory input and fine motor skills in young children especially. Research has also shown that sensory bags decrease restlessness and stress in children and help your child learn to be in the moment (mindfulness). These sensory bags are especially beneficial for young babies as well as for children who suffer from ADHD and sensory processing disorder (SPD). You can fill sensory bags with objects that provide different textures, colours and sounds (just be mindful not to choose items that can puncture your bag). They are excellent for babies during tummy time! Sensory bags also provide S.T.E.M. learning as your child learns to estimate, observe, experience cause and effect, etc. Make sure you use as much math vocabulary as you can (for example, estimate, talk about sizes, measure the intensity of the colours, the different colours, etc.)

CEFA Tip: Remember to always supervise your child.


As an Amazon Associate I earn from qualifying purchases


Siblings Can’t Stop Arguing? All it Takes is a Little Sugar!

My brother and I fought non-stop when we were young. We hit each other, pulled each other’s hair, argued constantly and wasted sixteen years disliking each other, when it could have been prevented. My brother is one of the nicest men I know and looking back, he was always a nice person. We just didn’t learn how to handle disagreements and got into an unhealthy pattern, until we decided enough was enough. We have now been close ever since.

When my children were born, I was determined not to let that happen. Although they are very different from one-another, they have an incredible relationship. So incredible in fact, that now, at 18 and 20, they decided to move in together. Both saying “there’s no one I’d rather live with than my brother”. I worked on that relationship since the day my second child was born and I can help you do that as well if you are now expecting your second child (just leave me a comment at the bottom of this article). But for those of you who already have problems helping your children get along and stopping the constant bickering – this article is for you.

If you want your children to stop arguing with each other, all it really takes is a little sugar – literally.

Next time your children disagree about something or are upset at each other, grab a sugar cube or a small package of sugar wherever you happen to be and simply explain that the best kept secret about arguments is that absolutely every single one of them can be solved with sugar (aka kindness, but please say sugar).

No matter how old your children are and trust me, I put this method to the test with my own two boys many times, it works like a charm. Here is how you do it:

  • Firstly, stop everything you are doing and address the issue. Children have to understand that when there is a problem, it needs to be resolved on the spot and to the point where everyone is satisfied – no exception.
  • Then, explain to your children that the goal is to first understand each other (one of Stephen Covey’s habits in his famous book: Seven Habits of Highly Effective People – also one of my personal favourites) then to find a solution that everyone is happy with.
  • The child who holds the sugar is the only one who can talk. All others have to listen.
  • Once the child said how they feel, the other child (or children) will repeat back to him what they interpret the issue to be (from the speaker’s point of view). For example:
    • Child with the sugar packet: I am mad that you took my toy without asking. I don’t like it when you just take my things because you leave them everywhere, I can’t find them when I want them and you leave grubby finger marks all over them. You don’t take care of my things as well as I do.
    • Child who was listening: you don’t like it when I take your toys without asking you first and you feel I don’t take care of them as well as you do.
  • If the child holding the sugar feels understood, they will then pass the sugar to the other child and listen to them without interjection or any other kind of interruption.
  • However, if the child holding the sugar does not yet feel understood, they keep the sugar and tries again to express what made them upset. This will go on until the child with the sugar feels completely understood by the other party (or parties).
  • You will have to guide this process at first, but trust me, it is a wise investment of your time since all you will have to do once they learn it is get the packet of sugar.
  • When it is your other child’s turn to explain their grievances, they will hold the sugar cube and explain what made them upset, or how they feel, from their point of view, until they feel completely understood. For example:
    • Child with the sugar now: You also take my toys without asking and I don’t complain when you do it, why can’t I do the same? Also, you pulled my hair and screamed at me when I took your toy and that hurt.
    • Child who is listening: you’re upset because I hurt you and because you don’t complain when I take your toys without asking but I don’t let you do the same.
  • Again, once the child holding the sugar feels completely understood, they can put the sugar down next to them and talk about what they each learned from the conversation with each other.
    • For example, one child might say that they didn’t realize they were doing the same thing to their sibling, or the other might say that they didn’t realize that their hands were not clean when playing with the borrowed toys and left marks all over it.
  • At this point, encourage your children to come up with a solution to their disagreement together.
    • You: now that you both listened to each other and truly understand each other’s points of view, what would you like to do to solve the issue?
    • Children’s possible solutions:
      • We could ask each other before borrowing toys
      • We could make sure that we take care of someone else’s things even better than we do our own
      • We could leave something we borrow back where we found it
    • It is a learning process, so you might have to ensure that they think of solutions that are good for all parties. If your child suggests not borrowing toys ever again, you could run through the scenario of how that would look like (for starters, they would each have a lot less toys to play with). And maybe that becomes the solution for a while if they both decide that is their preference. On the other hand, they could decide that they will both ask one-another before borrowing something and that they will be careful with the things they borrow. The solution is not necessarily one that you would have chosen as the parent, but it has to be one that both your children are happy with. Or all the parties involved (minus you) if there are more than two siblings involved.
    • Be patient here and stick to your goal: do not consider it solved until both children feel satisfied with the resolution and feel proud of having come up with it.
    • If children still have not reached that point or have something to add after having listened to one-another, do another round with the sugar cube. Especially at the beginning of this process, you will find that they are upset about many things and have a hard time distilling them to the issue at hand. That’s to be expected, after all, this is their first time trying to resolve an issue. You don’t have to solve all the issues in one day (unless your children want to keep going) – you could suggest that they try their solution until something else comes up and try the sugar again. Many children love the fact that the sugar packet gives them the power to talk and be listened to, uninterrupted.
    • Do not interfere, let your children do the work, otherwise you are being a judge, not a facilitator.
    • Do not resume any other activity until your children have reached a resolution.

Why Does This Method Work?

Children are learning to listen with the intent to understand each other, not merely to prove a point or determine who is right. Most times, children will find that they were both seeing the situation from different perspectives and that understanding one-another’s point of view allows them to find a solution to the problem that is respectful of both their needs.

You will find that by using my “sugar” method, children are developing empathy and also incredible negotiation skills – both of which are important life skills to learn.

By not focusing on anything else until their problem is solved, you will see that quickly, the arguments will be fewer over time. This is because it takes work to do the exercise (and the best part is, none of the work has to be done by you, the parent) and children want to get back to playing. They will be motivated to solve their problems efficiently in order to do something else and, well, get back to being happy.

How Much Should you get Involved?

Only get involved to tell them that you know they have the ability to solve the problem and coach them a little the first few times to make sure that they are following the “sugar rules”. Do not tell them what to say or how they should interpret what the other person is saying. Make sure they do not interrupt each other. When they get good at the sugar method, you will see that their solutions will evolve from compromises to real win-win solutions. If not, encourage them to keep looking for a way that makes them both happy instead of leaving them both less unhappy. You are teaching them not to settle for mediocrity, to reach for true synergy and to come up with a solution together.

How Soon can you Start?

As soon as children start arguing with words, they are old enough to use the sugar method. Over time, they will be able to use a more sophisticated method and be more creative in their solutions, but the main principle of the method, to resolve conflict by listening empathetically, is easy to grasp even for very young children.

What the Sugar Method will Teach your Child

The sugar method is really teaching us to use empathy, to handle disagreements with respect and kindness, to be sweet to each other and to reach out especially when you don’t see eye to eye. Giving children a sugar cube or a little package of sugar simply makes this message tangible and real for them.

You will be surprised to find out that this method works for anyone. In fact, I encourage you to try the method (exactly as you do with your children) with your spouse next time you have a disagreement. You will see firsthand how well it works. Do not talk until you hold the sugar. Instead, focus on understanding your partner to the point where they feel completely understood. Then take a turn with the sugar yourself. You will see conflicts vanish before your eyes once you are both focused on understanding each other and coming up with a win-win solution.

The Sweetest Part

You are giving your children these important skills for life. Focusing on understanding one-another before trying to be understood is an incredibly important skill at any age which we could all benefit from mastering. Having the opportunity to practice this type of conflict resolution from a very young age is incredibly beneficial to your child.

The sweetest part is that next time your children are yelling at each other or even starting to argue, all you have to do is say: “let’s solve this with a little sugar” and watch them learn on their own.

Please let me know how it goes next time you try it – it is the only method you will need. Sweet!


As an Amazon Associate I earn from qualifying purchases


Is My Child the Pre-School Type?

You’ve managed to get through potty training and leaving your little one alone for the first time. But now that the big moment has arrived, you’re having doubts. Is my child old enough to start an early learning program?

The short answer is yes. From the moment your child is born, they are ready to learn. Your child is learning at an incredibly rapid pace in the first five years, and that learning will affect them for the rest of their life. They are building their brain pathways, and for that, they need to be stimulated. Children of any age are thrilled to go to school if that school is set up for them to explore even beyond what they can explore at home, so rest assured that your child is not too young to go to school.

Understanding the Early Learning Myth:

For many parents, deciding whether or not to send their child to pre-school is not an easy decision. Not only are there conflicting opinions from critics who believe children should stay at home as long as possible, but there is such a wide range in the types of early learning programs offered, that the choice can become overwhelming.

Luckily, with a little education, you can cut through the chaos and make a sound choice that will benefit your child for years to come.  In order to do this there are two myths that need to be distilled.

  1. Your Child is Not too Young to Learn

Children’s curiosity is high during early childhood because they have an acute need to understand the world around them. A good early learning school knows this and provides plenty of opportunities for children to experiment and to continue developing at an optimum level. A great early learning school goes even further and observes your child as an individual, ensuring that they are challenged and always have something new and interesting to discover or learn. The key is choosing a school caters specifically to your child’s temperament and interests.

  1. Your Child is Definitely the “pre-school type”

Some parents look at their child running wild in the park, yelling at the top of their lungs, and conclude their child is not right for pre-school. This is complete nonsense. If you feel that your child is not “ready,” you have not found the right early learning environment.

It is true, you want to avoid environments that mimic elementary schools, expecting children to sit on chairs for hours on end, work quietly, or listen to the teacher without interrupting. These types of programs are not only boring, but also inappropriate for a young child.

Learning and play can be one and the same. By this we do not mean either or, but a perfect combination of both. Modern early learning schools will not simply provide your child with some time to learn intermeshed with some time to play. Instead, every activity feels like play to your child, but is designed specifically with learning objectives in mind.

In these schools, play is the way students learn music, math, science, and reading and writing. Through play, children will also learn empathy and social skills. The difference between this play and just regular play is the training of the teachers and the strength of the curriculum. The program is designed to enhance your child’s development during the brain’s most formative years.

We know from early learning and brain development research that children excel in an environment of this type. So if you have a feeling that your child is not the pre-school type, you just have not found the right pre-school.

How do you know when you’ve found the right school?

Armed with this knowledge, carefully interview the schools you are interested in. A good program will stimulate your child’s development, not just mimic the activities you do at home. The curriculum will not be strict, but should have clear learning objectives. Look for programs where the learning is not taught solely by just by seeing and listening. Children have to experience things (touch them, hold them, taste them, feel them) in order to learn.

Once you are satisfied with the program, you still need to make sure that the social group is the right one for your child. If your child is the only two year old in a group of five year olds, the group may not be ideal for your child. If children are the right age but are relating to each other in an aggressive manner, you might want to look for a better fit for your child. Find a place where teachers seem happy, children seem happy, and where you feel your child would perfectly fit in.

Lastly, discuss your child’s particular interests with the teachers, and ensure that those are part of the curriculum. Does your child love painting? Riding a bike? Making rocket ships out of giant cardboard boxes? Chances are, the right program will have all of these components.

Once you’ve found the right fit, I guarantee you these will be the most memorable school years in your child’s life.


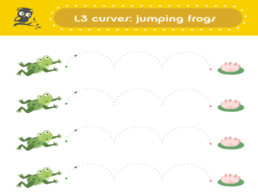
Curves Practice Sheet (Level 3) – Jumping Frogs

These worksheets are used at our CEFA Early Learning schools for our 2 to 3 year old children (Junior Kindergarten One and Two), to prepare them for writing alphabet letters and numbers, amongst other things. They are the exact fine motor skills required for your child to learn to form letters.

This line specifically also teaches your child to follow the left to right direction as they will do when reading (in English), so it has an added benefit.

If your child is not attending our schools and you would like to try these at home, make sure you follow the directions indicated on the large letters (green means start, red means stop, and the arrows will point you in the right direction.

We teach this to our students one child at a time, as the teacher needs to observe to make sure the child is following the right directions (otherwise they are learning it and practicing it wrong, which will impact their writing skills in the future). Make sure you do the same so your child can learn to write the right way (no pun intended!)

You can download this practice sheet here.

Best Ages for This Activity

Two to three

How to Make It

What You Will Need

  • Paper
  • A printer

Let’s Get Started!

  • Print the practice sheet
  • Invite your child to practice writing
  • Show them the practice sheet and invite them to trace it with their index finger first (without using a writing utensil first). Say “green says go” at the green dot, and “red says stop” at the red one. Also say “the arrow tells us to go this way” and try “gooooooo (as you trace with your finger) and stop! (as you arrive at the red dot)".
  • Now repeat the process with a writing utensil. Give them a fine felt marker if they are beginners, because a pencil is harder for them.
  • Only do a maximum of two of these worksheets. If your child wants to keep working, invite them to draw at the back of their worksheet. Drawing is an excellent fine motor activity to prepare your child to write.
  • If your child can perfectly follow the line without going (too) slowly, they are ready for a higher level of curves practice sheets next time (make sure you complete all the different curves for that level before moving on to the next level).

Learning Opportunities

This activity will give your child literacy skills: they will learn writing skills as they trace the letters and reading skills as they learn to follow from left to right.

Your child will also learn vocabulary by telling you about what they see on the page.

Extended Learning Opportunities

  • Draw on the back of this practice sheet. This is great for their imagination and creativity, as well as for their fine motor skills. If you talk about the colours your child is using, it will also teach them math (colour recognition).
  • Help your child make “snakes” or lines with play dough and “trace” the line on the practice sheet (where they drew) with the play dough lines. This will further reinforce your child’s understanding of this particular curve, as well as enhance their fine motor skills, which are essential for writing. you can find my homemade playdough recipe here.
  • Use cereal, lentils or pony beads to follow the curve instead of tracing it. This will enhance their fine motor skills, which are essential for writing.

  • Invite your child to cut the practice sheet (one finished) into a few pieces and then put the pieces back together (a home-made puzzle). This will help them acquire scissor skills.
  • help your child write their name at the bottom of the practice sheet

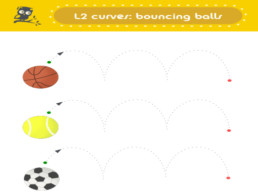
Curves Practice Sheet (Level 2) – Bouncing Balls

These worksheets are used at our CEFA Early Learning schools for our 2 year old children (Junior Kindergarten One), to prepare them for writing alphabet letters and numbers, amongst other things. They are the exact fine motor skills required for your child to learn to form letters.

This line specifically also teaches your child to follow the left to right direction as they will do when reading (in English), so it has an added benefit.

If your child is not attending our schools and you would like to try these at home, make sure you follow the directions indicated on the large letters (green means start, red means stop, and the arrows will point you in the right direction.

We teach this to our students one child at a time, as the teacher needs to observe to make sure the child is following the right directions (otherwise they are learning it and practicing it wrong, which will impact their writing skills in the future). Make sure you do the same so your child can learn to write the right way (no pun intended!)

You can download this practice sheet here.

Best Ages for This Activity

Two to three

How to Make It

What You Will Need

  • Paper
  • A printer

Let’s Get Started!

  • Print the practice sheet
  • Invite your child to practice writing
  • Show them the practice sheet and invite them to trace it with their index finger first (without using a writing utensil first). Say “green says go” at the green dot, and “red says stop” at the red one. Also say “the arrow tells us to go this way” and try “gooooooo (as you trace with your finger) and stop! (as you arrive at the red dot)".
  • Now repeat the process with a writing utensil. Give them a fine felt marker if they are beginners, because a pencil is harder for them.
  • Only do a maximum of two of these worksheets. If your child wants to keep working, invite them to draw at the back of their worksheet. Drawing is an excellent fine motor activity to prepare your child to write.
  • If your child can perfectly follow the line without going (too) slowly, they are ready for a higher level of curves practice sheets next time (make sure you complete all the different curves for that level before moving on to the next level).

Learning Opportunities

This activity will give your child literacy skills: they will learn writing skills as they trace the letters and reading skills as they learn to follow from left to right.

Your child will also learn vocabulary by telling you about what they see on the page.

Extended Learning Opportunities

  • Draw on the back of this practice sheet. This is great for their imagination and creativity, as well as for their fine motor skills. If you talk about the colours your child is using, it will also teach them math (colour recognition).
  • Help your child make “snakes” or lines with play dough and “trace” the line on the practice sheet (where they drew) with the play dough lines. This will further reinforce your child’s understanding of this particular curve, as well as enhance their fine motor skills, which are essential for writing. you can find my homemade playdough recipe here.
  • Use cereal, lentils or pony beads to follow the curve instead of tracing it. This will enhance their fine motor skills, which are essential for writing.

  • Invite your child to cut the practice sheet (one finished) into a few pieces and then put the pieces back together (a home-made puzzle). This will help them acquire scissor skills.
  • help your child write their name at the bottom of the practice sheet

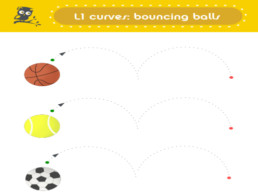
Curves Practice Sheet (Level 1) – Bouncing Balls

These worksheets are used at our CEFA Early Learning schools for our 2 year old children (Junior Kindergarten One), to prepare them for writing alphabet letters and numbers, amongst other things. They are the exact fine motor skills required for your child to learn to form letters.

This line specifically also teaches your child to follow the left to right direction as they will do when reading (in English), so it has an added benefit.

If your child is not attending our schools and you would like to try these at home, make sure you follow the directions indicated on the large letters (green means start, red means stop, and the arrows will point you in the right direction.

We teach this to our students one child at a time, as the teacher needs to observe to make sure the child is following the right directions (otherwise they are learning it and practicing it wrong, which will impact their writing skills in the future). Make sure you do the same so your child can learn to write the right way (no pun intended!)

You can download this practice sheet here.

Best Ages for This Activity

Two to three

How to Make It

What You Will Need

  • Paper
  • A printer

Let’s Get Started!

  • Print the practice sheet
  • Invite your child to practice writing
  • Show them the practice sheet and invite them to trace it with their index finger first (without using a writing utensil first). Say “green says go” at the green dot, and “red says stop” at the red one. Also say “the arrow tells us to go this way” and try “gooooooo (as you trace with your finger) and stop! (as you arrive at the red dot)".
  • Now repeat the process with a writing utensil. Give them a fine felt marker if they are beginners, because a pencil is harder for them.
  • Only do a maximum of two of these worksheets. If your child wants to keep working, invite them to draw at the back of their worksheet. Drawing is an excellent fine motor activity to prepare your child to write.
  • If your child can perfectly follow the line without going (too) slowly, they are ready for a higher level of curves practice sheets next time (make sure you complete all the different curves for that level before moving on to the next level).

Learning Opportunities

This activity will give your child literacy skills: they will learn writing skills as they trace the letters and reading skills as they learn to follow from left to right.

Your child will also learn vocabulary by telling you about what they see on the page.

Extended Learning Opportunities

  • Draw on the back of this practice sheet. This is great for their imagination and creativity, as well as for their fine motor skills. If you talk about the colours your child is using, it will also teach them math (colour recognition).
  • Help your child make “snakes” or lines with play dough and “trace” the line on the practice sheet (where they drew) with the play dough lines. This will further reinforce your child’s understanding of this particular curve, as well as enhance their fine motor skills, which are essential for writing. you can find my homemade playdough recipe here.
  • Use cereal, lentils or pony beads to follow the curve instead of tracing it. This will enhance their fine motor skills, which are essential for writing.

  • Invite your child to cut the practice sheet (one finished) into a few pieces and then put the pieces back together (a home-made puzzle). This will help them acquire scissor skills.
  • help your child write their name at the bottom of the practice sheet

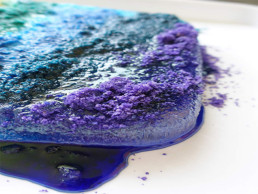
Melting Ice Painting

This is a fun art project that also teaches science when children witness the reaction between the ice and the salt. It is always a hit at our CEFA Early Learning schools, especially during summer camps! It is very simple and inexpensive to do and fascinating for the children – give it a try at home!

Best Ages for This Activity

Eight months to five years

How to Make It

Ingredients

  • Water
  • Any container that can go in the freezer
  • A few drops of gel food colouring (regular food colouring will work as well)
  • Coarse salt
  • A paintbrush (optional)
  • A tray if you have one, otherwise try this outside or somewhere easy to wipe, like the bathtub

Let’s Get Started!

  • The night before, pour some water into a large container and put it in the freezer. This will be your canvas.
  • Invite your child to try painting on ice
  • Together, prepare the “paint”: in separate cups or small bowls, pour a few drops of food colouring and add coarse salt. You can make as many colours as you like, and even mix colours for an added S.T.E.M. component (colour mixing). To benefit from the sensory experience of this activity, encourage your child to mix the salt and food colouring with their fingers. Take your time with this step – you child will learn so much from preparing this salt. Observe and discuss the process as much as possible with your child. For example:
    • How long does it take for the salt and food colouring to fully combine?
    • How many drops of food colouring does it take to achieve an intense colour?
    • What colours, mixed together, form other colours we could try? (you can invite your child to rub their hands or fingers together with a little bit of coloured salt in one hand, and a little bit of salt of another colour on the other, and see as they discover with delight what new colour they created)
    • How does the salt feel on their hands?
    • How many colours would they like to paint with?
  • Once all the colours are mixed, retrieve the container with the frozen ice “canvas” from the freezer and take it out of its mold.
  • Start painting on your ice canvas and take photos of your child and their painting during the process. Explain that their creation will not last very long because it will begin to melt, but that you can take photos of their masterpiece and immortalise it that way.
  • As your child adds the coloured salt to the ice block, they will notice that the salt begins to melt the ice, forming deep craters in the ice. This will be easy to observe because the colour will penetrate the crater – it is beautiful and fascinating.

  • Things you can discuss with your child:
    • What do you feel like painting?
    • Will you be painting with a paintbrush or use your fingers?
    • Do you want to try making a small sculpture instead? Shall we bring a spoon?
    • How long do you think your art piece will last before it melts completely? Should we measure how long it takes?
    • Once all the colours melt, what colour do you think the water will be?
    • Why do you think salt melts ice?
    • Where else do we use salt to melt ice? (relate this experiment to real life when in the winter, we salt ice on the streets)

Here is what happens in this experiment: Essentially, the salt makes it harder for the water molecules to bond together in their rigid structure. In water, salt is a solute, and it will break into its elements. So, if you’re using table salt, also known as sodium chloride (NaCl), to melt ice, the salt will dissolve into separate sodium ions and chloride ions.

Learning Opportunities

This is a great way to create a very different art piece, as it is not permanent. It literally changes as your child is painting. It also teaches S.T.E.M., especially if you take the time to observe the reaction as suggested above.

Make sure you use as much math vocabulary as you can (for example, measure time, measure intensity of colours, use words like faster/slower, deeper, on top of, inside, add, etc.) and use as many opportunities as you can to measure, compare, and mix colours. Name all the colours as well. You can make a video of your child doing this activity, which they can watch later and continue building on their learning experience.

Extended Learning Opportunities

  • Compare the reaction using fine salt for some colours and coarse salt for others. This will extend the S.T.E.M. learning.
  • See what happens if you use watercolours (and no salt) instead of coloured salt. This will extend the S.T.E.M. learning.
  • Find out what happens to the salt when we salt the streets? Where does it go? Discuss how it is not good for the environment. Did you know that chloride is very bad for the environment? It can kill aquatic animals once it gets in the water. This in turn affects other animal populations that rely on those sea creatures for nourishment. Chloride also dehydrates and kills plants and can alter soil composition, making it harder for vegetation to grow. While some other compounds that can melt ice and snow don’t include chloride, they are much more expensive than sodium chloride or calcium chloride (which is generally what is used to de-ice the streets in the winter). Figure out what can be used instead, and omit as a family to find alternative ways to melt ice in the winter, figuring out the pros and cons of other method (for example, melting the ice with hot water will work and will not affect the environment, but it also becomes very slippery ice once it freezes again. Heated driveways are a great way to prevent ice from forming in the first place, but they may be expensive to build, etc.) This will teach your child to contribute and to be responsible by helping preserve our marine life and environment. It will also teach your child to problem-solve and come up with solutions, which furthers S.T.E.M. learning and creativity.

Books Your Child Might Like

Toys Your Child Might Like
For 6 months +

For 1+

For 3+


As an Amazon Associate I earn from qualifying purchases


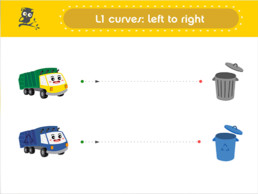
Curves Practice Sheet (Level 1) – Garbage and Recycling Truck

These worksheets are used at our CEFA Early Learning schools for our 2 year old children (Junior Kindergarten One), to prepare them for writing alphabet letters and numbers, amongst other things. They are the exact fine motor skills required for your child to learn to form letters.

This line specifically also teaches your child to follow the left to right direction as they will do when reading (in English), so it has an added benefit.

If your child is not attending our schools and you would like to try these at home, make sure you follow the directions indicated on the large letters (green means start, red means stop, and the arrows will point you in the right direction.

We teach this to our students one child at a time, as the teacher needs to observe to make sure the child is following the right directions (otherwise they are learning it and practicing it wrong, which will impact their writing skills in the future). Make sure you do the same so your child can learn to write the right way (no pun intended!)

You can download this practice sheet here.

Best Ages for This Activity

Two to three

How to Make It

What You Will Need

  • Paper
  • A printer

Let’s Get Started!

  • Print the practice sheet
  • Invite your child to practice writing
  • Show them the practice sheet and invite them to trace it with their index finger first (without using a writing utensil first). Say “green says go” at the green dot, and “red says stop” at the red one. Also say “the arrow tells us to go this way” and try “gooooooo (as you trace with your finger) and stop! (as you arrive at the red dot)".
  • Now repeat the process with a writing utensil. Give them a fine felt marker if they are beginners, because a pencil is harder for them.
  • Only do a maximum of two of these worksheets. If your child wants to keep working, invite them to draw at the back of their worksheet. Drawing is an excellent fine motor activity to prepare your child to write.
  • If your child can perfectly follow the line without going (too) slowly, they are ready for a higher level of curves practice sheets next time (make sure you complete all the different curves for that level before moving on to the next level).

Learning Opportunities

This activity will give your child literacy skills: they will learn writing skills as they trace the letters and reading skills as they learn to follow from left to right.

Your child will also learn vocabulary by telling you about what they see on the page.

Extended Learning Opportunities

  • Draw on the back of this practice sheet. This is great for their imagination and creativity, as well as for their fine motor skills. If you talk about the colours your child is using, it will also teach them math (colour recognition).
  • Help your child make “snakes” or lines with play dough and “trace” the line on the practice sheet (where they drew) with the play dough lines. This will further reinforce your child’s understanding of this particular curve, as well as enhance their fine motor skills, which are essential for writing. you can find my homemade playdough recipe here.
  • Use cereal, lentils or pony beads to follow the curve instead of tracing it. This will enhance their fine motor skills, which are essential for writing.

  • Invite your child to cut the practice sheet (one finished) into a few pieces and then put the pieces back together (a home-made puzzle). This will help them acquire scissor skills.
  • help your child write their name at the bottom of the practice sheet

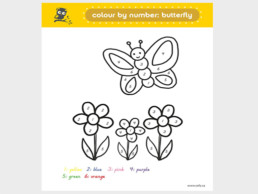
Colour by Numbers – Butterfly

I used to love colour by numbers pages when I was little! I couldn’t wait to see how it looked once it was all coloured. For young children, these are great because they practice two essential skills: fine motor skills (which are needed for writing) and math (by teaching your child numbers and colours in this case). Plus, these are a nice quiet activity that helps your child develop focus and concentration while you are working beside them.

You can download this colour by numbers page here.

Best Ages for This Activity

Two to five

How to Make It

What You Will Need

Let’s get started!

  • Print the colour by number sheet and set it up in a quiet, sunny space where your child can colour. Put on some classical music if you like! Set up the coloured pencils next to the sheet so your child can easily access them.
  • Invite your child to colour and show them how to do it on this sheet:
    • You look at the number on one area
    • You see what colour corresponds to that number
    • You colour inside the whole area that has that number
    • Now look for the next area and see what number it has, and what colour corresponds to that number, then colour the entire area
    • If this is your child’s first time, or if they are very young, colour one are with them to demonstrate, and stay with them as they try another area
  • If your child prefers to choose their own colours and not to colour by number but instead to colour whatever colours they choose, that is great too! They can use it as a colouring page and let their own creativity flow. You can always print the sheet again if they want to try colouring by number!

Learning Opportunities

This activity will give your child literacy skills: they will learn to read the numbers and the names of the colours. They will also learn writing skills by trying to colour within a confined space. This takes different fine motor skills than drawing, and are a great precursor to writing. They will learn math by learning the numbers as well as the colours. Your child will also learn vocabulary by telling you about what they see on the page, and what they are thinking about while they colour. They will learn about music if you play classical music (or jazz, or any music) for them while they colour and tell them about the composer (or singer, or band).

Extended Learning Opportunities

  • Draw on the back of this colouring sheet. This is great for their imagination and creativity, as well as for their fine motor skills. They can also add to this colouring page once they finish colouring it (for example, add a sun, more butterflies, different flowers, clouds, or anything they like!
  • Invite your child to cut the colouring sheet (once finished) into a few pieces and then put the pieces back together (a home-made puzzle). This will help them acquire scissor skills.
  • Help your child write their name at the bottom of the practice sheet.


As an Amazon Associate I earn from qualifying purchases